
SOMEBODY got new GRILLS!
#1
 04-19-2009, 05:27 AM

SOMEBODY got new GRILLS!
 As evidenced by the pics, someone on here had their new black mesh installed in their radiator grills...
Hmmm... Wonder who???
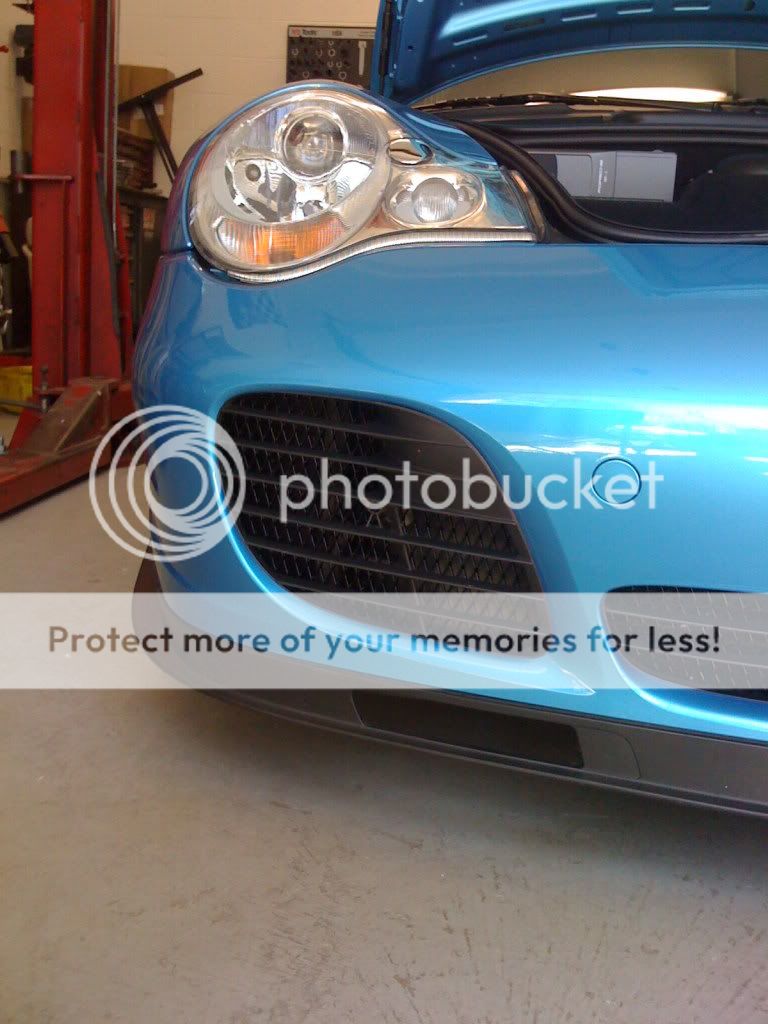


The source of the spy photos apologizes for the crappy iPhone pics!
Mike
#3
04-19-2009, 07:17 AM
Mikelly Edison came up with an ingenious install solution that I will let him tell you about. I spent the morning and part of the afternoon at Mike's place{nice], enjoyed his company, great car and track talk, and his incredible knowledge of DIY skills. After an initial fail, Mike got the inspiration and you can see the results.
Mike, no rattling at all, couldn't even tell we had done anything.
Also got a ride in Mike's car. He had me grabbing for the hold-on bar, it is fast. I'm not used to sitting in the passenger's seat. It made my chipped car feel like a slug. The K16/24 package from Kevin at UMW hauls ***. I want one.
And everything Mike has been saying about re-valved PSS9's is true. First off, I couldn't believe how much smoother his car rode. Second it felt much more planted than my car, which at present has off the shelf PSS9's. And third, never any hint of hitting the bump stops even though his car is at GT2 height. The proof was in the pudding. Nice setup Mike.
Let me say thanks again Mike for the great install and the great company. It was a pleasure spending time with you.
Mike, no rattling at all, couldn't even tell we had done anything.
Also got a ride in Mike's car.
He had me grabbing for the hold-on bar, it is fast. I'm not used to sitting in the passenger's seat. It made my chipped car feel like a slug. The K16/24 package from Kevin at UMW hauls ***. I want one.And everything Mike has been saying about re-valved PSS9's is true. First off, I couldn't believe how much smoother his car rode. Second it felt much more planted than my car, which at present has off the shelf PSS9's. And third, never any hint of hitting the bump stops even though his car is at GT2 height. The proof was in the pudding. Nice setup Mike.
Let me say thanks again Mike for the great install and the great company. It was a pleasure spending time with you.
#4
04-19-2009, 07:24 AM
Paul, I bought the mesh from a website that was posted in a thread on here about a month or two ago, custom car grills, I think. Mike has the package with the label, so he can verify that. I drove down to Mike's house and we, he mostly, installed them.

Trending Topics
#8
04-19-2009, 10:57 AM
Registered User
Join Date: Dec 2007
Location: Los Angeles, CA
Age: 50
Posts: 892
Rep Power: 79 

#9
04-19-2009, 04:18 PM
So yesterday we took the front bumper cover off the car. The major issue with my grill screens has been that they rattled. Soooo How to get them not to... I've read about epoxy and calk, or silicone sealers to mount them with... And I've looked at tons of stuff online trying to sort out the best way to mount these in the openings in the bumper to protect our radiators...
The best way to mount these came to me yesterday afternoon around 1230. It was starring me in the face, literally...With the cover off, you have the "gills" of the front corner radiators, along with the rubber boot of the center radiator.
I attached the grills to those Rubber ducts, cut to fit the inside of each boot, using the duct itself as the template, and zip tied them in place. You could also use safety wire to achieve the same, but using the zipties seems to work well... And attaching the mesh to the rubber is the absolute best solution, as it won't "buzz" like my previous setup did...The mesh sits in behind the stock factory grills.
http://www.customcargrills.com/products.asp?id=1
This is the company Larry got his black powdercoated mesh from. Now that I've done it to Larry's car, I could do this in about 2 hours...
It takes less than 30 minutes to remove the inner fender liners and bumper cover. There are about 30 screws and four plastic fasteners that you'll need to remove, along with the side marker lights and the trim panel at the front bonnet release. Anyone could do this with jack stands and hand tools...
When I do mine, I'll take lots of pics and do a DIY...
Mike
Last edited by Mikelly; 04-19-2009 at 04:22 PM.
#10
04-19-2009, 04:21 PM
Larry, You're too kind! It was an enjoyable day spent with good company and great cars!
Sometimes I think people think I exagurate about my car and the things it does well... It's good to get another opinion on the setup and performance of it!
Mike
Sometimes I think people think I exagurate about my car and the things it does well... It's good to get another opinion on the setup and performance of it!
Mike
Mikelly Edison came up with an ingenious install solution that I will let him tell you about. I spent the morning and part of the afternoon at Mike's place{nice], enjoyed his company, great car and track talk, and his incredible knowledge of DIY skills. After an initial fail, Mike got the inspiration and you can see the results.
Mike, no rattling at all, couldn't even tell we had done anything.
Also got a ride in Mike's car. He had me grabbing for the hold-on bar, it is fast. I'm not used to sitting in the passenger's seat. It made my chipped car feel like a slug. The K16/24 package from Kevin at UMW hauls ***. I want one.
And everything Mike has been saying about re-valved PSS9's is true. First off, I couldn't believe how much smoother his car rode. Second it felt much more planted than my car, which at present has off the shelf PSS9's. And third, never any hint of hitting the bump stops even though his car is at GT2 height. The proof was in the pudding. Nice setup Mike.
Let me say thanks again Mike for the great install and the great company. It was a pleasure spending time with you.
Mike, no rattling at all, couldn't even tell we had done anything.
Also got a ride in Mike's car.
He had me grabbing for the hold-on bar, it is fast. I'm not used to sitting in the passenger's seat. It made my chipped car feel like a slug. The K16/24 package from Kevin at UMW hauls ***. I want one.And everything Mike has been saying about re-valved PSS9's is true. First off, I couldn't believe how much smoother his car rode. Second it felt much more planted than my car, which at present has off the shelf PSS9's. And third, never any hint of hitting the bump stops even though his car is at GT2 height. The proof was in the pudding. Nice setup Mike.
Let me say thanks again Mike for the great install and the great company. It was a pleasure spending time with you.
#11
04-19-2009, 04:38 PM
Registered User
Join Date: Feb 2004
Location: In a Canyon - Really :)
Posts: 4,880
Rep Power: 288 
#12
04-19-2009, 04:39 PM
Mike - great way to mount those and thanks for the write-up (rep for you).
What mesh and sheet size is it that you used (it looks like it's the XXL)?
Thanks,
Rich
What mesh and sheet size is it that you used (it looks like it's the XXL)?
Thanks,
Rich
Last edited by RiA; 04-19-2009 at 04:41 PM.
#13
04-19-2009, 04:55 PM
ARI, It's simply to simple to even contemplate. Larry doesn't turn a lot of wrrenches and he was able to eyeball it and cut out the units as I attached them.
This is a BUTT simple mod... I was trying to find a pic of a car with the bumper cover off the car... If someone finds one, post it... I know I have one somewhere on a harddrive, but my left knee is swollen and getting to the hard drive ain't happening tonight... Someone post a pick and I'll comment on it, and you'll see how simple it is... The template IS the rubber ducts on the radiators...
Mike
#14
04-19-2009, 05:12 PM
Registered User
Join Date: Feb 2004
Location: In a Canyon - Really :)
Posts: 4,880
Rep Power: 288
Thanks Mike!
I just learned how to give rep points. Only been on this site everyday for 3 years.
I just learned how to give rep points. Only been on this site everyday for 3 years.
#15
04-19-2009, 05:22 PM
RiA, the invoice is in the shop (about 200 yards from the house where my left leg is elivated and Macallan scotch is keeping me happy but in pain) and I'm guessing here, but I believe we used the XXL gloss black in the 18X48 inch sheet. Larry was kind enough to buy two sheets so I could have enough to make my own set as well... I'll write up a DIY when I do mine, but I have to get my new bumper cover painted first... probably a few weeks.
Make sure you buy that size so you can have extra "incase" you botch it.
Mike
Make sure you buy that size so you can have extra "incase" you botch it.
Mike