
DIY Brake Job with Mintex Pads Review.
#1
 07-14-2009, 02:23 AM

Join Date: Oct 2008
Location: OC, CA
Posts: 466
Rep Power: 40 

11/15/11: UPDATE TO THE POST, I'VE ADDED PICTURES FOR THE VISUAL PEOPLE, AND MY MINTEX HAVE WORN AWAY, I HAVE INSTALLED COOL CARBONS. DEFINITELY GOT MY MONEY'S WORTH OUT OF THE MINTEX AFTER STARTING THIS THREAD IN 7/09 AND CHANGING OUT TODAY.
So this topic has been brought up often in several threads all over. Im here to state my review and experience with the Brake job and concerns with Mintex Pads.
First DIY Brake Job: One of the easiest I have ever done, Dont be afraid.
1. Jack car up
2. Remove wheel
3. Turn steering wheel to right for driver side, Left for passenger (easier access).
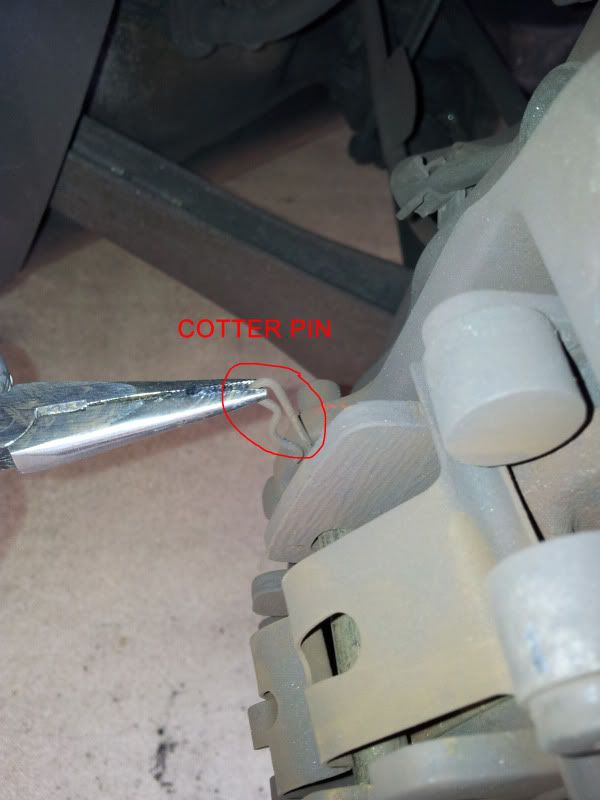
4. Remove COTTER PIN (Its located at the end of the HOLDING STUD on the inner fender well side)
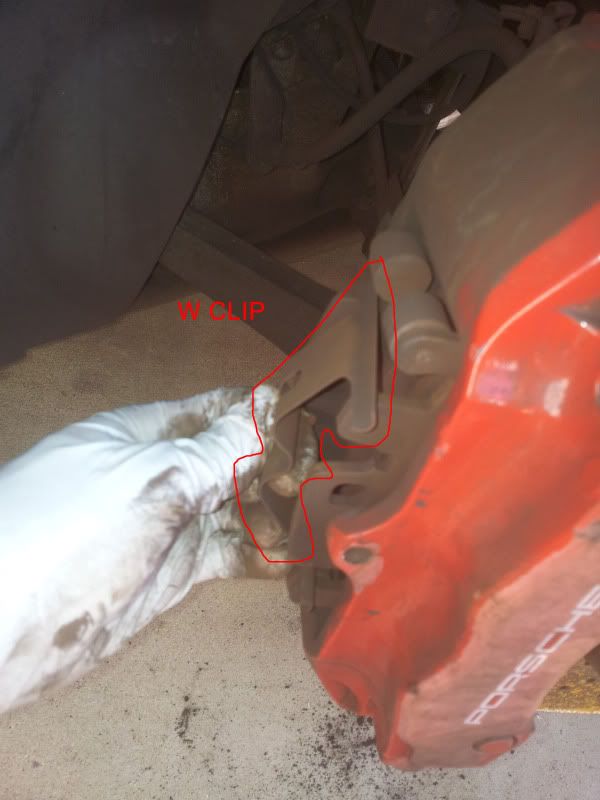
5. Push W-CLIP in towards the pads while pulling out HOLDING STUD out from the inner fender well.
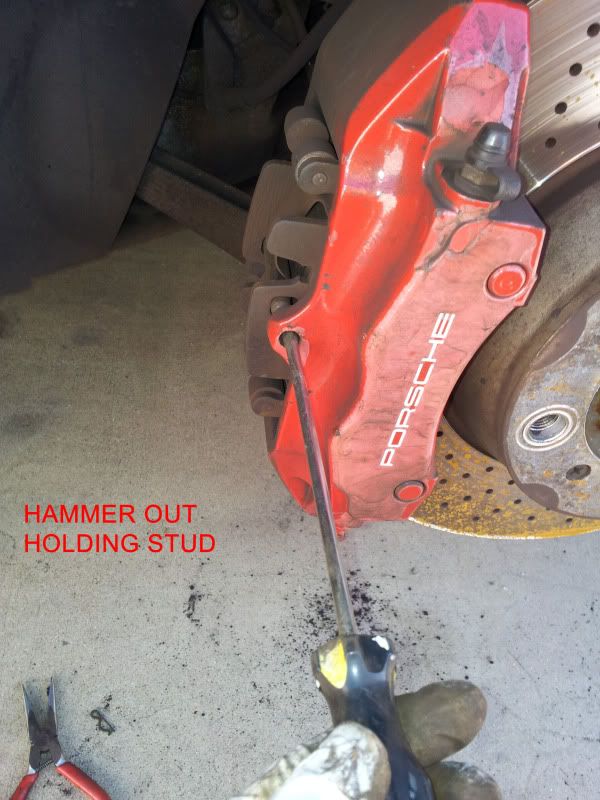
5-1/2. If you are having difficultly, get a flat head and lightly tap the HOLDING STUD OUT FROM OUTER ANGLE.
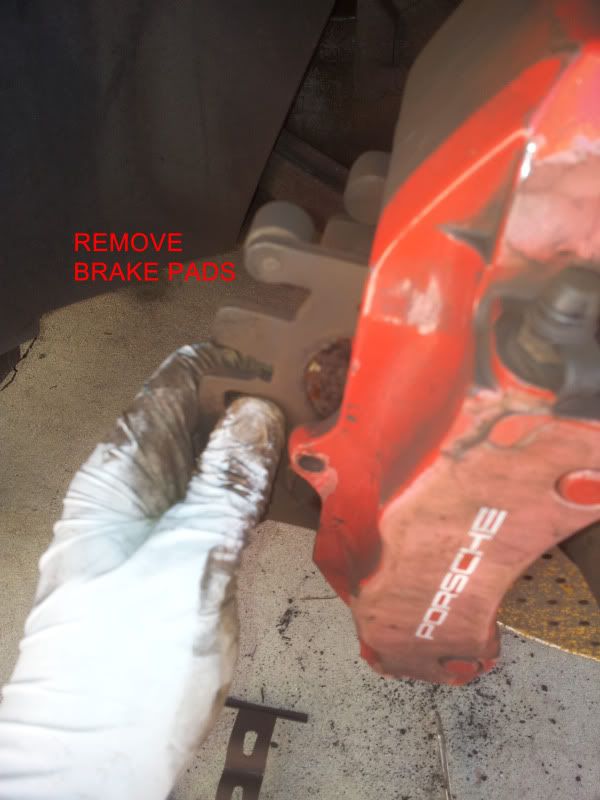
6. Squeeze existing pads against the HOLDING STUD hole with some vice grips, to push the pistons in. (PROCEED WITH CAUTION IF YOU WANT TO PROTECT THE PAINT ON YOUR CALIBERS. Mine are going to be repainted later on
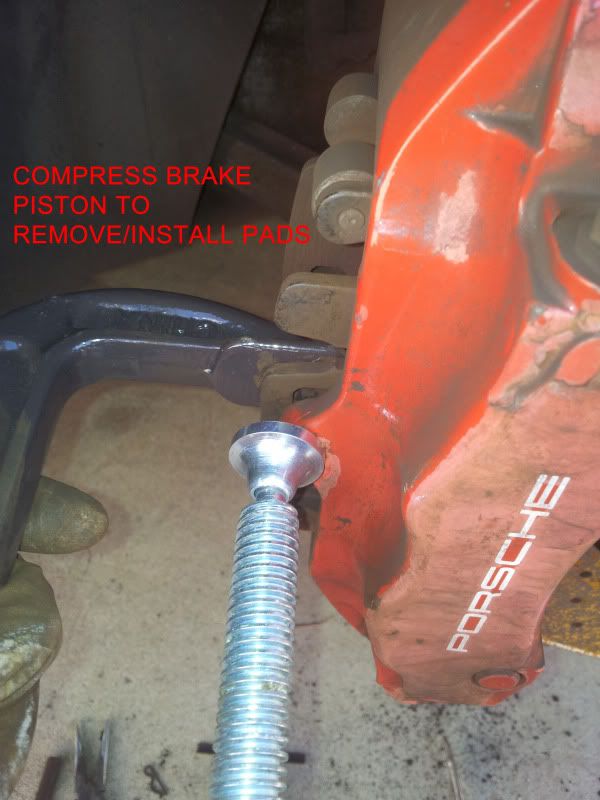
6-1/2. There are many ways to push the pistons in, This is how I decided to do it.
7. Remove old pads and Dampers(shims).
7-1/2. I was able to remove one damper but not the other so I actually left them in from now on, you can do what is capable on your end.
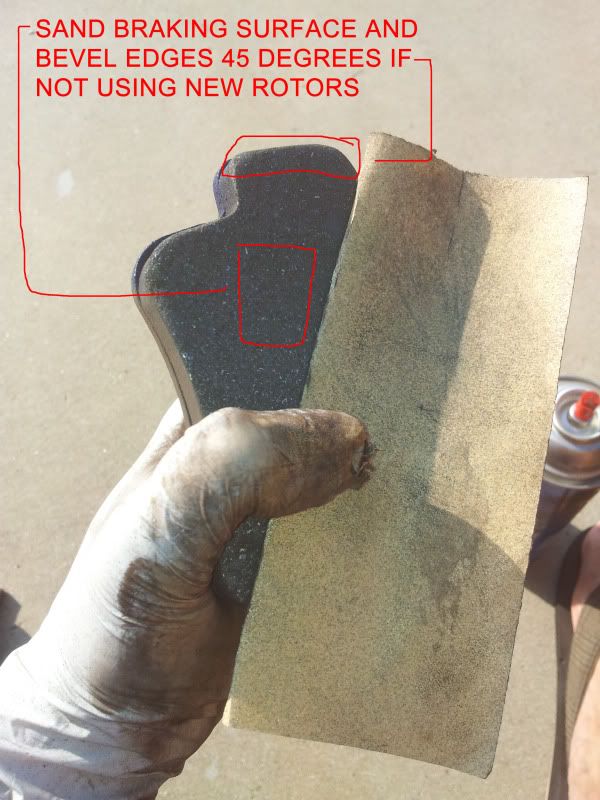
8. Get Mintex pads out (OR ANY PADS YOU'RE USING), PREP: BEVEL edges with sandpaper if you are using your old rotors and sand Surface of pad.
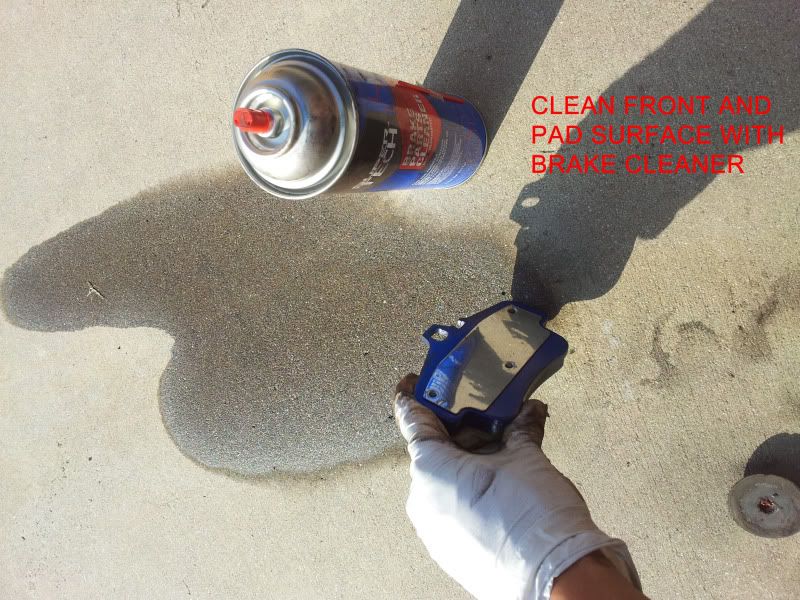
9. Clean backs of pads and dampers.
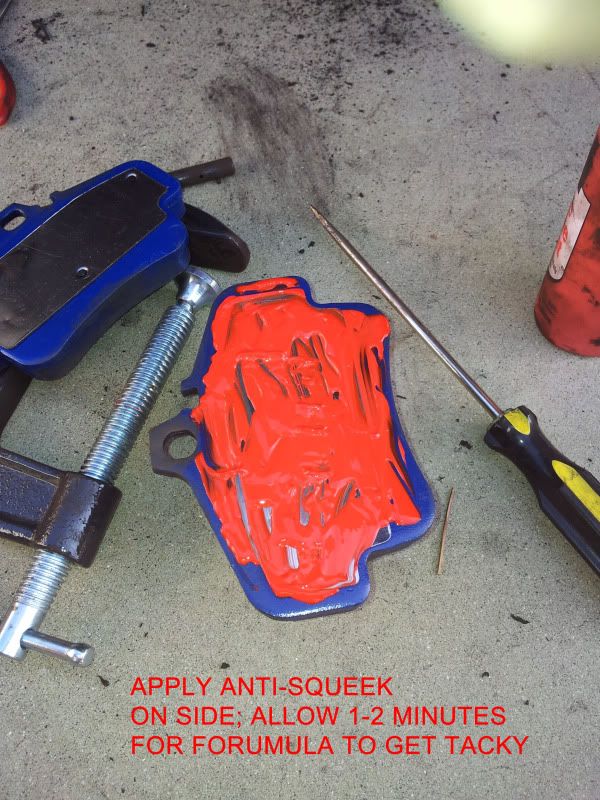
10. Apply "Brake Quiet" or any other sort of similar application in a smooth level application, on the brake pad backing and same backing on the damper.
11. Make sure pistons are still inside caliber, if not push back in.
11. Reinstall damper if you were able to successfully remove it earlier.

12. Slide brake pad in on both sides.
13. Zip tie brake sensors elsewhere or re-install in pads.
14. Reverse Assembly, Rears are the same.

15. Pat yourself on the back. You just saved an arm and a leg.
TIPS: I believe that the BEVELING was a critical factor in having no squeeling in the end. Also make sure you BED THEM IN CORRECTLY!!! I cant say this enough! It will make a day and night difference.
BEDDING FREEWAY STYLE: http://www.braketechnology.com/brakepadbedding.html
BEDDING STREET STYLE: http://www.coolcarbonperformance.com/bedding.html
Following this as best as you can word for word.
Mintex Pads Review: I had Pagid Oranges on my vehicle and they squeeled like a metro bus. I did not install these, It just came with my vehicle. I looked for options on decent pads that wouldnt break the bank nor squeel (yeah right huh?) I came across Mintex pads for $83 FRONT, $32 Rear. Could this be true a brake pad change for less then $150? I bit the bullet, got them next day and installed. I am completely satisified with my purchase especially for the price I paid. No squeel, Good performance, No squeel, and Cheap. They do not have the initial bite as the Pagid Oranges but I will survive.
I hope this writeup helps with your journey in pads an brake job. I wish I read something like this before I did mine Any questions, Post them up. I will try my best
So this topic has been brought up often in several threads all over. Im here to state my review and experience with the Brake job and concerns with Mintex Pads.
First DIY Brake Job: One of the easiest I have ever done, Dont be afraid.
1. Jack car up
2. Remove wheel
3. Turn steering wheel to right for driver side, Left for passenger (easier access).
4. Remove COTTER PIN (Its located at the end of the HOLDING STUD on the inner fender well side)
5. Push W-CLIP in towards the pads while pulling out HOLDING STUD out from the inner fender well.
5-1/2. If you are having difficultly, get a flat head and lightly tap the HOLDING STUD OUT FROM OUTER ANGLE.
6. Squeeze existing pads against the HOLDING STUD hole with some vice grips, to push the pistons in. (PROCEED WITH CAUTION IF YOU WANT TO PROTECT THE PAINT ON YOUR CALIBERS. Mine are going to be repainted later on
6-1/2. There are many ways to push the pistons in, This is how I decided to do it.
7. Remove old pads and Dampers(shims).
7-1/2. I was able to remove one damper but not the other so I actually left them in from now on, you can do what is capable on your end.
8. Get Mintex pads out (OR ANY PADS YOU'RE USING), PREP: BEVEL edges with sandpaper if you are using your old rotors and sand Surface of pad.
9. Clean backs of pads and dampers.
10. Apply "Brake Quiet" or any other sort of similar application in a smooth level application, on the brake pad backing and same backing on the damper.
11. Make sure pistons are still inside caliber, if not push back in.
11. Reinstall damper if you were able to successfully remove it earlier.
12. Slide brake pad in on both sides.
13. Zip tie brake sensors elsewhere or re-install in pads.
14. Reverse Assembly, Rears are the same.
15. Pat yourself on the back. You just saved an arm and a leg.
TIPS: I believe that the BEVELING was a critical factor in having no squeeling in the end. Also make sure you BED THEM IN CORRECTLY!!! I cant say this enough! It will make a day and night difference.
BEDDING FREEWAY STYLE: http://www.braketechnology.com/brakepadbedding.html
BEDDING STREET STYLE: http://www.coolcarbonperformance.com/bedding.html
Following this as best as you can word for word.
Mintex Pads Review: I had Pagid Oranges on my vehicle and they squeeled like a metro bus. I did not install these, It just came with my vehicle. I looked for options on decent pads that wouldnt break the bank nor squeel (yeah right huh?) I came across Mintex pads for $83 FRONT, $32 Rear. Could this be true a brake pad change for less then $150? I bit the bullet, got them next day and installed. I am completely satisified with my purchase especially for the price I paid. No squeel, Good performance, No squeel, and Cheap. They do not have the initial bite as the Pagid Oranges but I will survive.
I hope this writeup helps with your journey in pads an brake job. I wish I read something like this before I did mine
Any questions, Post them up. I will try my best
Last edited by enoyskt; 11-15-2011 at 07:50 PM.
Trending Topics
#8
07-14-2009, 04:36 PM
Registered User
Join Date: Jul 2005
Location: Palos Verdes, California
Age: 59
Posts: 550
Rep Power: 71
Great job and thanks for posting!
Any chance of posting a pic detailing all the anatomy for those of us not as well versed mechanically as you?
Any chance of posting a pic detailing all the anatomy for those of us not as well versed mechanically as you?
#10
07-14-2009, 05:43 PM
i did this a while back. initially the dusting was to bad but lately its pretty horrible. after a week of driving, youll definitely notice the brake dust that gets emitted.
then again, i live in NYC so theres a lot of stop and go traffic.
then again, i live in NYC so theres a lot of stop and go traffic.
#12
02-01-2011, 05:21 PM
Great write up. I'll be looking to do my own in the spring..quick question..
How long did it take you to do all 4 start to finish?
How long did it take you to do all 4 start to finish?
#13
11-15-2011, 07:51 PM
Join Date: Oct 2008
Location: OC, CA
Posts: 466
Rep Power: 40
Updated first post with pics and more info, Cool Carbons so far are not squeeking
Mintex lasted me from 7/09 til today 11/11.
The process takes about 1.5 - 2 hours total.
Mintex lasted me from 7/09 til today 11/11.
The process takes about 1.5 - 2 hours total.
