
Exhaust - Nuts Totally Corroded!
#121
 01-16-2012, 11:11 AM

Glad to see your persistence.
If you drilled into the jacket with a 5.5 mm bit, that's about .220". You need about .242" to start the tap. So you'll need to enlarge the hole to a drill size "C" or .242" or 15/64" or 7/32 should if you can't find the other sizes.
Keep in mind, first you'll want to drill and tap the 8mm hole to a depth of the original. I'd actually go about 4mm less leaving more material for the plug. If you have 40mm total and need 30mm for the 8mm diameter bolt, I'd go 26mm leaving 14mm for the plug. After the plug is installed you can always drill and tap the 8mm hole a bit deeper.
Important: You'll want to grease the tap to catch chips and go slowly removing and cleaning the tap after a couple of turns. Keep the chips out of the motor. Also if you go too deep, your f'ed. Remember your cutting a taper, and depth of threads is very critical. You may have to tap a bit, remove the tool and check engagement and depth of the plug when tight. If you tap too deep the plug will go into the jacket and fall through.
You need to think this through very carefully and do a few dry runs in your mind or a few tests on some sacrificial material first.
Most importantly, see if you are able to grind down the largest OD of the tap to be effective and have it fit into the 8mm threaded hole. I made of pic of how the modded tap should look here. The red area is where you have to grind it down to fit in the hole, blue is where you made the extension to drive it. Hope this helps. No guarantees it will work, I'm home and away from the shop so I can't look at or measure any of this stuff for you. Day off today, cold and snowing. I'll be hiking later in the mountains. Good luck.
#122
01-16-2012, 11:57 AM
Join Date: Jul 2008
Location: Warwickshire, England
Age: 41
Posts: 1,751
Rep Power: 140 

Thanks for putting up with all my questions
I'm sure i'll see it through to the end (eventually)
I think everyone that's reading but not posting wants to see this thread come to an end
The stupid thing is all of this came about because the nuts fixing my manifold to the turbos had corroded causing the exhaust system to leak - Can't believe this has escalated to drilling into the cylinder heads!!
I'm sure I'm not the only one that hasn't heard about the tapered taps before
So, for me and everyone else that doesn't know about these.....
Are the plugs also tapered, or is it just the tap which tapers?
I'd guess the plug tapers too, but it doesn't explain this on any of the vendors sites, and the one you posted is too complicated for me - I work in metric!
Most of the UK sites I've been looking at list the plugs as 1/16 (27) NPT but don't give any other dimensions
I think the 1/16 (27) is the number of threads per inch
But how do i know the external dimensions and the depth of the plug?
I'm sure that's a stupid question, but I haven't found an answer yet
#123
01-16-2012, 12:26 PM
Wow! I can not believe what I just read.. This really sucks.. Nick is on point with his advise. When you get to turning the tap you will see exactly what he means. Nick rep to you!
#124
01-16-2012, 12:37 PM
Join Date: Jul 2008
Location: Warwickshire, England
Age: 41
Posts: 1,751
Rep Power: 140
Definitely sucks!
It's all 'easily' fixed though, so it's just frustration really
I'm learning as well which is something I relish, even in the bad times
I'm thinking I might just bite the bullet now and do the rest of the exhaust and turbos once this is all worked out
I really didn't want to start messing with the rest of the system as its all just as bad as this is, but now I'm right into the job I might as well do the full job and see it through
All of this for a blowing exhaust?!
Definitely gonna have a sense of achievement once it's done
Yeah, I've sent some rep in Nicks direction just recently
#125
01-17-2012, 10:38 AM
Back at work after a few days off. I had a chance to grab a 1/16x27 plug, the same size tap and an 8mm threaded hole. I knew all the fits would be close, but as it is the original 8mm threaded hole is too small and the 1/16x27 plug is I believe the smallest commonly available. So the proceedure is going to be a bit more involved. You will need to enlarge the original 8mm hole, then carefully go in, tap and install the plug. Next the hole will have to be threaded for a helicoil or other type of threaded insert. This will put a steel threaded sleeve into the original hole bring it back to the original dimensions.
If this is too much for you to deal with you may try another approach or consult an expert to complete the repair for you.
GL as always. Keep us posted!
If this is too much for you to deal with you may try another approach or consult an expert to complete the repair for you.
GL as always. Keep us posted!
#126
01-23-2012, 08:53 AM
Join Date: Jul 2008
Location: Warwickshire, England
Age: 41
Posts: 1,751
Rep Power: 140
Ok, after speaking with as many people as possible I decided to tap the whole thing to fit an M8 set screw/grub screw
I prefer the idea of the tapered pipe plug, but it seems a little too much for me
Im going to apply RTV sealer to the set screw in order to seal it
RTV sealer is a slow drying, flexible setting paste that changes to a pliable, non-hardening film when the solvents evaporate
It works between -55*c to +200*c
So it should be more than capable of holding up to what I need of it
I spoke to a couple of hotrod friends and they said Chrysler B & RB heads, and some LA Mopar heads have bolts which are drilled into the water jackets
They told me I shouldn't even think of it as a fix, as some engines are actually design a little like that!
#127
01-23-2012, 09:03 AM
Join Date: Jul 2008
Location: Warwickshire, England
Age: 41
Posts: 1,751
Rep Power: 140
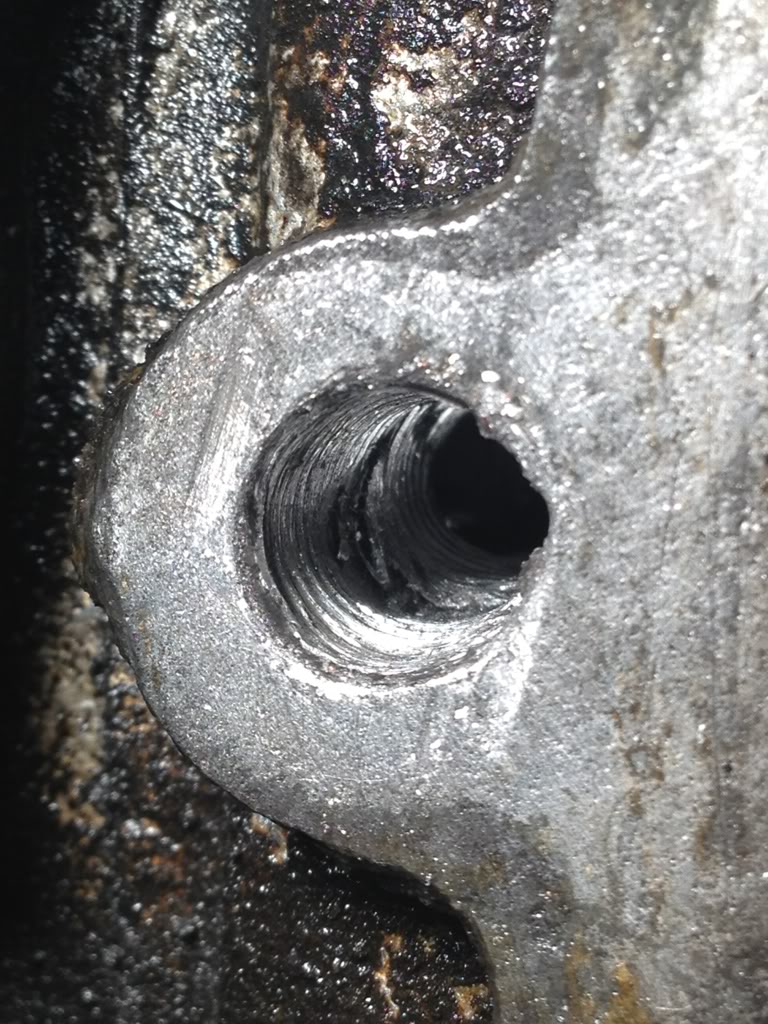
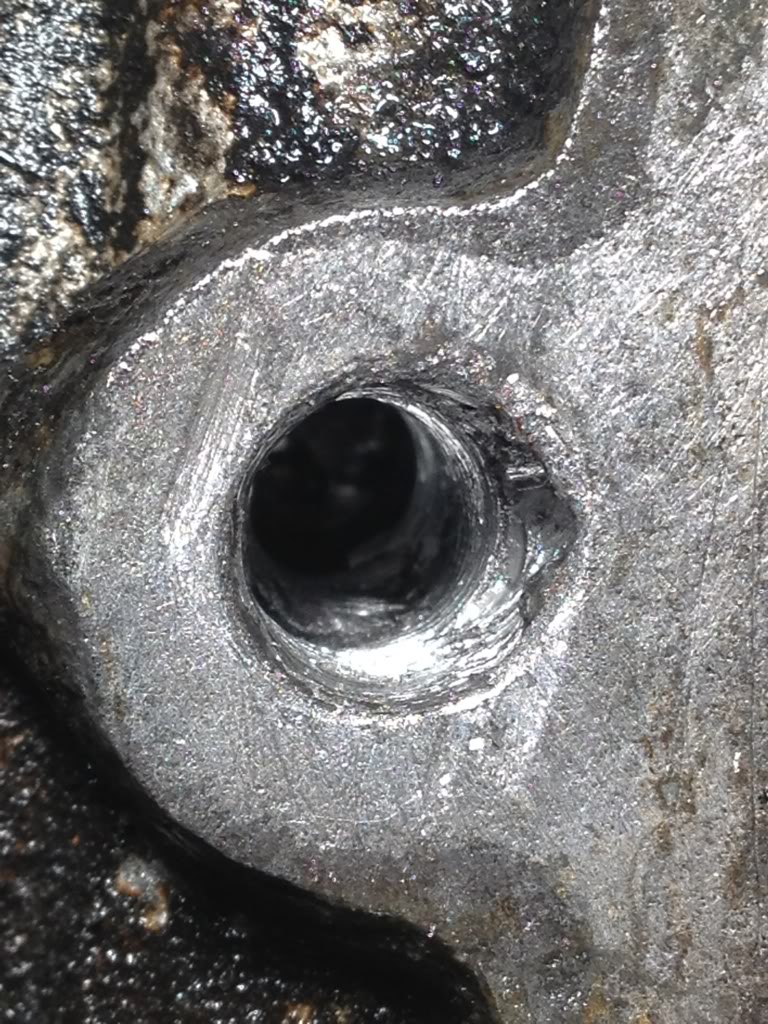
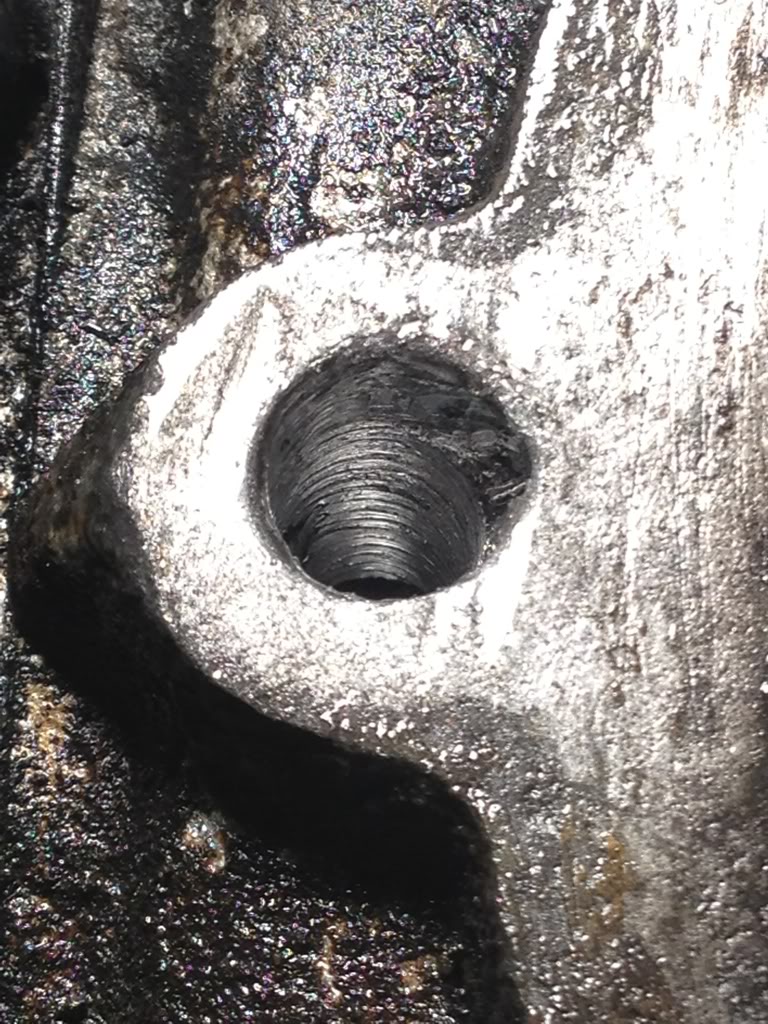
So, here's where I am right now
I've tapped the hole to fit an M8 thread
However, the hole I drilled was slightly off centre to begin with - as mentioned previously
Now that I've tapped the head I can see there's a slight problem with the hole
The hole is perfect further down the thread, so the plug will be fine, but due to the oval shape of it to start with, the manifold bolt doesn't have quite enough material to bind on to which causes it to wobble at the start
Once the bolt is in 5-10mm everything is ok again
The bolt is meant to go into the head by 20mm so there's still enough thread there for it, but I'm not happy with it
I don't know whether to try it as it is first, and then fit an insert if it still bugs me
Here's some pictures for you
It's the same hole in all the photos, just taken from different angles so you can see into the thread
#128
01-23-2012, 10:35 AM
I'm not expert on this, but I would think 10-15 mm of thread should be fine, it's not like the headers are held on with 2 bolts. As long as you can torque it per spec, based on the depth you are quoting, I would think that would be adequate.
Hopefully others will chime in.
Hopefully others will chime in.
Last edited by JSBear; 01-23-2012 at 10:48 AM.
#129
01-23-2012, 01:26 PM
Join Date: Jul 2008
Location: Warwickshire, England
Age: 41
Posts: 1,751
Rep Power: 140
Well, I decided to test fit a bolt into the hole I'd tapped just to see if it'd hold
If it held then knew I could install the plug to fix the hole in the head
I've installed the plug and have just drilled my final stud out
I think I can now say with absolute certainty that there's something not quite right with my cylinder head
I was drilling my final bolt - I hadn't even got to the required depth, and the ****er went into the water jacket again!
I'm not impressed in the slightest
I was just approaching a depth of 20mm and the head leaked coolant again
Well, I'm not angry in the slightest
I honestly couldn't care less
I think I might take the engine out and take the head off to be welded now
That should be a good way to waste a lot more of my time
Note to anyone that reads this
If your exhaust manifold starts to leak, or if your bolts are corroded, don't even waste your time on them
Last edited by ant_8u; 01-23-2012 at 06:06 PM.

#131
01-23-2012, 05:17 PM

Ant
I don't know what to say, you've put so much time and effort into this
One thing I do know is when things start to go wrong its best to stop and have a break from it, normally when I've ****ed something up I've known I should've stopped but for some reason I've carried on and made it worse.
I also greatly admire your determination, your like the Terminator, you just will not give in
I think the situation your in now is still recoverable without removing the head but I also think its at the stage where it needs the skills of a proper professional, and by that I mean somebody that has done this type of thing hundreds of times before, and could come up with a good quality solution to make it as good as new.
If it was my car I would give somebody like Baz at Hartech a call and show him this thread.
You really don't want to get into pulling the engine and removing the head, there is so much to potentially go wrong.All that stuff on top of the engine,if you miss one clip or connection the engine will need to come out again, the cam timing that needs special tools and so on.Getting somebody to do the cam timing would probably cost not much less than getting a specialist to fix your bolt holes will now.
I think a specialist could have you back on the road in a few days and you could have all of this behind you and get back to enjoying the car again. There is no shame in getting some help with something like this.
I think getting it repaired by a specialist now would be cheaper than if you carry on and run in to more trouble that requires :-
Having to remove the engine and head, then fix
Having to replace the head completely, a new one is over �2K
Do you feel confident you won't end up in this situation?
I hope I'm not coming across wrong, I just don't want to see your situation get any worse
Keep your chin up
And
#132
01-23-2012, 06:06 PM
A new head is WAY more than 2000euro! They like $4000usd each! And used single heads are nearly impossible to find!
Ant
I don't know what to say, you've put so much time and effort into this
One thing I do know is when things start to go wrong its best to stop and have a break from it, normally when I've ****ed something up I've known I should've stopped but for some reason I've carried on and made it worse.
I also greatly admire your determination, your like the Terminator, you just will not give in
I think the situation your in now is still recoverable without removing the head but I also think its at the stage where it needs the skills of a proper professional, and by that I mean somebody that has done this type of thing hundreds of times before, and could come up with a good quality solution to make it as good as new.
If it was my car I would give somebody like Baz at Hartech a call and show him this thread.
You really don't want to get into pulling the engine and removing the head, there is so much to potentially go wrong.All that stuff on top of the engine,if you miss one clip or connection the engine will need to come out again, the cam timing that needs special tools and so on.Getting somebody to do the cam timing would probably cost not much less than getting a specialist to fix your bolt holes will now.
I think a specialist could have you back on the road in a few days and you could have all of this behind you and get back to enjoying the car again. There is no shame in getting some help with something like this.
I think getting it repaired by a specialist now would be cheaper than if you carry on and run in to more trouble that requires :-
Having to remove the engine and head, then fix
Having to replace the head completely, a new one is over £2K
Do you feel confident you won't end up in this situation?
I hope I'm not coming across wrong, I just don't want to see your situation get any worse
Keep your chin up
And

#134
02-05-2012, 06:15 AM
Join Date: Jul 2008
Location: Warwickshire, England
Age: 41
Posts: 1,751
Rep Power: 140
Update:
I've ordered a variety of bolts, screws, washers, and inserts
I ordered a few of each in various sizes so I know (hopefully) I've got all bases covered
I got some RTV type silicone sealant too, which will go onto the studs
I've got Sunday - Tuesday off work which should give me some time to do something to it
But it's been snowing here, so I need to make sure my other car is in the garage again at the end of each night
Oh well, guess I better start shovelling the drive
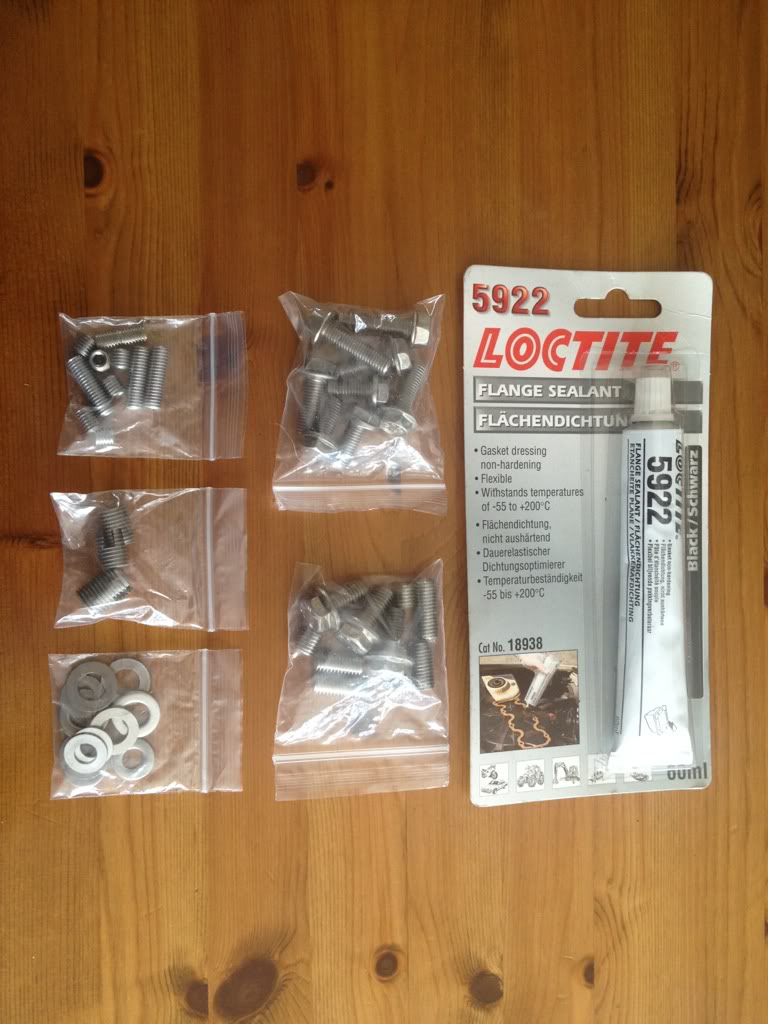
Last edited by ant_8u; 02-05-2012 at 06:27 AM.
#135
02-07-2012, 01:00 PM
Join Date: Jul 2008
Location: Warwickshire, England
Age: 41
Posts: 1,751
Rep Power: 140
Ok, some questions......
(and of course, some pictures)
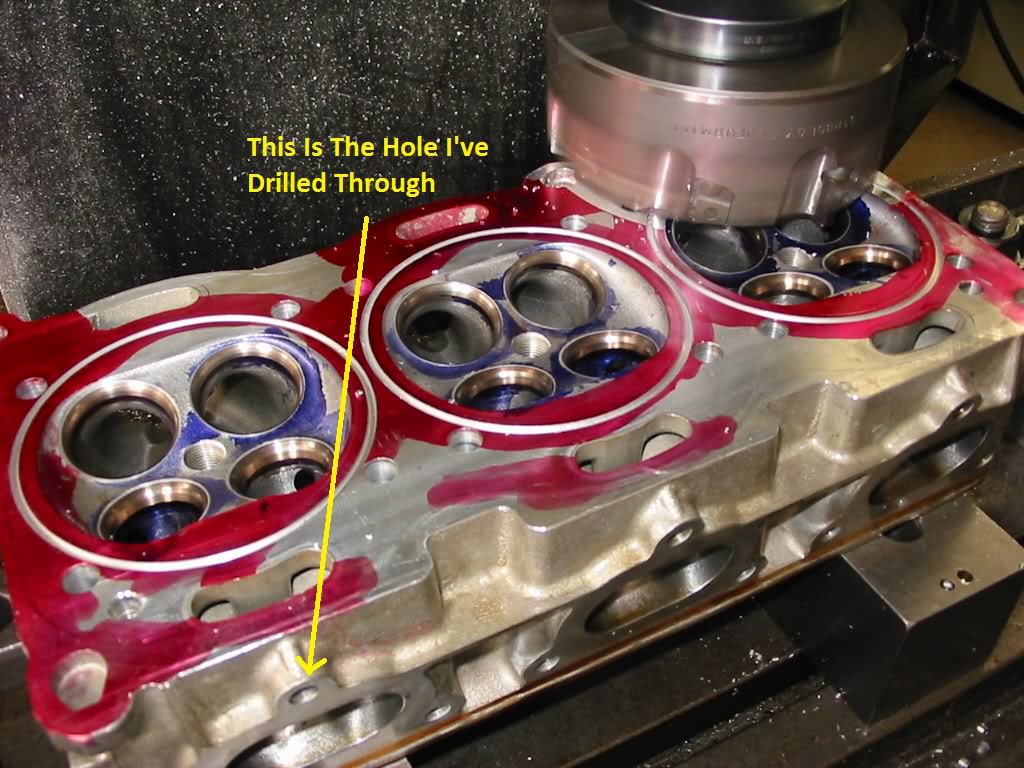
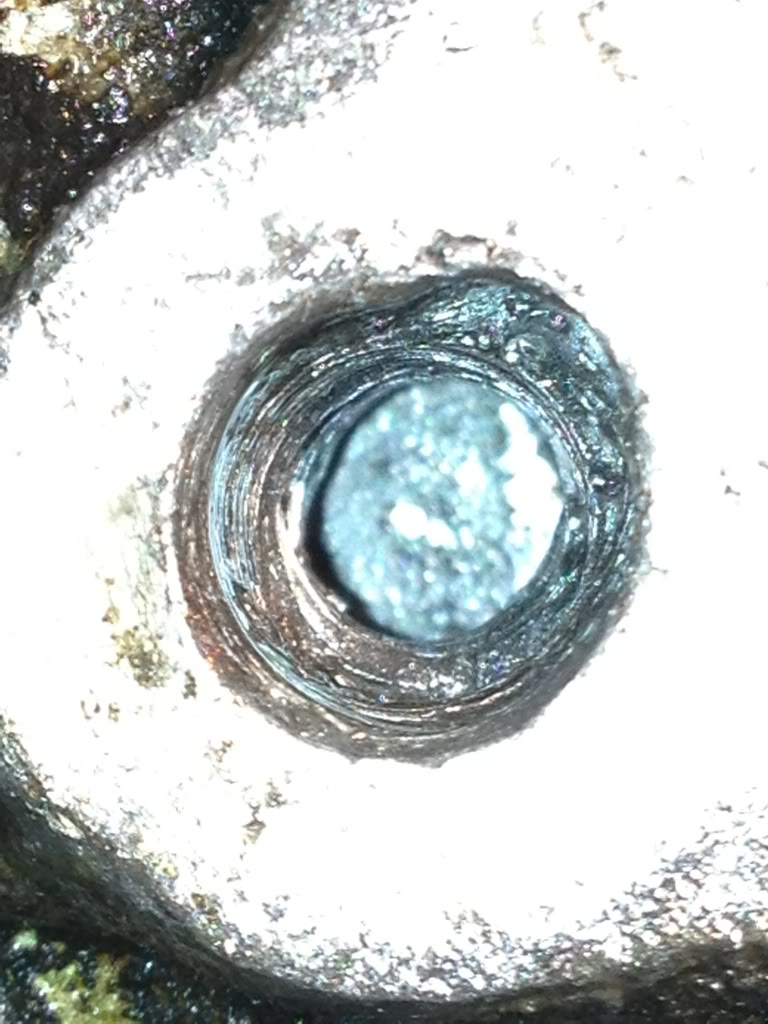
If you remember, here is a photo showing the hole which I have drilled through
I have taken some measurements and have the following dimensions:
Manifold Bolt = M8 x 30mm
12mm = Manifold Flange
23mm = Original thread depth (in the cylinder head)
34mm = Total depth of head (to the back of the water jacket)
Note:
The 15mm is the depth of the insert, should one be required
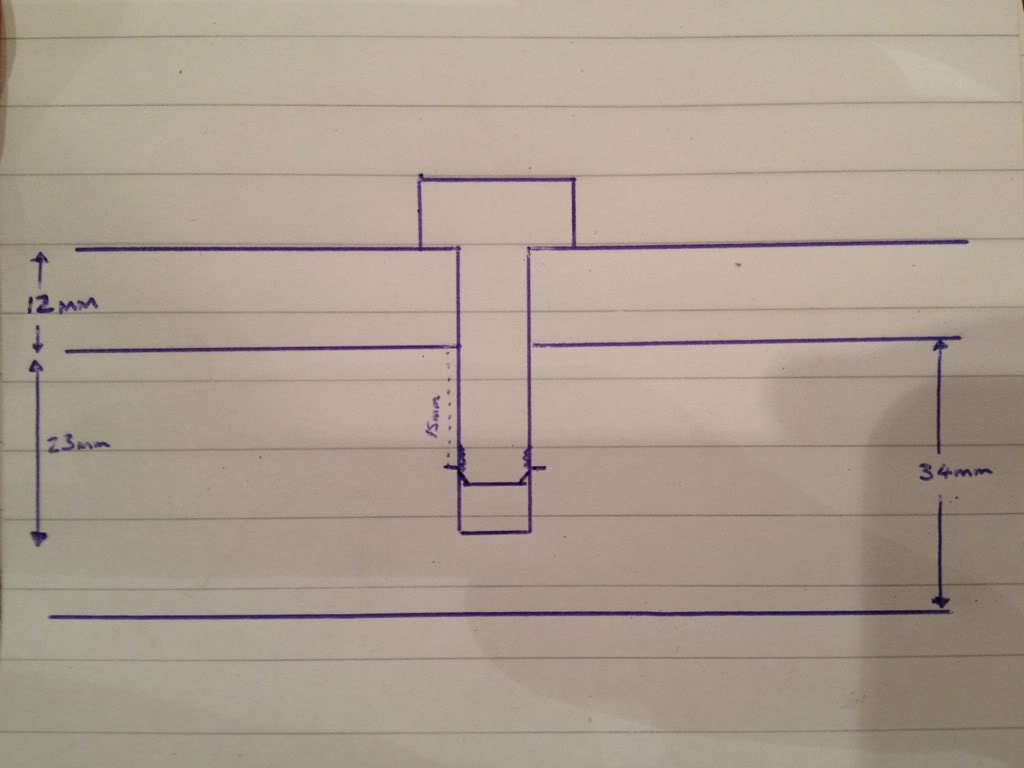
So, whilst the bolt has a 30mm thread, it only goes into the head by 18mm
(30mm thread minus 12mm manifold depth)
And as the head is originally threaded to a depth of 23mm, there is a 5mm 'void' at the bottom of the bolt
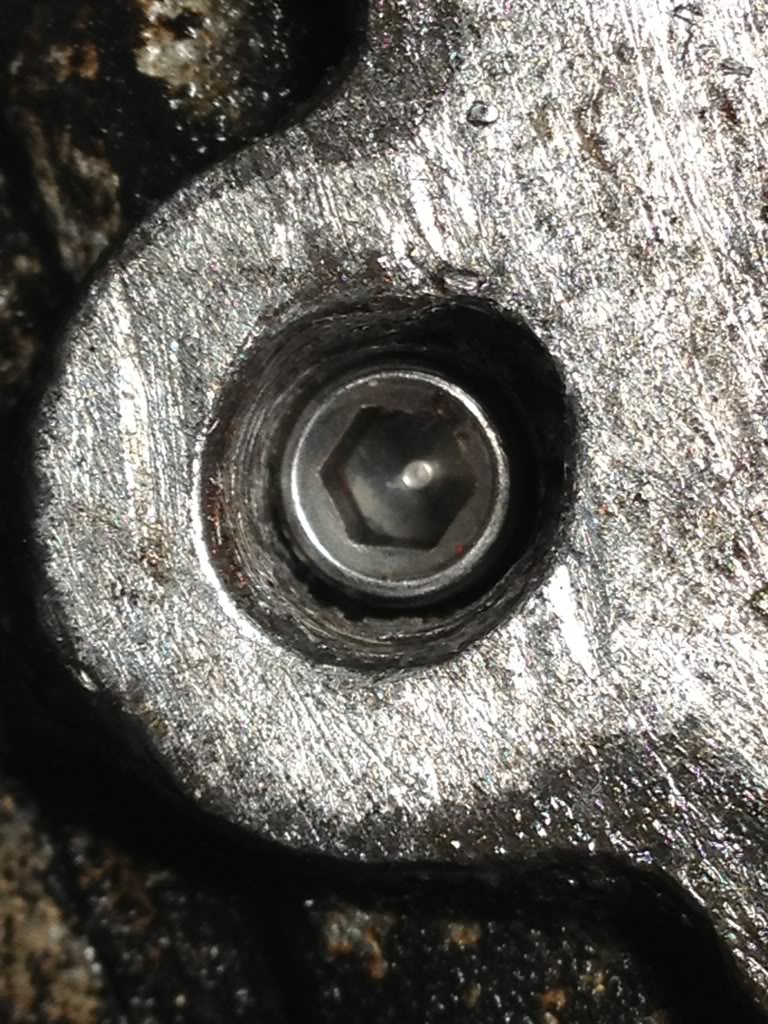
I fitted a M8 x 25mm grub screw/set screw into the hole, to test for fitment
With the screw inserted as far as it will go (until it hits the back of the water jacket) it is 'sunken' by just over 8mm
Hopefully these pictures show the back of the water jacket
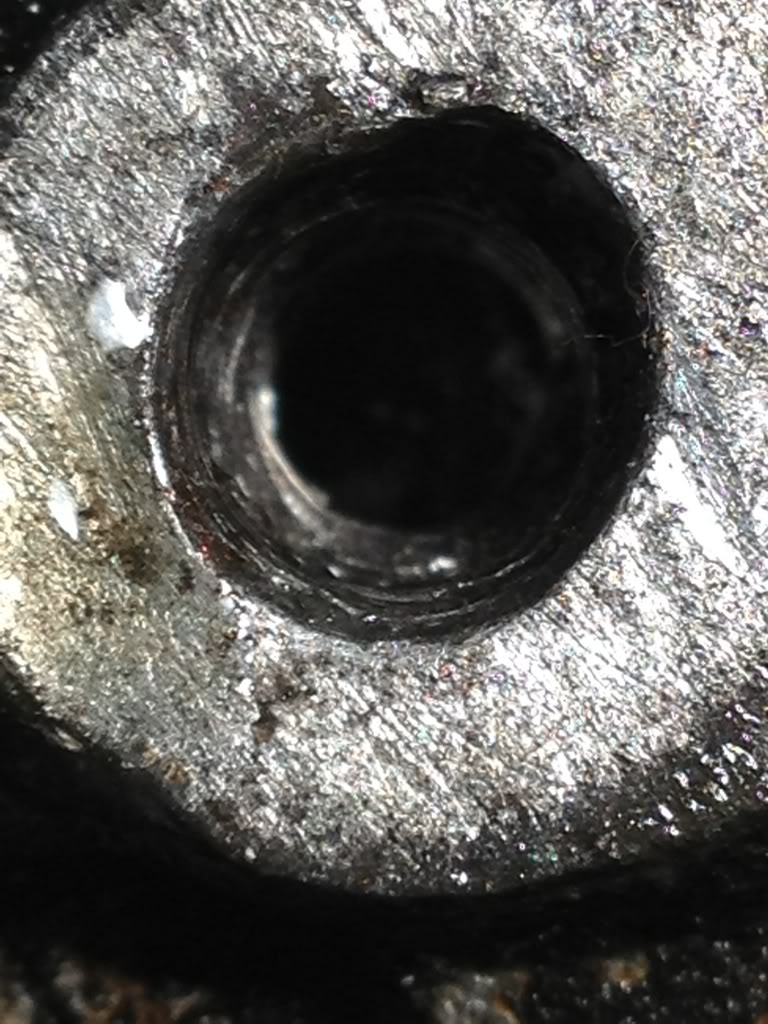
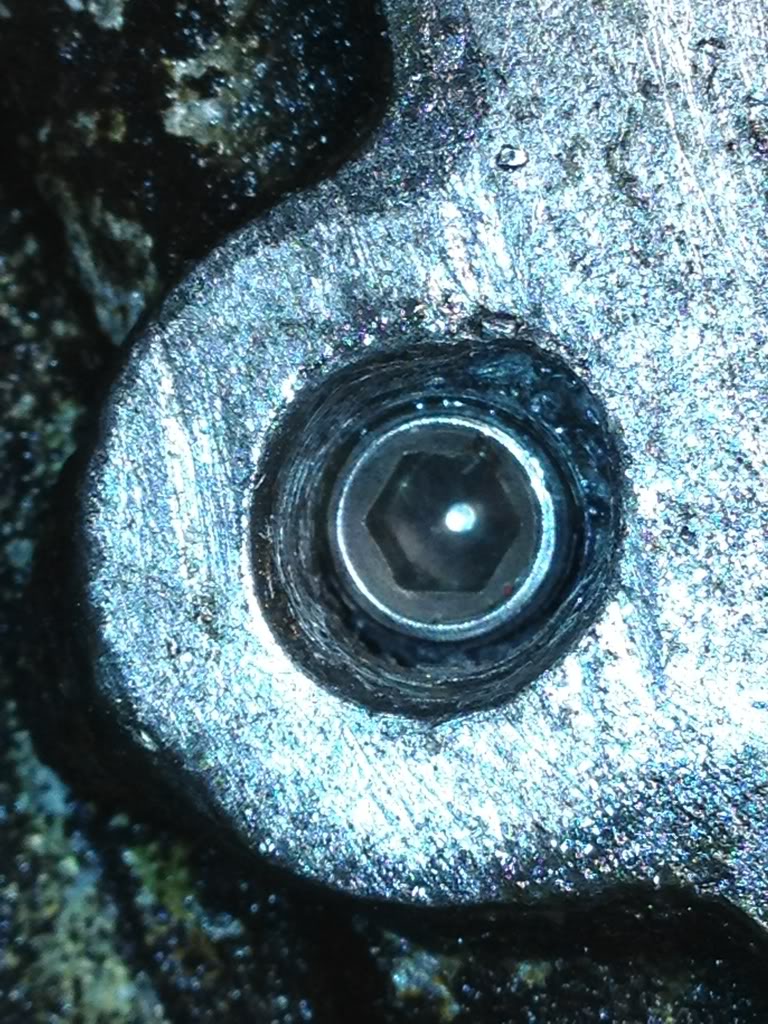
And these ones show the 25mm set screw trial fitted
Look how big the hole is initially - I'll definitely need an insert or some way to fill that hole
Now then, as the manifold is 12mm, If I were to try and fit a 20mm manifold bolt (instead of the 30mm as previously used) it would but up against the set screw with no 'void' space
I could fix this by either using a washer when fitting the bolt, or by using a shorter set screw
I am very much aware that I don't want to use too short a screw though for fear of it falling into the head if it's screwed in too far
The main problem I would have with using the 25mm set screw though is that if it is only 'sunken' by 8mm I would not be able to fit the insert into the head (as it's 15mm long)
So then, in order to fit a 15mm long insert I would want to use a set screw of less than 19mm length
(34mm total head depth minus 15mm insert depth)
Something I can't decide on is, should I fit the longest screw possible and fit it until it buts up against the water jacket, or will this restrict the cooling system too much, and would I therefore be better off fitting something which doesn't pertrude into the water way?
You can probably tell from the pictures that i'll need to fit an insert or do something in order to be able to fit a manifold bolt securely in place
Would it be a stupid idea to use some kind of liquid metal to level off the hole after the set screw is fitted, and then just drill it again?
(and of course, some pictures)
If you remember, here is a photo showing the hole which I have drilled through
I have taken some measurements and have the following dimensions:
Manifold Bolt = M8 x 30mm
12mm = Manifold Flange
23mm = Original thread depth (in the cylinder head)
34mm = Total depth of head (to the back of the water jacket)
Note:
The 15mm is the depth of the insert, should one be required
So, whilst the bolt has a 30mm thread, it only goes into the head by 18mm
(30mm thread minus 12mm manifold depth)
And as the head is originally threaded to a depth of 23mm, there is a 5mm 'void' at the bottom of the bolt
I fitted a M8 x 25mm grub screw/set screw into the hole, to test for fitment
With the screw inserted as far as it will go (until it hits the back of the water jacket) it is 'sunken' by just over 8mm
Hopefully these pictures show the back of the water jacket
And these ones show the 25mm set screw trial fitted
Look how big the hole is initially - I'll definitely need an insert or some way to fill that hole
Now then, as the manifold is 12mm, If I were to try and fit a 20mm manifold bolt (instead of the 30mm as previously used) it would but up against the set screw with no 'void' space
I could fix this by either using a washer when fitting the bolt, or by using a shorter set screw
I am very much aware that I don't want to use too short a screw though for fear of it falling into the head if it's screwed in too far
The main problem I would have with using the 25mm set screw though is that if it is only 'sunken' by 8mm I would not be able to fit the insert into the head (as it's 15mm long)
So then, in order to fit a 15mm long insert I would want to use a set screw of less than 19mm length
(34mm total head depth minus 15mm insert depth)
Something I can't decide on is, should I fit the longest screw possible and fit it until it buts up against the water jacket, or will this restrict the cooling system too much, and would I therefore be better off fitting something which doesn't pertrude into the water way?
You can probably tell from the pictures that i'll need to fit an insert or do something in order to be able to fit a manifold bolt securely in place
Would it be a stupid idea to use some kind of liquid metal to level off the hole after the set screw is fitted, and then just drill it again?