
LED taillights - Thoughts?
#91
 03-09-2009, 03:57 PM


Join Date: Feb 2009
Location: USA
Posts: 2,295
Rep Power: 0 

I think you want the red/smoked then

but you can make the final call when the red/clear gets here
Edwin

#93
03-09-2009, 05:39 PM

Awaiting Email Confirmation
Join Date: Mar 2008
Location: New Jersey/NYC
Posts: 432
Rep Power: 0
Wow they really do look great on Oranges car really updates it a lot. Want them on my car ASAP!
#94
03-09-2009, 07:20 PM
Installation and fitment on NB C2
Guys,
I apologize for getting these in so late. My work schedule has been pretty hectic this last week.
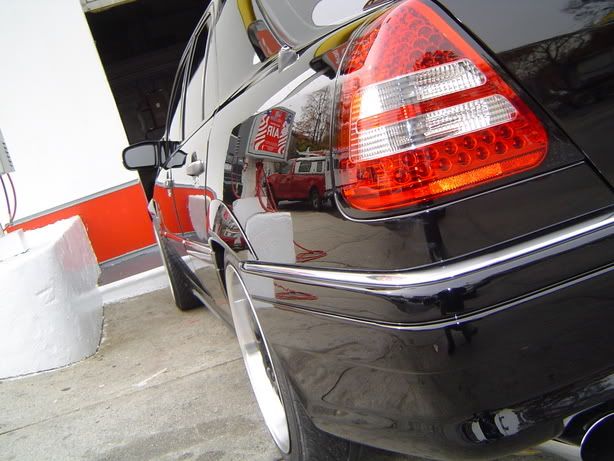
I went and met up with Tony from Precision Porsche on Sunday afternoon to see and test fit their new LED lights on my car.
The finish on these is pretty good, they fit in the stock slots and I was impressed with how the lines stayed consistent with the spacing between the assembly and the panels. Just to let you know, I replaced all of my old tail light bulbs with "High Intensity" bulbs. So, they are much brighter than stock bulbs. I will let the pictures speak for themselves.
Installation:
1. Open rear hood.
2. Remove old nut that is in your old housing.
3. Take old light assembly out of slots.
4. Unscrew the bulb housings for the old bulbs. These have unique slotting narrow on top and wide on bottom. This means that the housing will only insert and remove in a certain way. You will keep your old "Reverse light bulb", "Fog light bulb, and the little side marker bulb.
5. Remove (2) bulbs. (1) is turn signal-single contact on bottom of bulb, (1) is brake light, night light combo bulb - dual contacts on bottom of bulb. Each of these bulbs has unique offset of posts on each side. This means that the bulb will only go in a certain way.
6. Screw in the bulb ends from the new LED light assembly. This were they did homework. The LED assembly sits inside the housing and the wires are connected to light bulb ends that you simply plug and play. The bulb ends match the pattern of the old bulbs so you can't mix them up.
Tony said that you don't use the little side marker bulb because there is a reflector there. If that's the case you just remove the bulb and cover the end of the connector.
7. Place new assembly in receiving slots and install new bolt.
8. Check lights, turn signal, hazards, night light, and braking.
9. Close rear hood.
10. Enjoy!!!!
I apologize for getting these in so late. My work schedule has been pretty hectic this last week.
I went and met up with Tony from Precision Porsche on Sunday afternoon to see and test fit their new LED lights on my car.
The finish on these is pretty good, they fit in the stock slots and I was impressed with how the lines stayed consistent with the spacing between the assembly and the panels. Just to let you know, I replaced all of my old tail light bulbs with "High Intensity" bulbs. So, they are much brighter than stock bulbs. I will let the pictures speak for themselves.
Installation:
1. Open rear hood.
2. Remove old nut that is in your old housing.
3. Take old light assembly out of slots.
4. Unscrew the bulb housings for the old bulbs. These have unique slotting narrow on top and wide on bottom. This means that the housing will only insert and remove in a certain way. You will keep your old "Reverse light bulb", "Fog light bulb, and the little side marker bulb.
5. Remove (2) bulbs. (1) is turn signal-single contact on bottom of bulb, (1) is brake light, night light combo bulb - dual contacts on bottom of bulb. Each of these bulbs has unique offset of posts on each side. This means that the bulb will only go in a certain way.
6. Screw in the bulb ends from the new LED light assembly. This were they did homework. The LED assembly sits inside the housing and the wires are connected to light bulb ends that you simply plug and play. The bulb ends match the pattern of the old bulbs so you can't mix them up.
Tony said that you don't use the little side marker bulb because there is a reflector there. If that's the case you just remove the bulb and cover the end of the connector.
7. Place new assembly in receiving slots and install new bolt.
8. Check lights, turn signal, hazards, night light, and braking.
9. Close rear hood.
10. Enjoy!!!!
#95
03-09-2009, 07:30 PM
these look to dark?? i think the pics are not that great?? im going to wait and see the clear/red. if they look nice im going to get those. if not maybe get the all clear and make them myself.
#96
03-09-2009, 07:32 PM
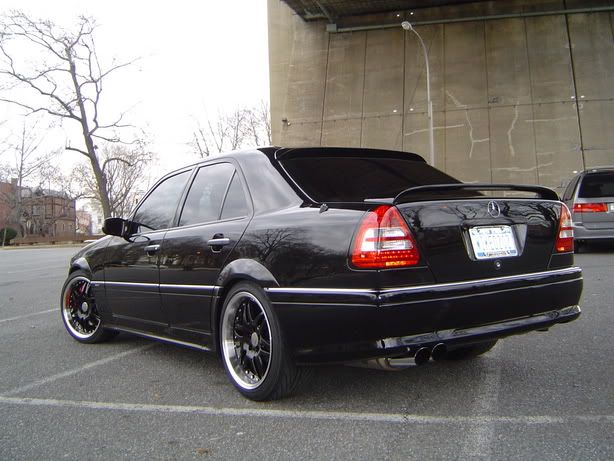
Few more pictures
Here are few more pics comparing the LED's to the OEM with "High Intensity" bulbs and fitment.
Hope this helps those who are on the fence. I would like to know what the warranty is on the lights. But it does inprove the looks and they will be stunning at night.
OrangeC2
Hope this helps those who are on the fence. I would like to know what the warranty is on the lights. But it does inprove the looks and they will be stunning at night.
OrangeC2
#98
03-09-2009, 07:41 PM
Awaiting Email Confirmation
Join Date: Mar 2008
Location: New Jersey/NYC
Posts: 432
Rep Power: 0
They do look a little weak but i think he said that he changed his bulbs to a much brighter bulb then stock. Are those The smoked red/clear ?
#99
03-09-2009, 07:47 PM
so that means that they need to be brighter than stock? right? and what do you mean by changeing the light bulbs? i have led tail lights on my mercedes and the only place i used the same light bulb was for the reverse and the turn signal??

#101
03-09-2009, 08:01 PM
Awaiting Email Confirmation
Join Date: Mar 2008
Location: New Jersey/NYC
Posts: 432
Rep Power: 0
Yea i think the Non smoked red/clear will hopefully look more like those on your Benz guess time will tell when they come......
#102
03-09-2009, 08:02 PM
jstrat85,
I mean that the light bulbs in my old housing are the "High Intensity" bulbs. My old reverse, night/brake, and turn signal are brighter than stock light bulbs. That is one reason they look brighter than the LED's. If you take a look at the back of the light assembly on my first set of pictures you will see the connectors that you plug in and the open holes for the "Fog" and "Reverse" light bulbs from your old set of lights.
As far as the pictures looking darker, my camera's aperture set itself down to reduce the glare.
OrangeC2
Hope this clears things up a big.
#105
03-09-2009, 08:27 PM
Awaiting Email Confirmation
Join Date: Mar 2008
Location: New Jersey/NYC
Posts: 432
Rep Power: 0