
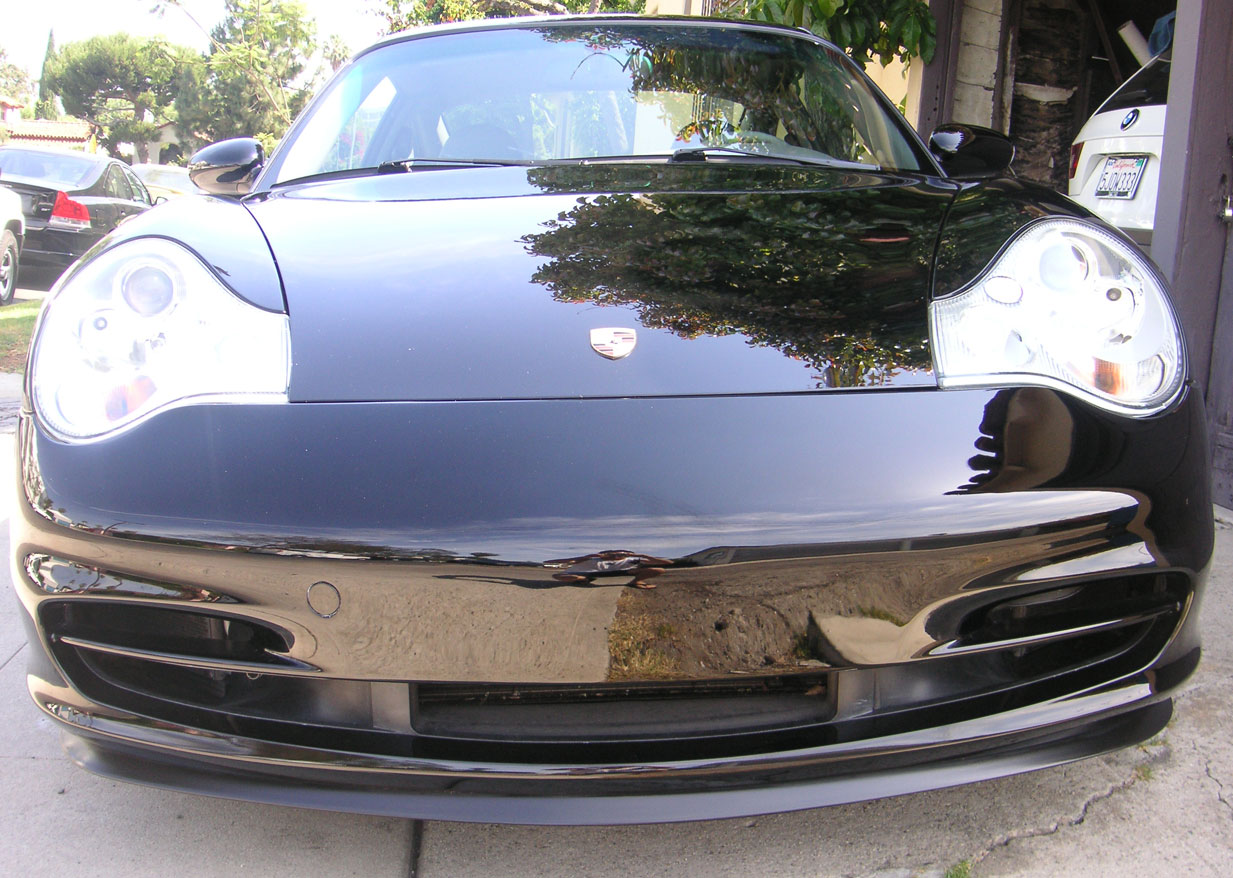
Installed 02 GT3 lip spoiler on OEM 996 C2 bumper
#16
 07-03-2007, 03:36 PM

Join Date: Apr 2007
Location: Chained to my Laptop....
Posts: 3,124
Rep Power: 170 

Originally Posted by jstgermaine
For added lift cancelling in the front, I put the GT3 cup front splitter (much more pronounced than the factory GT3 Street unit) on my 99. It bolts on the car, under the front bumper and faces down, not forward. You can't see it from outside of the car, but at speeds of 75+ you can definately feel the difference.
I'll try to dig up the part number.
I'll try to dig up the part number.
#18
07-03-2007, 04:07 PM
Originally Posted by p0rsch3
Nice- I see this turning into a very useful thread. Can you post a pic of the installed lip on your car please-
It's not quite as streetable as it once was.

#19
07-03-2007, 06:30 PM
Join Date: Apr 2007
Location: Chained to my Laptop....
Posts: 3,124
Rep Power: 170
Front Lip DIY #1
Due to the limitation of the forun system (only let's you include 10 images in any one post) I have put the DIY into two posts:
1.
------------------------------
DIY STUFF
------------------------------
Ok so here's the steps. This is a pretty easy install, you just need to have a good eye to line it up before you drill holes and screw down.
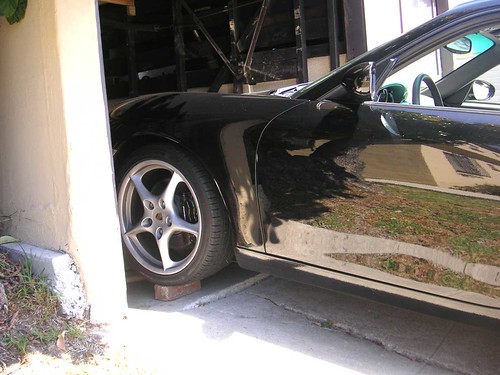
1. You need about 18" to 24" under the car to lay comfortably and adjust / fasten everything. Most of your work will be under the car.
So, get something SAFE to jack up your car with- Don't be ghetto like me with the "angled driveway 2-brick method" - I do not want to be responsible for you getting squished. btw, I used OSHA-approved bricks...
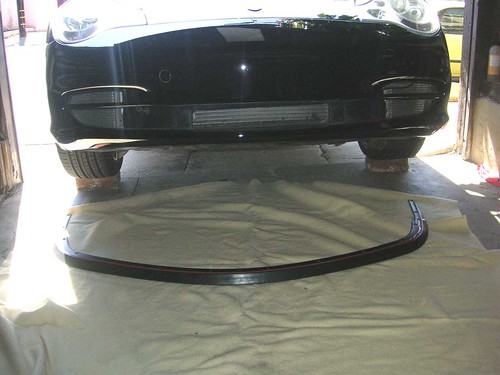
Lay out a blanket after you have the car up high enough and lay the lip under the car: (sorry for the crappy pics, the afternoon sun was coming straight in behind the car)
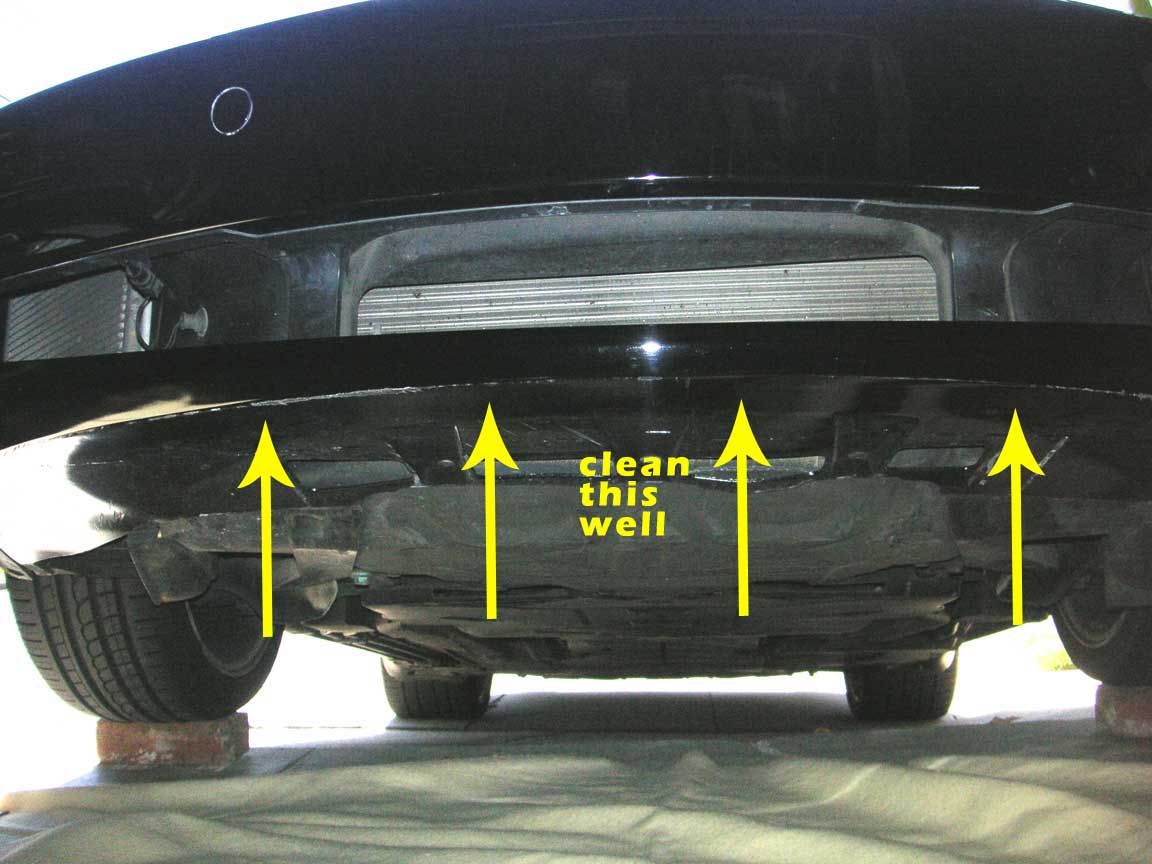
Clean the underside of the bumper and if neccessary chip off any scraped plastic (for those of you who park by braille...). You want a smooth surface.
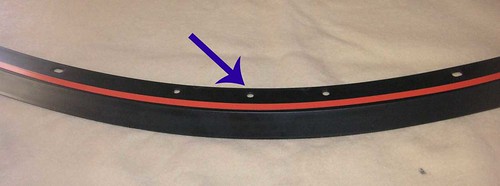
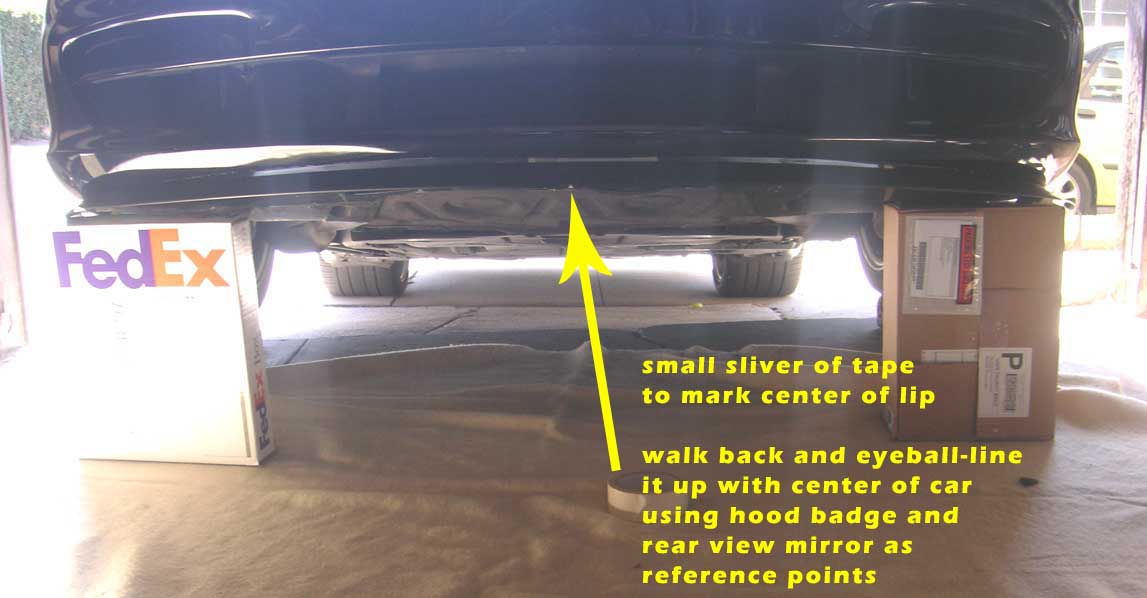
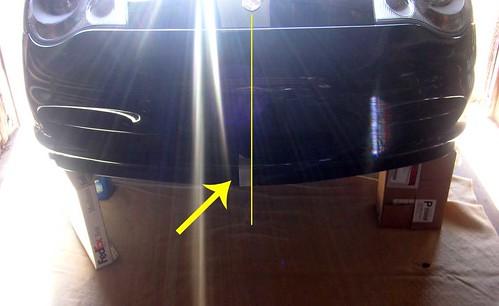
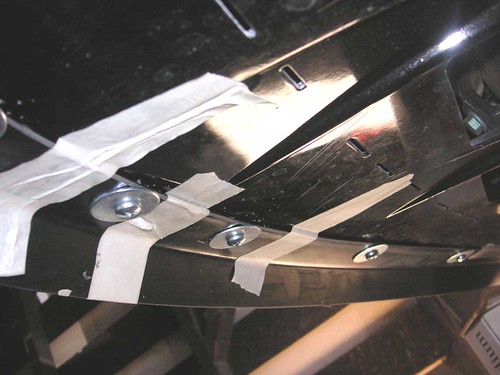
you will want to line up the center of lip with the center line of the car.
I used the center hole on the lip as a reference then stuck a sliver of white tape on the front edge of the lip. when I put the lip against the car the tape sliver gave me a center reference mark for the initial fitment.
It is easiest to get your initial fit if you can sandwich the lip up to the car snugly, then move it around until it looks straight. i used a couple of boxes for the props that held the lip against the bumper. (those free Fedex boxes do come in handy!!)

MEASUREMENT:
I set the center of the lip 1/4" recessed from the front edge of the bumper.
On right and left bumper corners, the mounting side edge of lip should be flush with the underside front edge of bumper.
At the wheelwell sides, you should have approximately 1.2" of the lip ends protruding into the wheelwell area.
If you line up initially to these specs, you are off to a good start.
Now that you have it in place and have adjusted it around to get it even, use a piece of tape on the middle center of lip to hold the lip in place on the car. Ditto for each of the sides nearest the wheel well.
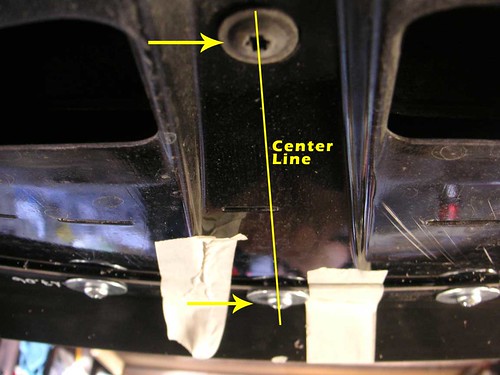
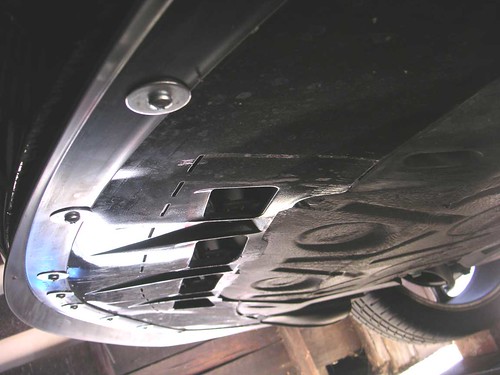
Now crawl under the car and look at the center mounting hole of the lip.
It should line up with the center screw that holds the bumper to the car.
this is a good check to be sure that you have every thing centered. If you do not, you will see a lot of the orange tape of the lip sticking out on one corner of the bumper or the other. So it's pretty easy to tell when you have it just right. You should barely see orange tape at either of the bumper corners or sides.
Now tape the lip to the bumper in several spots to hold it in place.
(This pic is just for reference of line-up- You should not have your screws in yet).
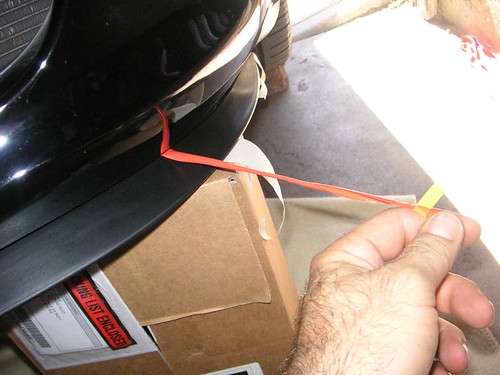
Starting on the drivers side of the lip, grasp the white masking tape handle on the orange sticky cover and begin peeling it off of the adhesive. do this slowly and gently so as not to move the lip. press the adhesive up firmly to bond to car.
1.
------------------------------
DIY STUFF
------------------------------
Ok so here's the steps. This is a pretty easy install, you just need to have a good eye to line it up before you drill holes and screw down.
1. You need about 18" to 24" under the car to lay comfortably and adjust / fasten everything. Most of your work will be under the car.
So, get something SAFE to jack up your car with- Don't be ghetto like me with the "angled driveway 2-brick method" - I do not want to be responsible for you getting squished. btw, I used OSHA-approved bricks...
Lay out a blanket after you have the car up high enough and lay the lip under the car: (sorry for the crappy pics, the afternoon sun was coming straight in behind the car)
Clean the underside of the bumper and if neccessary chip off any scraped plastic (for those of you who park by braille...). You want a smooth surface.
you will want to line up the center of lip with the center line of the car.
I used the center hole on the lip as a reference then stuck a sliver of white tape on the front edge of the lip. when I put the lip against the car the tape sliver gave me a center reference mark for the initial fitment.
It is easiest to get your initial fit if you can sandwich the lip up to the car snugly, then move it around until it looks straight. i used a couple of boxes for the props that held the lip against the bumper. (those free Fedex boxes do come in handy!!)
MEASUREMENT:
I set the center of the lip 1/4" recessed from the front edge of the bumper.
On right and left bumper corners, the mounting side edge of lip should be flush with the underside front edge of bumper.
At the wheelwell sides, you should have approximately 1.2" of the lip ends protruding into the wheelwell area.
If you line up initially to these specs, you are off to a good start.
Now that you have it in place and have adjusted it around to get it even, use a piece of tape on the middle center of lip to hold the lip in place on the car. Ditto for each of the sides nearest the wheel well.
Now crawl under the car and look at the center mounting hole of the lip.
It should line up with the center screw that holds the bumper to the car.
this is a good check to be sure that you have every thing centered. If you do not, you will see a lot of the orange tape of the lip sticking out on one corner of the bumper or the other. So it's pretty easy to tell when you have it just right. You should barely see orange tape at either of the bumper corners or sides.
Now tape the lip to the bumper in several spots to hold it in place.
(This pic is just for reference of line-up- You should not have your screws in yet).
Starting on the drivers side of the lip, grasp the white masking tape handle on the orange sticky cover and begin peeling it off of the adhesive. do this slowly and gently so as not to move the lip. press the adhesive up firmly to bond to car.
Last edited by p0rsch3; 07-04-2007 at 12:32 PM.
#20
07-03-2007, 06:31 PM
Join Date: Apr 2007
Location: Chained to my Laptop....
Posts: 3,124
Rep Power: 170
2.
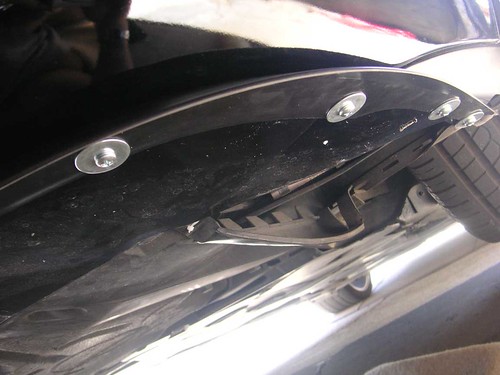
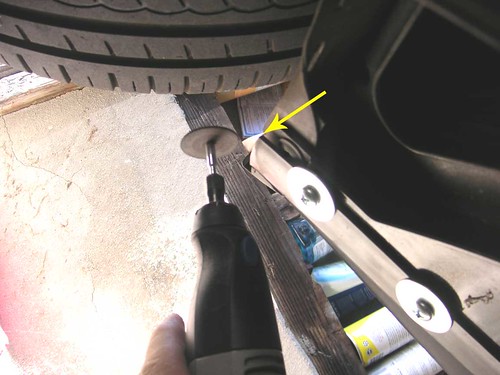
Now, you will begin putting in your screws and washers.
Start with the center and work your way out right / left.
I used a dremel with drill tip to make 1/8" pilot holes, then used a screw gun to put the screws in. Do NOT over-tighten or you will strip the plastic.
I put the screws in snug at first but was still able to slide the washers a bit.
I made a second pass with a hand screwdriver and while pushing the washers forward, tightened each screw.
Put in the rest of the screws and pull tape off. Remove boxes.
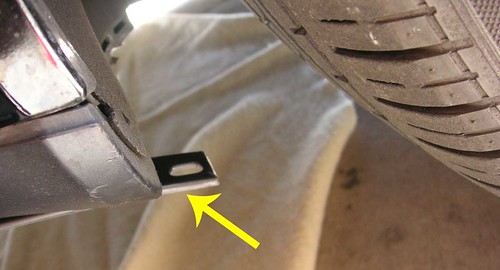
You will have to make one new hole on each end closest to the wheelwell.
Look on far right of pic- I popped in a new scew about 1" from wheelwell.
Use a dremel and cut off the 1" lip overhang on each side.
Check your screws for tighness, and you are done!
Now, you will begin putting in your screws and washers.
Start with the center and work your way out right / left.
I used a dremel with drill tip to make 1/8" pilot holes, then used a screw gun to put the screws in. Do NOT over-tighten or you will strip the plastic.
I put the screws in snug at first but was still able to slide the washers a bit.
I made a second pass with a hand screwdriver and while pushing the washers forward, tightened each screw.
Put in the rest of the screws and pull tape off. Remove boxes.
You will have to make one new hole on each end closest to the wheelwell.
Look on far right of pic- I popped in a new scew about 1" from wheelwell.
Use a dremel and cut off the 1" lip overhang on each side.
Check your screws for tighness, and you are done!
Last edited by p0rsch3; 07-04-2007 at 11:55 AM.

#23
07-03-2007, 08:46 PM
Join Date: Apr 2007
Location: Chained to my Laptop....
Posts: 3,124
Rep Power: 170
Originally Posted by cdaniels
I want to change the front bumper on my year 2000 996 and like the GT2 look. Any tips where to get the best quality GT2 aftermarket front bumper for my car?
http://www.gmgracing.com/porsche_aero.shtml


#27
07-06-2007, 01:39 AM
Join Date: Apr 2007
Location: Chained to my Laptop....
Posts: 3,124
Rep Power: 170
Holy hell- this lip makes a HUGE difference at speed!
I had been regularly taking the car up to about 90+ prior to adding the lip, and noting at what speed it started to feel 'light' in front and washy over the freeway pavement dips or fast lane changes (usually around 80+mph). I pretty much traverse the same stretch of freeway. When the rear wing deploys it seemed to add to the problem of the front lightness and porpoising.
so tonight, I had a nice cruise in my pcar to Long Beach along with a buddy of mine driving his tricked 944.
Hitting the same stretches of freeway at 95+ and some other stretches that I used to slow down for, the car was tight. No front bobbing and it felt very good, like it wanted more.
I really didn't expect much from this mod since it is a pretty small lip, but really, it did make a dramatic difference in feel and stability.
anyhow, just wanted to share that. I'm definitely pleased.
#28
07-06-2007, 07:11 AM
Registered User
Join Date: Nov 2006
Location: Crazy Town USA
Age: 62
Posts: 839
Rep Power: 51
I have looked everywhere for the same type of lip for my 99 C2 that you have. It is a simple look that does not kill the stock look. Wonder if there was a GT2 style lip for the 98-99s...I think the other options look crappy that I have seen
Last edited by YoopsRacing; 07-06-2007 at 07:51 AM.
#29
07-06-2007, 09:23 AM
Join Date: Apr 2007
Location: Chained to my Laptop....
Posts: 3,124
Rep Power: 170
Originally Posted by YoopsRacing
I have looked everywhere for the same type of lip for my 99 C2 that you have. It is a simple look that does not kill the stock look. Wonder if there was a GT2 style lip for the 98-99s...I think the other options look crappy that I have seen
They are both familiar with this project as i've thoroughly bugged the **** out of both of them.. LOL.
There should be a 99 GT2 lip equivalent they can look up and send you, if you are willing to gamble shipping costs to try it out. Maybe this one will fit as well, the under-bumper on the 99 looks like it might be of similar measurement.
-Kurt
#30
07-07-2007, 10:03 PM
Join Date: Apr 2007
Location: Chained to my Laptop....
Posts: 3,124
Rep Power: 170
Originally Posted by jstgermaine
Sure thing. It'll be Thursday for the pictures and Friday for the posting though...the 996 rarely sees the light of day with the exception of track days.
It's not quite as streetable as it once was.
It's not quite as streetable as it once was.