
High Mileage '06 Carrera S Journal [Equinox]

#137
 08-23-2012, 12:15 AM
Join Date: Dec 2011
Location: Beaumont, TX
Posts: 123
Rep Power: 26 

easiest answer is, you don't need to bleed your brakes when you change pads/rotors. I don't.

edit: basically, if you don't open the bleeder valve on the caliper and release fluid - there is no need to bleed the lines of air. You can compress the pistons on the calipers to make room for the new pads with a brake spoon, or simple pry bar / flat head screw driver all without opening the bleeder valve. It will compress with little relative effort.
Last edited by Equinox; 08-23-2012 at 12:32 AM.
#138
08-23-2012, 01:14 AM
Join Date: Dec 2011
Location: Beaumont, TX
Posts: 123
Rep Power: 26
Brake pads, rotor replacement, and adjust parking brake
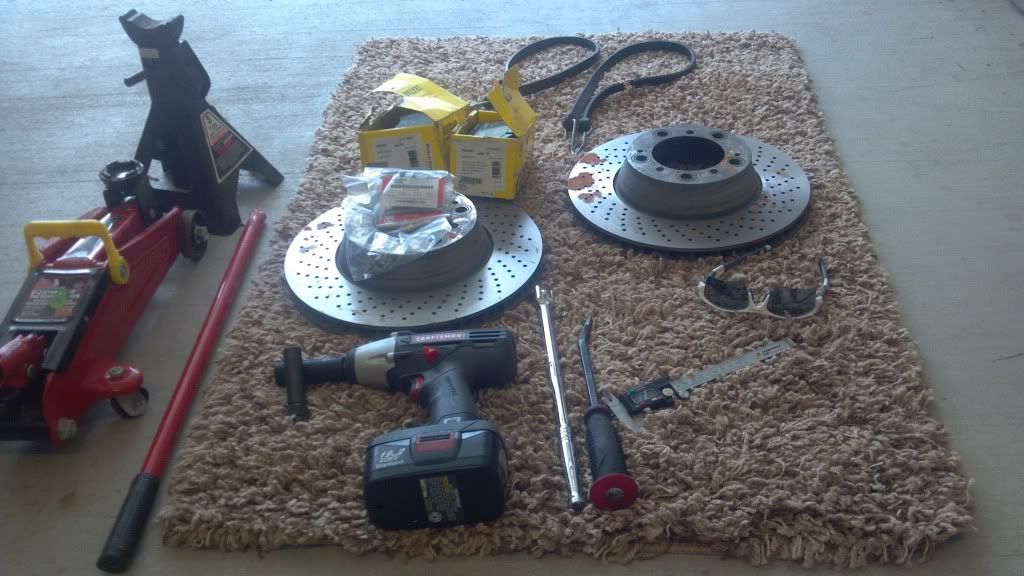
Tools:
Breaker bar and key and matching socket (to remove your lug nuts) breaker shown
Jack stand & Jack shown
flat head screw driver, medium
phillips head screw driver, medium
10MM Allen wrench (to loosen caliper bolts)
Metal/claw hammer (to knock the pin out of the caliper that holds the brake pads)
Rubber mallet (to bang on the rotor if it sticks)
Medium Prybar (to pry out the brake pads, you can also just use your flathead) shown
Bungee cord (to hold the caliper once you unbolt it) shown
Flashlight (to see into hub holes, and adjust your parking brake)
Parts:
Rotors (only replaced my rear) shown
Pads, front and back (I used Textar) shown
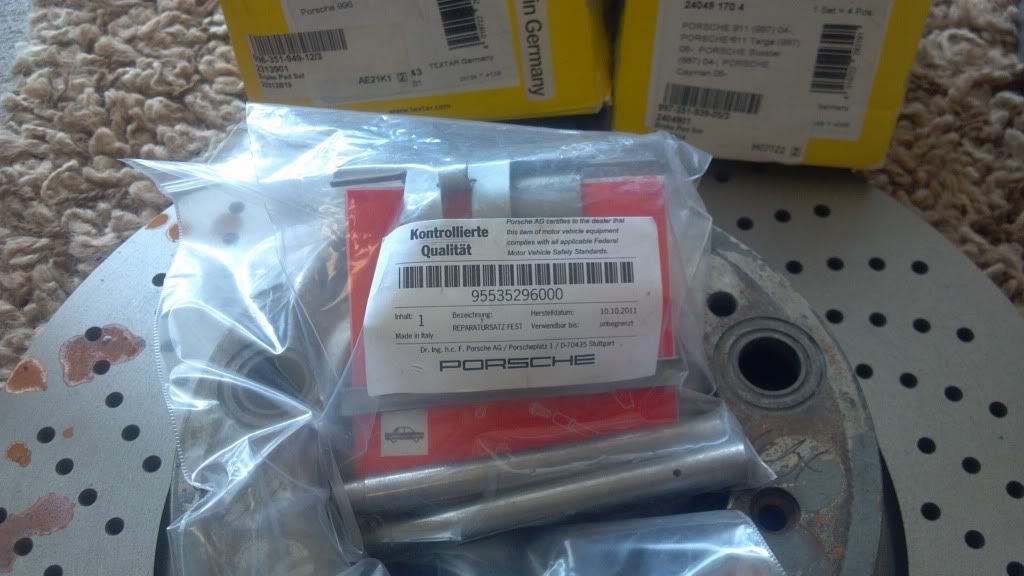
Porsche Rebuild kit (optional, contains 2 pins to hold brake pads 4 screws to hold rotors) shown
Replacement caliper piston shims/silencers (optional, my rears were original @ 76,000 miles, and rusted out, fronts apparently have been replaced at around est. 50k) link here
 .
.
Above: Various tools I threw together before the project, as well as parts. Of note, a 1/2" breaker bar to remove the lug nuts, a pry bar to compress the caliper brake pistons, bungee cords to hang the calipers when I remove them, jack stand, jack. Not in the picture, but needed are, flat head screw driver to pry sensors and cotter pins out and adjust parking brake, phillips head screw driver to remove rotor screws, 10MM allen wrench to remove caliper bolts, rubber mallet to bang on rotor, a flash light to adjust parking brake, and ring clip plier if you have them, for the rear brake pad sensors. You may improvise, but these worked the best for me. (I didn't end up using the impact, I expected to use it to loosen my lug nuts)
Above: Caliper Spring Kit, (I only replaced my rear set, rear set and PN shown) click for link
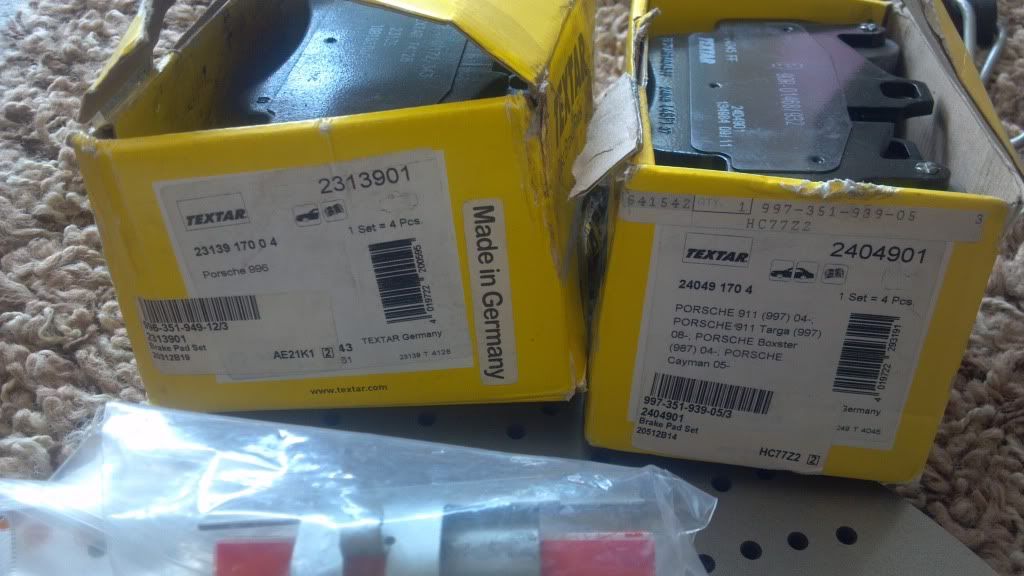
Above: Front (on the left) and rear (on the right) brake pads from textar. A little cheaper than oem, ~$75 for fronts, ~$110 rear. Porsche OEM pads front cost ~$215, and rears costs ~$140. I don't race, I only highway it everywhere. Racers may research pads more than I. These are comparable to OEM, and still made in Germany, Bonus!
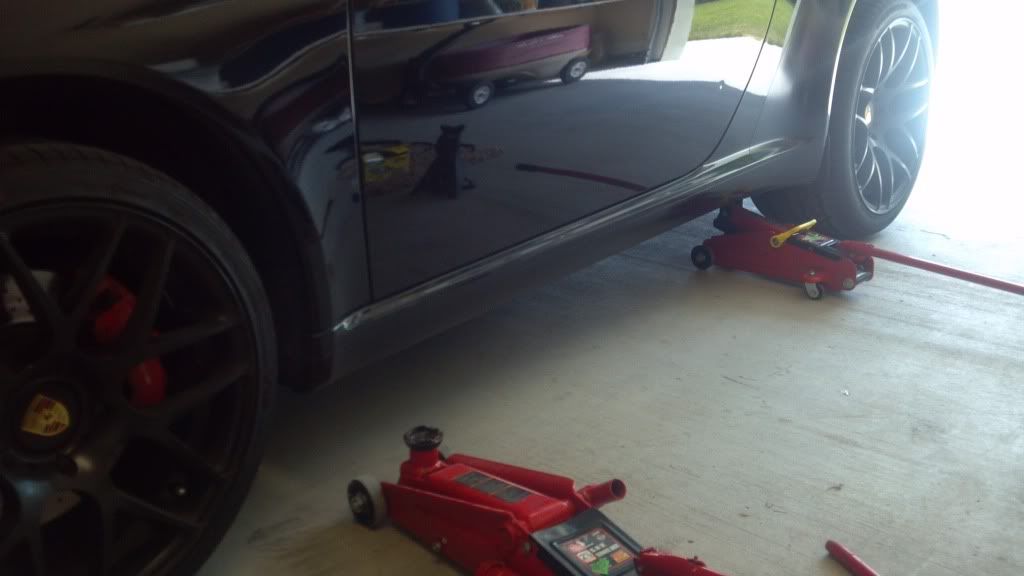
Above: I started with the front brakes, but to get a jack under the front jack point, I had to jack up the rear first. The rear jacking point is higher, and thus my jack will fit under the car, raising it enough to put the other jack under the front jack point. I'm silly. Make sure to use jack stands for safety, as jacks WILL LOWER ON YOU OVER TIME. No joke.

Above: Before getting the tire all the way off the ground, loosen the lug nuts a little, so when the tire is off the ground, it won't just spin when you try and loosen super tight lights. Raise up the car to a comfortable working height, and remove your wheel(s)

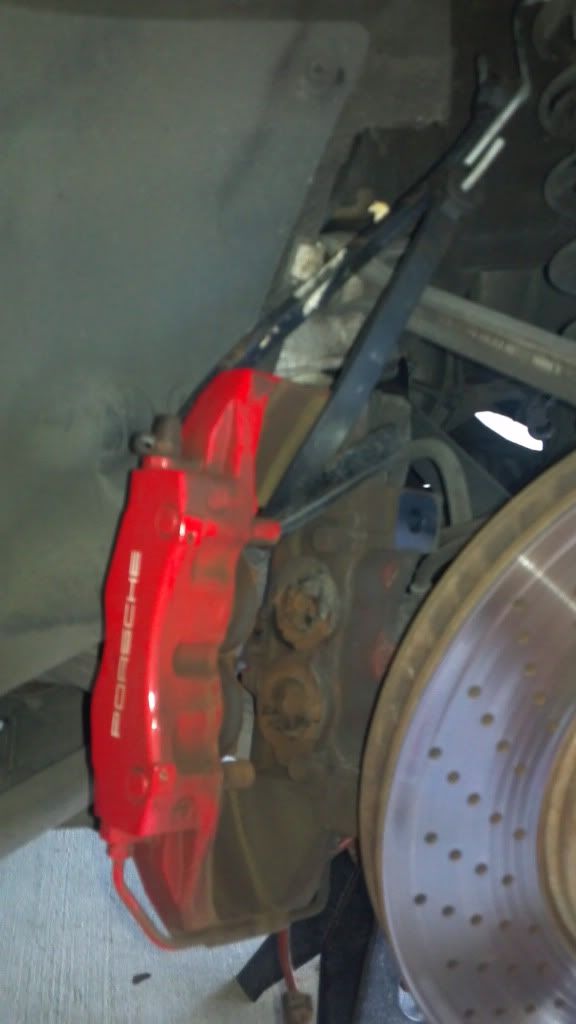
Above: We've revealed brakes. Pictured is the front driver side, but some of my pictures jump around for best quality and detail when I talk about trouble spots. I did not replace the front rotors. They are fine IMHO. It appears they were replaced previously, possibly around 50k according to car fax. (they are shown with at about 76k, making it about 26k miles on them?)
Above: First thing, remove the sensors that sit in your pad. The FRONT PAD SENSORS can be removed by prying on the underside of them with a screw driver. The rears are a little different, and I will cover in a moment.

Above: Now the inside sensor of the FRONT BRAKES ONLY. Pull the wire out from the metal spring clip that holds in the brake pads, and let the sensor wires hang in the wheel well out of the way.

Above: For the rear brake sensors, I had to bust out my ring clip puller, below you will see why. You can improvise with anything you want, but I had this thing I never use, so yeah.
Above: Here is the sensor on the REAR BRAKE PADS ONLY, seen with the pad already pulled out of the caliper. You'll notice, unlike the front sensors being held in with plastic, the rear pads have little metal tension clips.

Above: You can see I am compressing the tension clips together, and then I pull up and out of the recess. You can probably do this with sharp needle nose pliers. I still ended up bending the little metal clips, but nothing that a little bit of MORE BENDING couldn't fix. You can remove the rear brake pads out of the caliper without first removing the sensors - this gives you more room to work getting the sensors out of the old pads.

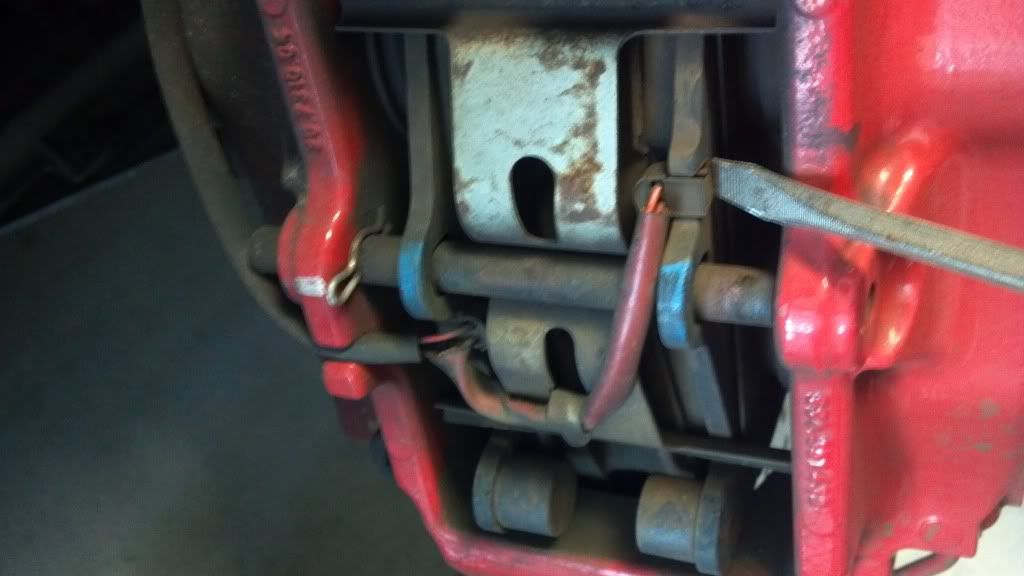
Now that the sensors are out of the way, you can pull up on the cotter pin to unlock the caliper brake pad pin. If the pin is oriented so you can't get to it easily, just use some toothed pliers and rotate the large metal pin so the cotter pin is easier to get too.

Above: Now tap the large metal pin towards the inside of the car to release the spring clip and pads. It will fall out the other side and onto the floor. I used my flathead and a claw hammer. Wear safety protection! (passenger caliper shown to confuse you, so caliper is on opposite side of rotor.)

Above: The old hardware shown. They actually are in good enough shape to reuse. I wouldn't suggest sanding them clean unless you plan on painting them with high temp paint - if you sand them clean and DON'T coat them, they will oxidize again, and become even weaker. Just leave the rust be, and it will protect the material under it.
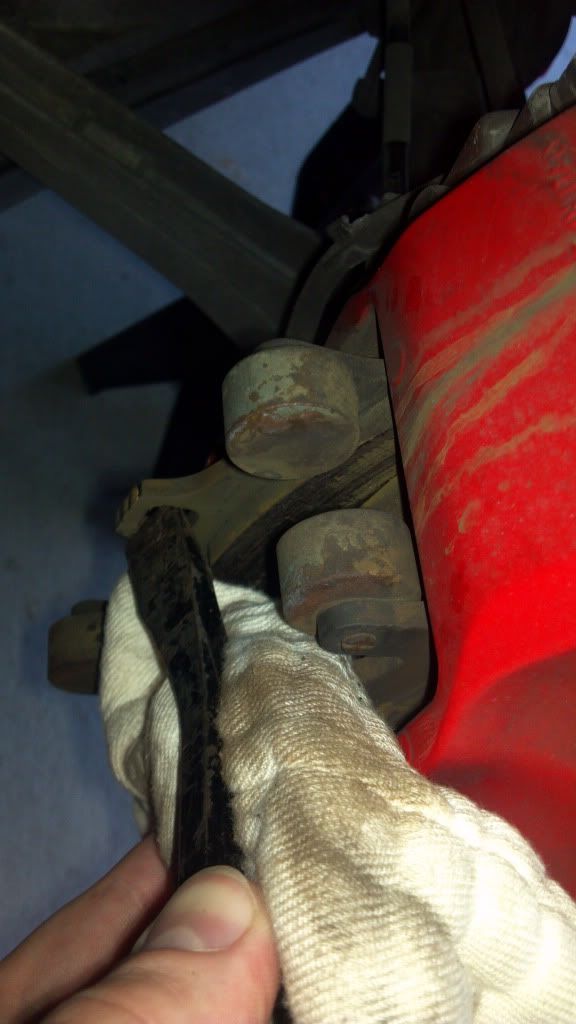
Above: The brake pads can be pried out of the caliper. I used a pry bar, and pried against the caliper casting. It wasn't very difficult at all, and I used a heavy cloth to keep the pry bar from scratching the red caliper.

Above: As you can see, the hole the sensor fits into, how close the worn pad is to exposing it to the spinning rotor. If the rotor gets to the point it hits the sensor, the dash will tell you, you need new pads - but you will also need new sensors, usually. I made it just in time
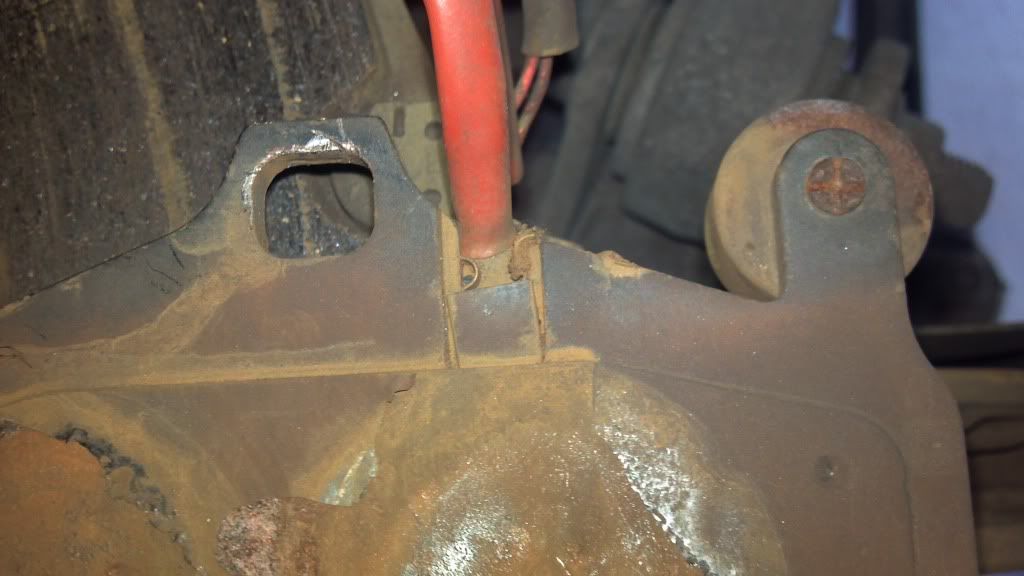
Above: Okay, we need to get the caliper out of the way, in order to remove and replace the rotors. So ON THE FRONT CALIPERS ONLY, you need to use a 10mm socket, and unbolt the brake line bracket from the small holding brace on the strut. Just unbolt the bracket, and let it hang. On the rear, you don't have to do this, as it's held down with a little clip you can undo with your finger if memory serves me.

Above: on both front and rear calipers, you need to unbolt the two 10mm allen head bolts that attach it to the spindle. Have your bungee ready to take the weight of the caliper once you remove both of these.
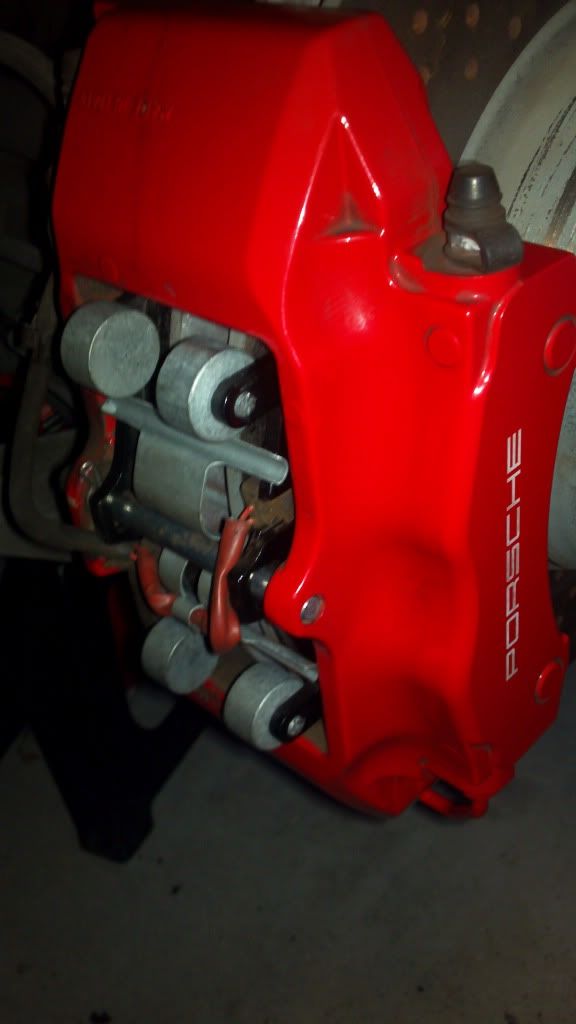
Above Run the bungee cord through the caliper, and hang it on your spring up above. This will take the weight of the caliper, and keep it from ripping cords and lines. This is why you don't have to undo a brake line. Shown is my rear caliper, and you can see the rusted crap all over the pistons. This is my brake pad dampeners that have corroded. I should have bought new ones. I'll have to revisit them when I have time. Here is a link of the part when it's not rusted to death
Above: The rotor is held on by two medium sized phillips screws right on the front. I didn't have any trouble loosening them, but replacement screws come with the supplied Porsche kit. If you have trouble removing these, you can spray a little WD40 on them first.
Above: Pull off your rotor. Sometimes it will release just by hand, and some times you will have to coax it with a rubber mallet. Remember. THE PARKING BRAKE MUST BE OFF TO REMOVE THE REAR ROTORS. The "correct" way to release the rotor from the hub is to reuse your little screws from the rotors, and screw them into the threaded holes on the front of the rotor face (different than the holes you unscrewed them from) and you tighten them back in. They push against the hub and pop off the rotors. This also has a chance of screwing up the threads of your screws - which is why Porsche recommended using new ones every time (or you could just bang on the effing rotor).

Above: Under the rear rotors, is the parking brake ala drum brake. This is why it's bloody hard to remove the rear rotor if you have the parking brake on. Don't be that guy. Now despite my drum pads being pretty low, I don't use my eBrake other than to park; Some people may use it in autocross events, and this is who should replace the drum shoes if they look like this.
Instead of replacing these shoes, I went ahead and adjusted my parking brake to grip better. As your drum shoe wears away, the pad has a bigger gap to cover to grip the inside of the rotor's drum, so you have to pull back farther on your ebrake. Eventually, you can't pull back far enough on the eBrake to make it hold worth a damn, this is also when you should replace your shoes. Mine has become admittedly weak when I engage the ebrake to park, and when the ebrake is on, and I push on the car, I can hear a metal squeak coming from the rear wheels. This is because the shoe is too loose to grip, and it just makes noise. In the end, even if you don't have an issue with your eBrake, you should adjust it while you're down here, even if you've never done it. It's super simple.
Above: Put your new rotor on, and screw the two phillips screws back in to hold it. Tighten BOTH lightly then tighten. If you tighten one by itself, the rotor may seat incorrectly. The chamfer on the screws help align the rotor up. (Note, this image is of me removing an old rotor, I didn't take one of me installing the new one, lol)

Above: Un-bungee your caliper and bolt that sucker back up to the strut and spindle with your 10mm allen wrench. 62ft/lbs, or since you may not have a torque wrench like me, man snug tight, plus an 1/8th turn more. Yeah, I said it. Anyways, now take your pry bar, and spread out the pistons in the caliper, to make room for your new, thicker, pads. Just push against the damper shim right above each piston, and SLOWLY push the piston back into the caliper. If you do it too fast, the fluid will push back out all the other pistons in the caliper; pushing slow, allows the fluid to actually get pushed back up the lines and into the brake reservoir. Alternate back and forth once or twice with the four pistons in the caliper, pushing them back, and in about 30 seconds, you'll have them all pushed nearly flush with the caliper; Plenty of room for your new pads. You should easily be able to make enough room to slide the new pads in; if you don't have enough room, push in the piston a little more, or make sure the caliper is parallel with the rotor (if you mounted the caliper and rotor correctly). This part shouldn't be very forceful, the piston should slide back into the caliper each time.
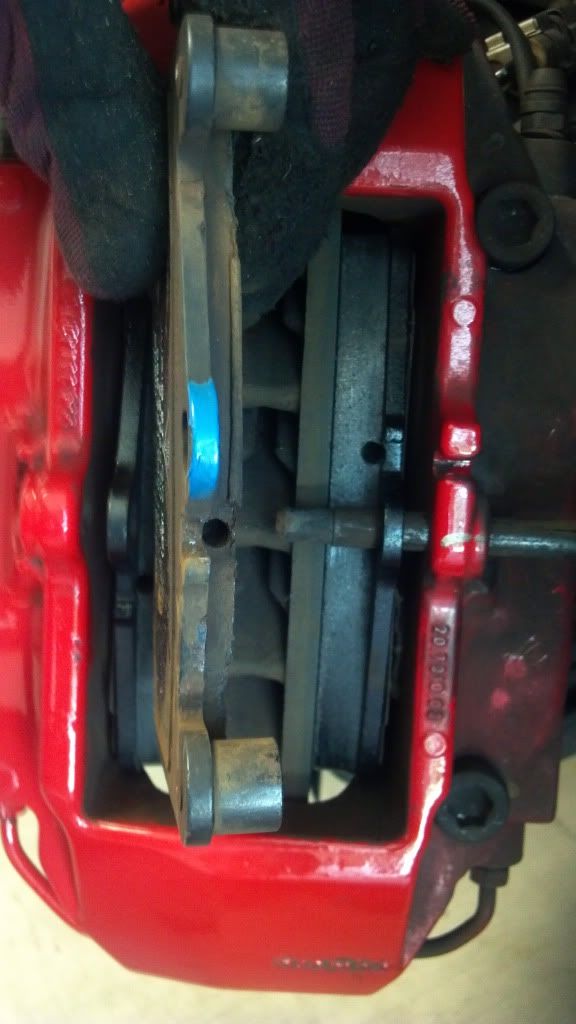
Above: Slide your new brake pads in, and use your (new, if you bought a replacement kit) large brake pad retaining pin to check that they seat far enough down that the pin will slide through the guide holes on the pads. Note I am holding the old pad in front of the new ones to show you the difference. You can see the hole that the pad life sensor sits in, and how the new pad sets it a lot farther back from the rotor now. Next, you can put your (also new, if you bought a set) compression spring clip over the back of the pads, compress down with your fingers, and slide your metal pin all the way through to the outside of the caliper. Slide your cotter pin in the end of the large brake pad retaining pin, to keep it from falling out, and clip your brake sensors back into the brake pads. Finally, check your brake line to make sure it's not caught on something behind the strut - and route it back how it was before your removed the caliper (fronts need to be rebolted to the strut with a 10mm socket, and rears should have a small clip. I'm not so sure about the rears TBH.
Above: A finished rear caliper. Ensure your sensors are clipped in well to the brake pads. I used a flat head screw driver to press on the tops until they seated properly, and that's it! You're done!
NOTE: Most people and brake pad mfg'ers suggest bedding in your brake pads by going out and driving up to 60mph and hitting the brakes pretty hard, and repeating twice more. This is to make your pads run parallel to your rotors and to form "friction coal!", and is really only needed if you are re-using your rotors, and they are worn a little, i.e., valleys and cuts into them from previous pads. They also say, this is only for your front pads, as doing this for your rears is "impractical" as you'd have to drag your pads for several miles to get them to temperature.
Textar's procedure to bedding in brake pads
Since my rear rotors were new, they don't need to be bedded in, in my cynical opinion, but my fronts rotors are not new, so they do. Thus, I have to go out and drive like a student driver to create magical friction coal "that don't apply to rear brakes." Any who, time for some brake stomping. Let's go! (I didn't actually do this, just so you know. Form your own decision on this one.)
Tools:
Breaker bar and key and matching socket (to remove your lug nuts) breaker shown
Jack stand & Jack shown
flat head screw driver, medium
phillips head screw driver, medium
10MM Allen wrench (to loosen caliper bolts)
Metal/claw hammer (to knock the pin out of the caliper that holds the brake pads)
Rubber mallet (to bang on the rotor if it sticks)
Medium Prybar (to pry out the brake pads, you can also just use your flathead) shown
Bungee cord (to hold the caliper once you unbolt it) shown
Flashlight (to see into hub holes, and adjust your parking brake)
Parts:
Rotors (only replaced my rear) shown
Pads, front and back (I used Textar) shown
Porsche Rebuild kit (optional, contains 2 pins to hold brake pads 4 screws to hold rotors) shown
Replacement caliper piston shims/silencers (optional, my rears were original @ 76,000 miles, and rusted out, fronts apparently have been replaced at around est. 50k) link here
.Above: Various tools I threw together before the project, as well as parts. Of note, a 1/2" breaker bar to remove the lug nuts, a pry bar to compress the caliper brake pistons, bungee cords to hang the calipers when I remove them, jack stand, jack. Not in the picture, but needed are, flat head screw driver to pry sensors and cotter pins out and adjust parking brake, phillips head screw driver to remove rotor screws, 10MM allen wrench to remove caliper bolts, rubber mallet to bang on rotor, a flash light to adjust parking brake, and ring clip plier if you have them, for the rear brake pad sensors. You may improvise, but these worked the best for me. (I didn't end up using the impact, I expected to use it to loosen my lug nuts)
Above: Caliper Spring Kit, (I only replaced my rear set, rear set and PN shown) click for link
Above: Front (on the left) and rear (on the right) brake pads from textar. A little cheaper than oem, ~$75 for fronts, ~$110 rear. Porsche OEM pads front cost ~$215, and rears costs ~$140. I don't race, I only highway it everywhere. Racers may research pads more than I. These are comparable to OEM, and still made in Germany, Bonus!
Above: I started with the front brakes, but to get a jack under the front jack point, I had to jack up the rear first. The rear jacking point is higher, and thus my jack will fit under the car, raising it enough to put the other jack under the front jack point. I'm silly. Make sure to use jack stands for safety, as jacks WILL LOWER ON YOU OVER TIME. No joke.
Above: Before getting the tire all the way off the ground, loosen the lug nuts a little, so when the tire is off the ground, it won't just spin when you try and loosen super tight lights. Raise up the car to a comfortable working height, and remove your wheel(s)
Above: We've revealed brakes. Pictured is the front driver side, but some of my pictures jump around for best quality and detail when I talk about trouble spots. I did not replace the front rotors. They are fine IMHO. It appears they were replaced previously, possibly around 50k according to car fax. (they are shown with at about 76k, making it about 26k miles on them?)
Above: First thing, remove the sensors that sit in your pad. The FRONT PAD SENSORS can be removed by prying on the underside of them with a screw driver. The rears are a little different, and I will cover in a moment.
Above: Now the inside sensor of the FRONT BRAKES ONLY. Pull the wire out from the metal spring clip that holds in the brake pads, and let the sensor wires hang in the wheel well out of the way.
Above: For the rear brake sensors, I had to bust out my ring clip puller, below you will see why. You can improvise with anything you want, but I had this thing I never use, so yeah.
Above: Here is the sensor on the REAR BRAKE PADS ONLY, seen with the pad already pulled out of the caliper. You'll notice, unlike the front sensors being held in with plastic, the rear pads have little metal tension clips.
Above: You can see I am compressing the tension clips together, and then I pull up and out of the recess. You can probably do this with sharp needle nose pliers. I still ended up bending the little metal clips, but nothing that a little bit of MORE BENDING couldn't fix. You can remove the rear brake pads out of the caliper without first removing the sensors - this gives you more room to work getting the sensors out of the old pads.
Now that the sensors are out of the way, you can pull up on the cotter pin to unlock the caliper brake pad pin. If the pin is oriented so you can't get to it easily, just use some toothed pliers and rotate the large metal pin so the cotter pin is easier to get too.
Above: Now tap the large metal pin towards the inside of the car to release the spring clip and pads. It will fall out the other side and onto the floor. I used my flathead and a claw hammer. Wear safety protection! (passenger caliper shown to confuse you, so caliper is on opposite side of rotor.)
Above: The old hardware shown. They actually are in good enough shape to reuse. I wouldn't suggest sanding them clean unless you plan on painting them with high temp paint - if you sand them clean and DON'T coat them, they will oxidize again, and become even weaker. Just leave the rust be, and it will protect the material under it.
Above: The brake pads can be pried out of the caliper. I used a pry bar, and pried against the caliper casting. It wasn't very difficult at all, and I used a heavy cloth to keep the pry bar from scratching the red caliper.
Above: As you can see, the hole the sensor fits into, how close the worn pad is to exposing it to the spinning rotor. If the rotor gets to the point it hits the sensor, the dash will tell you, you need new pads - but you will also need new sensors, usually. I made it just in time
Above: Okay, we need to get the caliper out of the way, in order to remove and replace the rotors. So ON THE FRONT CALIPERS ONLY, you need to use a 10mm socket, and unbolt the brake line bracket from the small holding brace on the strut. Just unbolt the bracket, and let it hang. On the rear, you don't have to do this, as it's held down with a little clip you can undo with your finger if memory serves me.
Above: on both front and rear calipers, you need to unbolt the two 10mm allen head bolts that attach it to the spindle. Have your bungee ready to take the weight of the caliper once you remove both of these.
Above Run the bungee cord through the caliper, and hang it on your spring up above. This will take the weight of the caliper, and keep it from ripping cords and lines. This is why you don't have to undo a brake line. Shown is my rear caliper, and you can see the rusted crap all over the pistons. This is my brake pad dampeners that have corroded. I should have bought new ones. I'll have to revisit them when I have time. Here is a link of the part when it's not rusted to death
Above: The rotor is held on by two medium sized phillips screws right on the front. I didn't have any trouble loosening them, but replacement screws come with the supplied Porsche kit. If you have trouble removing these, you can spray a little WD40 on them first.
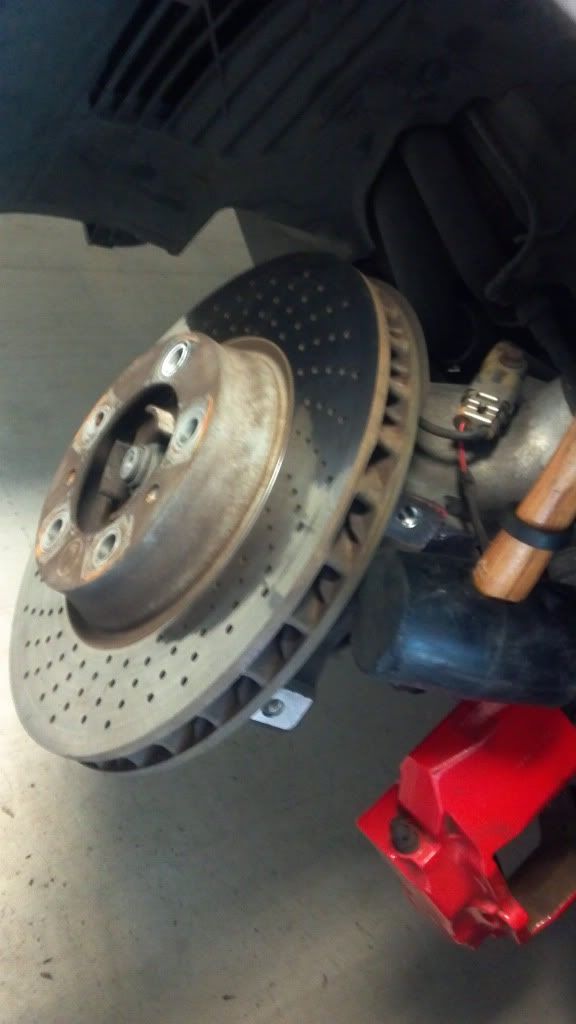
Above: Pull off your rotor. Sometimes it will release just by hand, and some times you will have to coax it with a rubber mallet. Remember. THE PARKING BRAKE MUST BE OFF TO REMOVE THE REAR ROTORS. The "correct" way to release the rotor from the hub is to reuse your little screws from the rotors, and screw them into the threaded holes on the front of the rotor face (different than the holes you unscrewed them from) and you tighten them back in. They push against the hub and pop off the rotors. This also has a chance of screwing up the threads of your screws - which is why Porsche recommended using new ones every time (or you could just bang on the effing rotor).
Above: Under the rear rotors, is the parking brake ala drum brake. This is why it's bloody hard to remove the rear rotor if you have the parking brake on. Don't be that guy. Now despite my drum pads being pretty low, I don't use my eBrake other than to park; Some people may use it in autocross events, and this is who should replace the drum shoes if they look like this.
Instead of replacing these shoes, I went ahead and adjusted my parking brake to grip better. As your drum shoe wears away, the pad has a bigger gap to cover to grip the inside of the rotor's drum, so you have to pull back farther on your ebrake. Eventually, you can't pull back far enough on the eBrake to make it hold worth a damn, this is also when you should replace your shoes. Mine has become admittedly weak when I engage the ebrake to park, and when the ebrake is on, and I push on the car, I can hear a metal squeak coming from the rear wheels. This is because the shoe is too loose to grip, and it just makes noise. In the end, even if you don't have an issue with your eBrake, you should adjust it while you're down here, even if you've never done it. It's super simple.
Above: Put your new rotor on, and screw the two phillips screws back in to hold it. Tighten BOTH lightly then tighten. If you tighten one by itself, the rotor may seat incorrectly. The chamfer on the screws help align the rotor up. (Note, this image is of me removing an old rotor, I didn't take one of me installing the new one, lol)
Above: Un-bungee your caliper and bolt that sucker back up to the strut and spindle with your 10mm allen wrench. 62ft/lbs, or since you may not have a torque wrench like me, man snug tight, plus an 1/8th turn more. Yeah, I said it. Anyways, now take your pry bar, and spread out the pistons in the caliper, to make room for your new, thicker, pads. Just push against the damper shim right above each piston, and SLOWLY push the piston back into the caliper. If you do it too fast, the fluid will push back out all the other pistons in the caliper; pushing slow, allows the fluid to actually get pushed back up the lines and into the brake reservoir. Alternate back and forth once or twice with the four pistons in the caliper, pushing them back, and in about 30 seconds, you'll have them all pushed nearly flush with the caliper; Plenty of room for your new pads. You should easily be able to make enough room to slide the new pads in; if you don't have enough room, push in the piston a little more, or make sure the caliper is parallel with the rotor (if you mounted the caliper and rotor correctly). This part shouldn't be very forceful, the piston should slide back into the caliper each time.
Above: Slide your new brake pads in, and use your (new, if you bought a replacement kit) large brake pad retaining pin to check that they seat far enough down that the pin will slide through the guide holes on the pads. Note I am holding the old pad in front of the new ones to show you the difference. You can see the hole that the pad life sensor sits in, and how the new pad sets it a lot farther back from the rotor now. Next, you can put your (also new, if you bought a set) compression spring clip over the back of the pads, compress down with your fingers, and slide your metal pin all the way through to the outside of the caliper. Slide your cotter pin in the end of the large brake pad retaining pin, to keep it from falling out, and clip your brake sensors back into the brake pads. Finally, check your brake line to make sure it's not caught on something behind the strut - and route it back how it was before your removed the caliper (fronts need to be rebolted to the strut with a 10mm socket, and rears should have a small clip. I'm not so sure about the rears TBH.
Above: A finished rear caliper. Ensure your sensors are clipped in well to the brake pads. I used a flat head screw driver to press on the tops until they seated properly, and that's it! You're done!
NOTE: Most people and brake pad mfg'ers suggest bedding in your brake pads by going out and driving up to 60mph and hitting the brakes pretty hard, and repeating twice more. This is to make your pads run parallel to your rotors and to form "friction coal!", and is really only needed if you are re-using your rotors, and they are worn a little, i.e., valleys and cuts into them from previous pads. They also say, this is only for your front pads, as doing this for your rears is "impractical" as you'd have to drag your pads for several miles to get them to temperature.
Textar's procedure to bedding in brake pads
Since my rear rotors were new, they don't need to be bedded in, in my cynical opinion, but my fronts rotors are not new, so they do. Thus, I have to go out and drive like a student driver to create magical friction coal "that don't apply to rear brakes." Any who, time for some brake stomping. Let's go! (I didn't actually do this, just so you know. Form your own decision on this one.)
Last edited by Equinox; 08-24-2012 at 03:00 AM.
#139
08-23-2012, 02:52 AM
Join Date: Dec 2011
Location: Beaumont, TX
Posts: 123
Rep Power: 26
Now, to adjust your parking brake:
Basically, just watch this -
Above: I did the same thing in the video, but here are my pictures. This image is after I've taken off the rear rotor, which isn't required, but I'm just showing you to understand what is going on.
Your drum shoe, when the parking brake is pulled, expands outwards, rubbing the drum shoe on the inside drum of the rear brake rotor. As your drum shoe wears away, the pad has a bigger gap to cover to grip the inside of the rotor's drum, so you have to pull back farther on your ebrake to hit the inside lining of the rotor drum. Eventually, you can't pull back far enough on the eBrake to make it hold worth a damn, this is also when you should replace your shoes. Mine has become admittedly weak when I engage the ebrake to park, and when the ebrake is on, and I push on the car, I can hear a metal squeak coming from the rear wheels. This is because the shoe is too loose to grip, and it just makes noise. In my opnion, because I can pull up higher on the ebrake, and it then engages tightly, I don't need to replace my shoes. This is a risk I'm willing to take, you may not want too. Also, Autozone didn't have the brake shoes in stock until next week, so I said **** it. In the end, even if you don't have an issue with your ebrake, you should adjust it while you're down here, even if you've never done it. It's super simple. Once again, it does not require your rotor to be taken off, only the rear rim and tire. I have it off to explain what is going on.
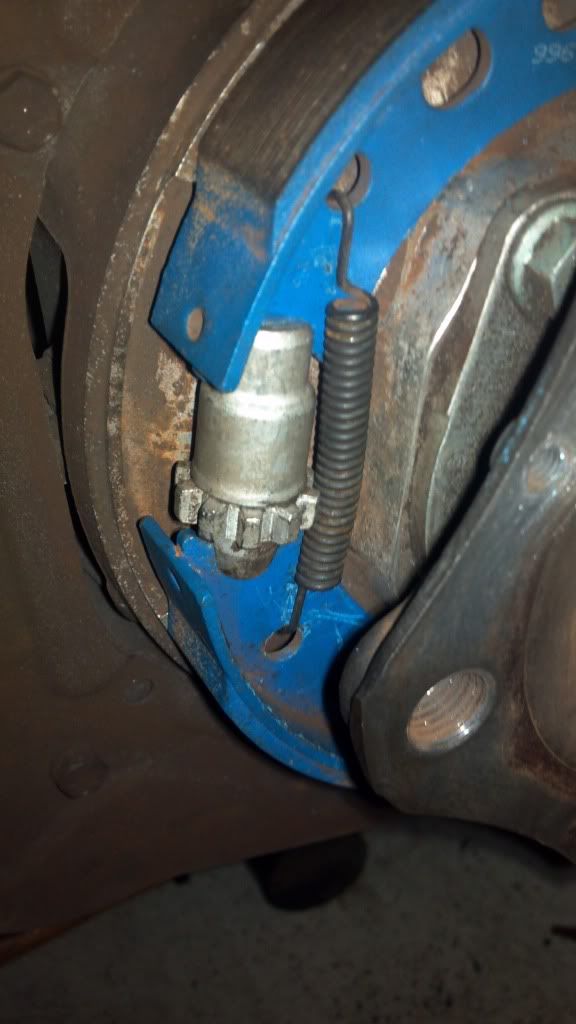
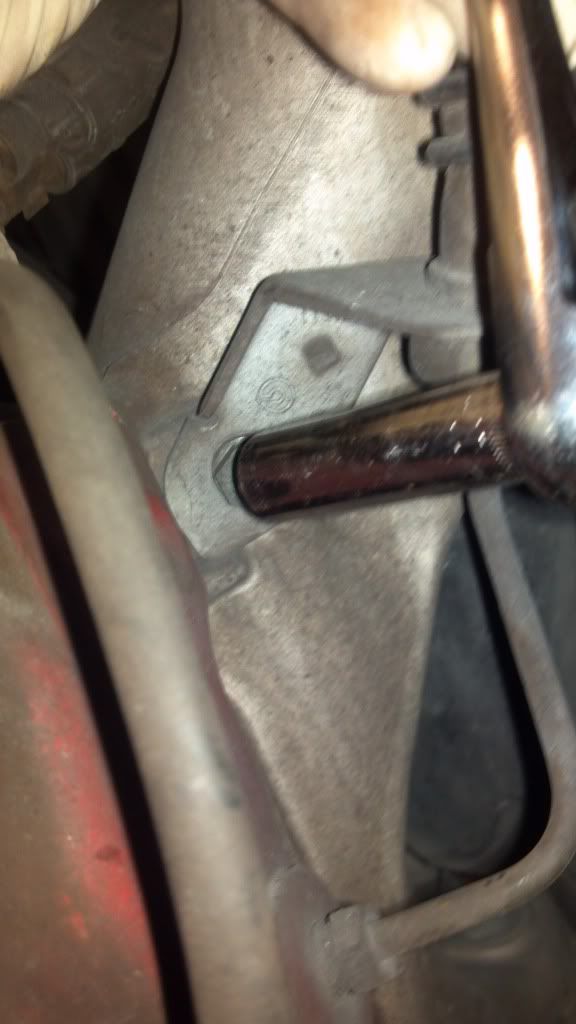
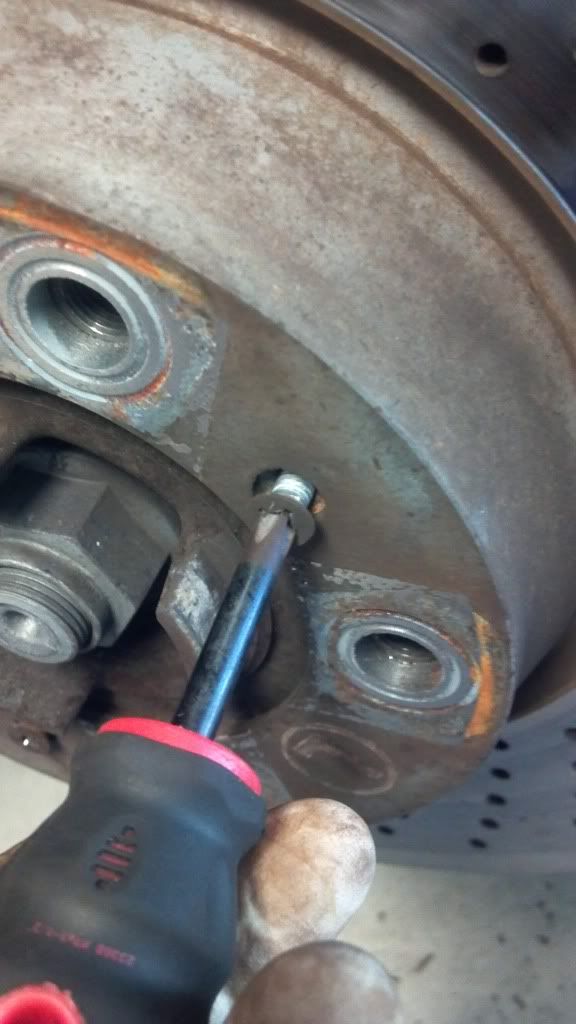
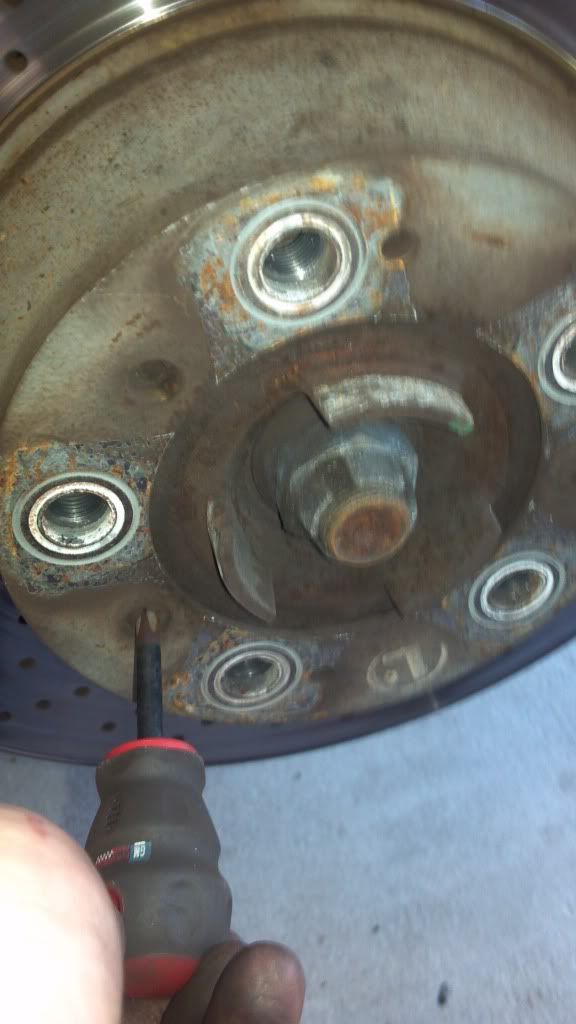
Above: This is the adjuster piece for the parking brake. It sits at the end of both drum shoes, and as you spin the little gear teeth, the adjuster will spread the drum shoes more, raising them closer to the brake rotor drum. You can just use a flat blade to adjust it one way or another, and you do it through the lug nut holes in the rotor and hub. See how the hub threaded hole lines up with the adjuster? Bother of the adjusters are on the rear most side of the brake shoes. Passenger it's on your left, and driver it's on your right of the hub.

Above: Here, I am using my US Army issued flashlight so I can see the adjuster. What you want to do is used your flat head, and watch the adjuster. Now, WITH THE PARKING BRAKE OFF, and the car out of gear (so your can turn the brake rotor with your hand later) roll the adjuster's teeth with the screwdriver to expand it. (I believe to your right makes it bigger, but you can see it grow with your flashlight.) Expand the adjuster until it isn't easy to expand anymore. Took me about 8 or so turns. If it won't expand anymore, i.e., it hit the inside of the drum, try and spin the brake rotor with your hand. Once you can not turn the brake rotor with your hand, back the adjuster off "4 clicks." You should now be able to spin your brake rotor again. Go pull the ebrake, and see if it stops you from being able to turn the brake rotor. If so, you have just adjusted your parking brake. Woot!
If you haven't already, a video explanation is linked at the top of this post. It's a you tube video of a Porsche tech doing the same thing.
Basically, just watch this -
Above: I did the same thing in the video, but here are my pictures. This image is after I've taken off the rear rotor, which isn't required, but I'm just showing you to understand what is going on.
Your drum shoe, when the parking brake is pulled, expands outwards, rubbing the drum shoe on the inside drum of the rear brake rotor. As your drum shoe wears away, the pad has a bigger gap to cover to grip the inside of the rotor's drum, so you have to pull back farther on your ebrake to hit the inside lining of the rotor drum. Eventually, you can't pull back far enough on the eBrake to make it hold worth a damn, this is also when you should replace your shoes. Mine has become admittedly weak when I engage the ebrake to park, and when the ebrake is on, and I push on the car, I can hear a metal squeak coming from the rear wheels. This is because the shoe is too loose to grip, and it just makes noise. In my opnion, because I can pull up higher on the ebrake, and it then engages tightly, I don't need to replace my shoes. This is a risk I'm willing to take, you may not want too. Also, Autozone didn't have the brake shoes in stock until next week, so I said **** it. In the end, even if you don't have an issue with your ebrake, you should adjust it while you're down here, even if you've never done it. It's super simple. Once again, it does not require your rotor to be taken off, only the rear rim and tire. I have it off to explain what is going on.
Above: This is the adjuster piece for the parking brake. It sits at the end of both drum shoes, and as you spin the little gear teeth, the adjuster will spread the drum shoes more, raising them closer to the brake rotor drum. You can just use a flat blade to adjust it one way or another, and you do it through the lug nut holes in the rotor and hub. See how the hub threaded hole lines up with the adjuster? Bother of the adjusters are on the rear most side of the brake shoes. Passenger it's on your left, and driver it's on your right of the hub.
Above: Here, I am using my US Army issued flashlight so I can see the adjuster. What you want to do is used your flat head, and watch the adjuster. Now, WITH THE PARKING BRAKE OFF, and the car out of gear (so your can turn the brake rotor with your hand later) roll the adjuster's teeth with the screwdriver to expand it. (I believe to your right makes it bigger, but you can see it grow with your flashlight.) Expand the adjuster until it isn't easy to expand anymore. Took me about 8 or so turns. If it won't expand anymore, i.e., it hit the inside of the drum, try and spin the brake rotor with your hand. Once you can not turn the brake rotor with your hand, back the adjuster off "4 clicks." You should now be able to spin your brake rotor again. Go pull the ebrake, and see if it stops you from being able to turn the brake rotor. If so, you have just adjusted your parking brake. Woot!
If you haven't already, a video explanation is linked at the top of this post. It's a you tube video of a Porsche tech doing the same thing.
Last edited by Equinox; 08-24-2012 at 02:45 AM.

 !
!
#142
09-05-2012, 01:14 PM
Join Date: Dec 2011
Location: Beaumont, TX
Posts: 123
Rep Power: 26 

Did the kistudios overpriced vinyl head light trim pieces on the car the other day. I just cleaned up the lights with soap and water, then used my "Johnson and Johnson baby wash, and water" solution I used for the clear bra to slicken the light so I could slide around the sticker, and squeegee'd on my trim pieces. The piece comes pre cut, and looks like a "horseshoe" before you stick it on. Because the sticker curves to the shape of the light, the open end of the horseshoe closes up, and meets together to make a full circle when installed. I think it looks good - and no heat gun needed.
Last edited by Equinox; 09-14-2012 at 08:42 PM.
#144
09-14-2012, 08:52 PM
Join Date: Dec 2011
Location: Beaumont, TX
Posts: 123
Rep Power: 26
Well, this may come as a surprise for most, but I've decided to sell the car. From my quick turn over of my 09 370z after only putting 11,000 miles on it - I've now put about 10k miles on the 997, and I'm still not smitten, it is however the best looking car I've had by far. I still cant get over the rear wheel arches. It's an amazing car, but I think it's not my "class" of car. Ultimately, I think I don't like sports cars, and should just stick to silly import "hot hatch" cars that are still mega practical on a daily basis. I drive the poor 997 to work every other day, in a straight line, with no hill in sight. It seems like a waste. I just don't get to enjoy it, and I think I'd rather have something cheaper, 4door, and more every day highway cruise control tourer. I do think, however, that after I move to the hill country, coming up this year, and finish building my house in a couple years, I think I'll probably have a perfect place for a 09+ turbo, but not as a daily driver.
eBay listing
Silly as it sounds, I'll most likely end up with a 2013 CT200h F Sport, or 2013 STI. Talk about a change, but I think it's more my silly style.
Last thing I did on the car was change out the spark plugs, and removed the Fabspeed X pipe - putting back on the raspy stock exhaust.
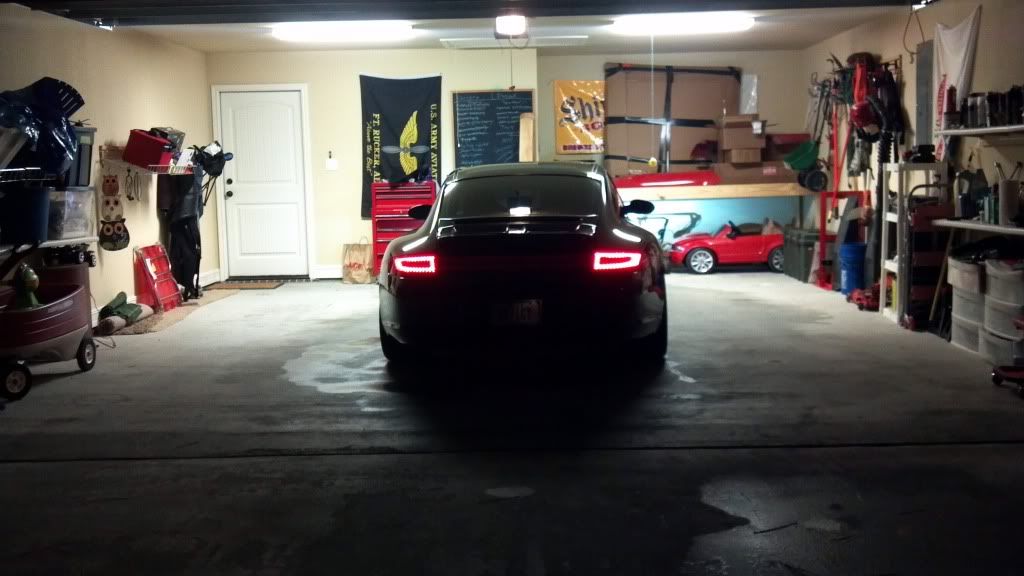
Freshly washed to sell...
eBay listing
Silly as it sounds, I'll most likely end up with a 2013 CT200h F Sport, or 2013 STI. Talk about a change, but I think it's more my silly style.
Last thing I did on the car was change out the spark plugs, and removed the Fabspeed X pipe - putting back on the raspy stock exhaust.
Freshly washed to sell...

#147
10-14-2012, 08:57 PM
I just found this thread. What amazing work you've done. I was so happy to learn that there is a guy who does all of these DIY projects and does write-ups to boot with an 06S. Then, the thread reads like a tragedy for me because you are selling  . I'm hoping you have a change of heart, but GLWS.
. I'm hoping you have a change of heart, but GLWS.
