997.2 Sprint Booster Installation Trick
#1
I just completed the installation in my 2010 997.2 6 speed. I ended up using an adjustable pipe wrench to remove the harness and clip. I gently placed one of the tips on the gray piece and the other on the bottom of the black plastic connector. I slowly squeezed until the clip disengaged and the connector easily slid off. There was no damage to the plastic pieces or connector.
I had previously installed the sprint booster on my 2006 Cayenne S without any difficulties. Today, I was struggling for about 20 min today before I thought to use the wrench. Then it took less than three seconds and no effort.
I had previously installed the sprint booster on my 2006 Cayenne S without any difficulties. Today, I was struggling for about 20 min today before I thought to use the wrench. Then it took less than three seconds and no effort.
#5
The throttle response feels quicker even with the sports mode off. I like this because the ride is more comfortable for the passengers when the suspension isnt in the sports mode but i get the benefit from a quicker response to pedal input.
I find heal toe shifting also easier as the distance i have to press the accelerator is also decreased to blip the revs.
In the sports mode i "feel" like i am driving a carrera S even though my 997.2 is only 350hp. I know the actual 0-60 time doesnt change with the Sprint Booster but it sure "feels" that way.
The sprint booster, imo, makes the car more response and to me translates to better drivablilty and ultimately more fun!
#7
Trending Topics
#10
Total noob here, as my post count indicates. I am curious to know if anyone else has tried this method with the same success as stated in the op. I tried, but to no avail. Applied substantial force, the grey 'lever' snapped and it still won't give. I just can't seem to get the clip to disengage. It's frustrating beyond belief and I couldn't feel any dumber. I know others here had spent more than the stated ten minute install time to get this done and I was hoping to get a clue as to what it was that they did to finally get it to release. Please go easy on me. I really do feel pretty retarded at this point.
Last edited by dhc997; 02-27-2012 at 10:37 PM.
#11
The more precise name of the tool I used was "adjustable joint pliers.". Plumbers use it on pipes so my description may not have been spot on. My bad!
It may be a good idea to wrap the metal tips with eletrical or cloth tape to protect the clip and connectors. If you look to the underside of the clip while pressing you need to keep pressing until the bottom of the grey clip is flush with the bottom of the connector. Please let me know if this was helpful.
It may be a good idea to wrap the metal tips with eletrical or cloth tape to protect the clip and connectors. If you look to the underside of the clip while pressing you need to keep pressing until the bottom of the grey clip is flush with the bottom of the connector. Please let me know if this was helpful.
#12
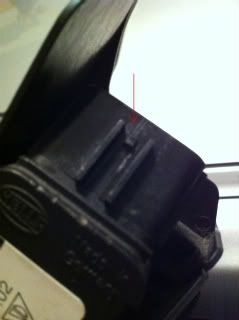
Thank you for taking the time to respond and elaborate. It is greatly appreciated. Yes, that is the very tool I used before proceeding with my attempt by hand (at which point the tab broke). I actually ended up taking stabs in the dark (literally, with the heavily scarred casing as a reminder of the attempts) using a point end o-ring tool at all angles. Obviously, the problem was I had no idea of the precise position I needed to go to get it to unlatch. Plenty of installation posts with pictures provided could be found, but none providing insight into the locking mechanism of this simple unit on the 997. I hate not knowing exactly what I'm doing, so I took a picture of the "peg" seated on the male end, at which point the unit locks (arrow marked), for others who might feel the same way. It is seated at the top, between the two rails which is easily seen once the accelerator is removed from the floorpan. I imagine this will do well to spare others the pain of trial and error in the contorted position that needs to be assumed to gain access (even with the pedal assembly removed).


Last edited by dhc997; 02-29-2012 at 12:37 AM.
Thread
Thread Starter
Forum
Replies
Last Post
911TurboRules
Automotive Parts & Accessories For Sale/Wanted
5
06-23-2024 07:59 AM
PenguiN
Automotive Parts & Accessories For Sale/Wanted
9
04-22-2021 08:33 PM


