
Front LED DRL Light Installation Walk Through Help
#1
 04-05-2012, 09:49 PM

Join Date: Sep 2011
Location: Toronto
Posts: 157
Rep Power: 21 
Front LED DRL Light Installation Walk Through Help
O.K. I haven't done a DIY walkthrough before but this should help people with a very general help on how this mod can be completed.
I didn't start taking pictures until I was a few step's into the install but use the owners manual for assistance on taking out the oem lights. I used the credit card that was in the folder and a very fine small screwdriver to assist in the removal. The left light popped right out with the credit card only. Note** I did have to apply a lot of force to get them out.
When you pull the stock lights out, you can either disconnect the wire clips or take the entire housing and bulb out of the existing light. Either way works. I did both (different on each light).
The Orange Tuning lights I had, had one main connector and my thought of simple plug in and go was too hook that connector up and I would be good to go. Not true, I turned my key and noticed the (!) and warning on my dash.
There are 3 OEM wiring clips that came off of the stock lights. So, after I had the main (easy) one plugged in, I had to find a home for the other two. That was the tricky part. The other two plugs were tucked in the new light for shipping and simply needed to be pulled out of the holes in the new lights.
*** IMPORTANT TIP***
When connecting the clips together make sure you hear or feel a 'click' and/or try to pull them apart (not by the wires) to make sure the are connected firmly. If they are not properly connected they can cause error messages and your lights might not work right.
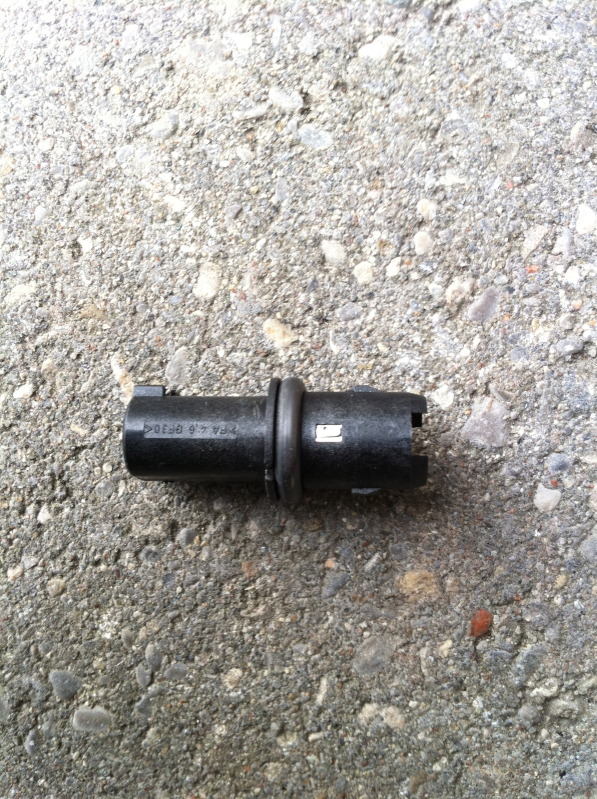
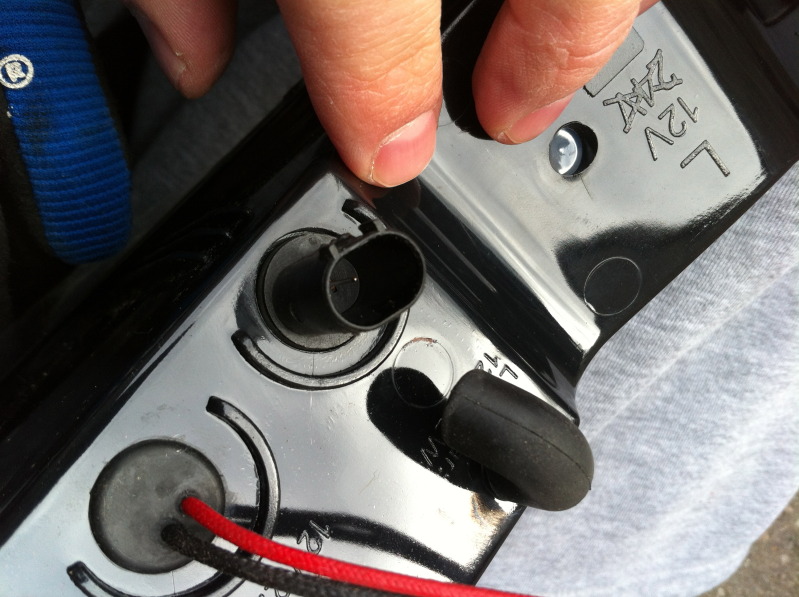
This is the picture of what I first found coming out from the new lights. The larger clip is easily found on the stock OEM wiring harness but I was clueless to what the smaller plug was for.
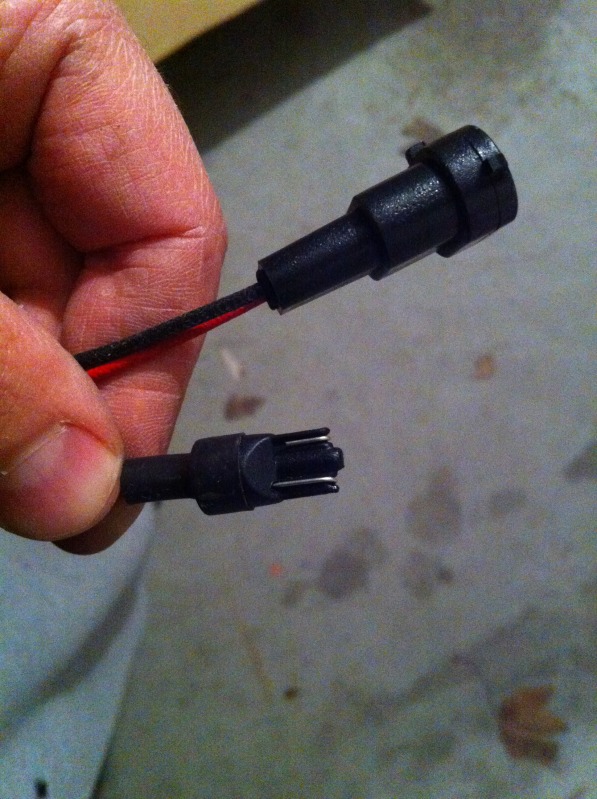
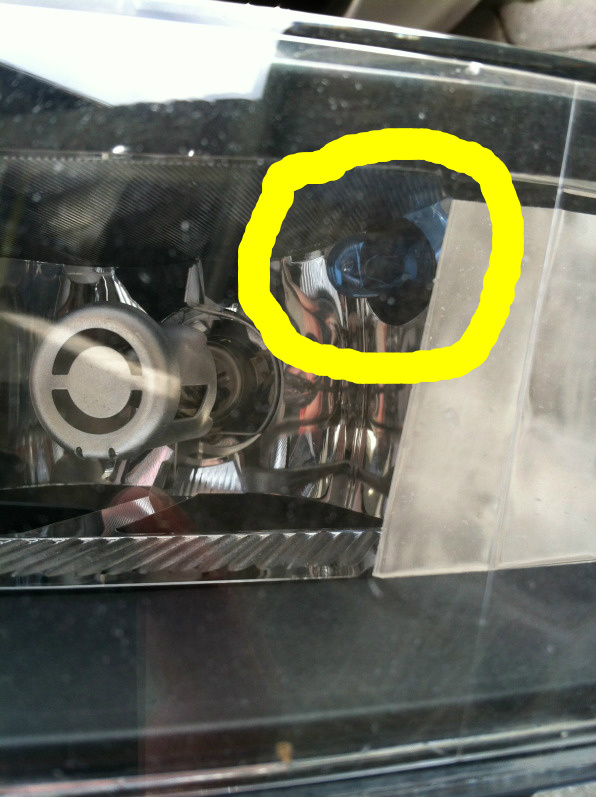
The smaller plug is replacing this light...
(small blue one on the upper right)
This is a picture of the clip that that needs to be removed from the oem lights. Thanks to paddyh I realized that I the one main connector doesn't control all lights and these new clips need to be connected to get full functionality.
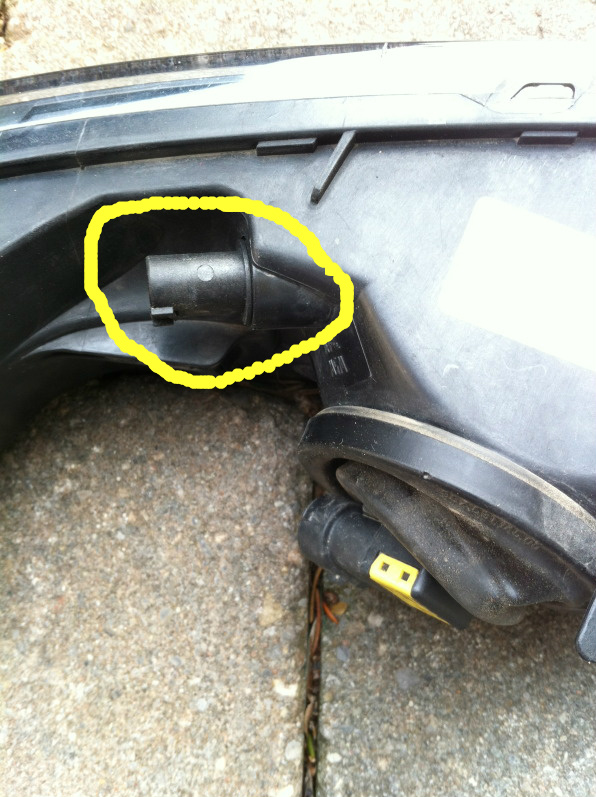
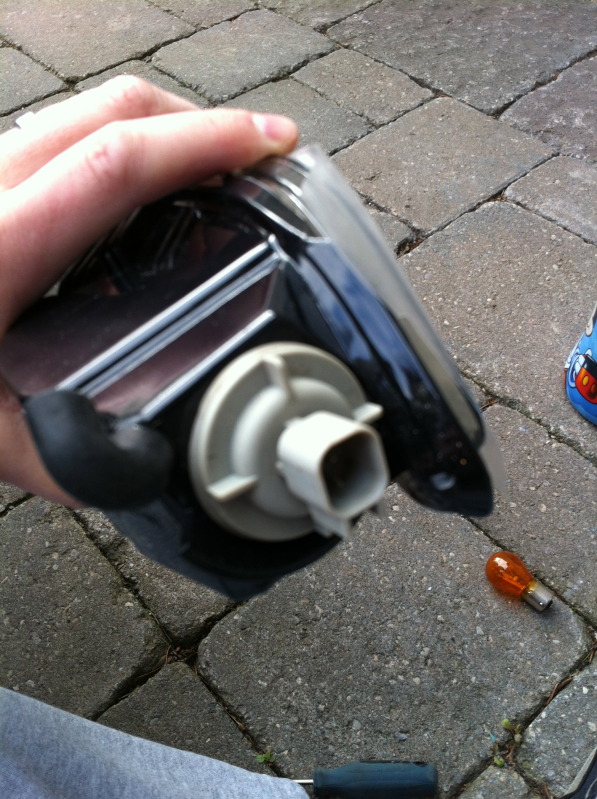
Although this is a picture of the new light it's the same for both. I used a 11mm open ended wrench and turned the plug a half turn. I had an issue on the first light and used the assistance of a small screw driver but I think i didn't have the guides lined up properly. The second one was easy.
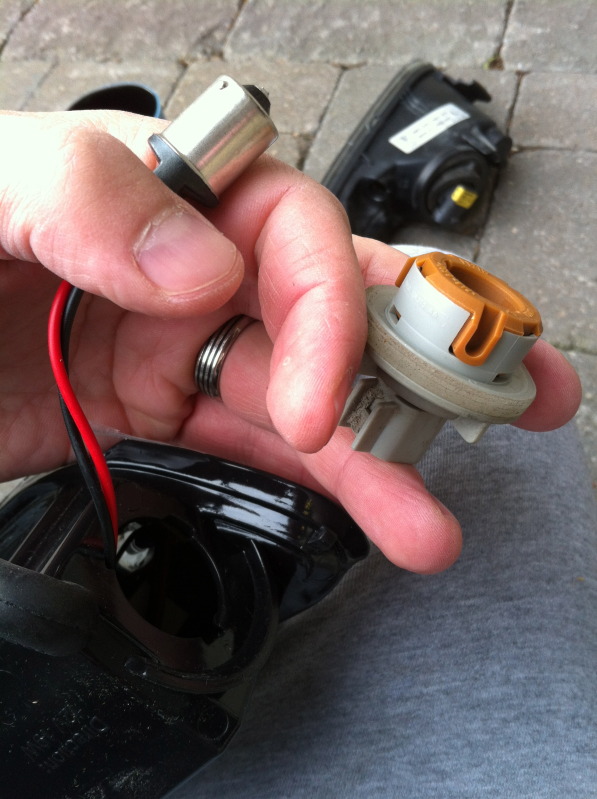
This is what the plug looks like.
The male plug of the new lights and the male plug off the oem lights.
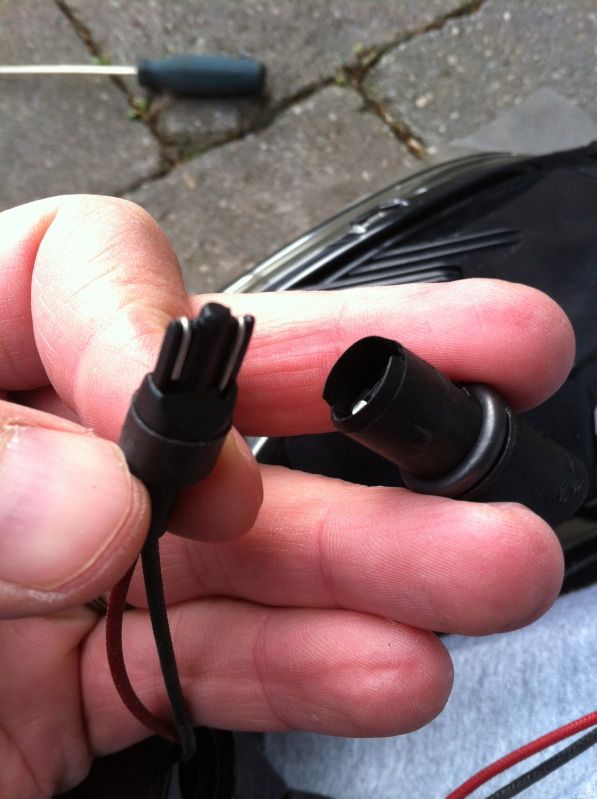
Connected...
Line the plug up with the guides and insert it into the new lights. Make sure you give it a half turn to so it stays secure.
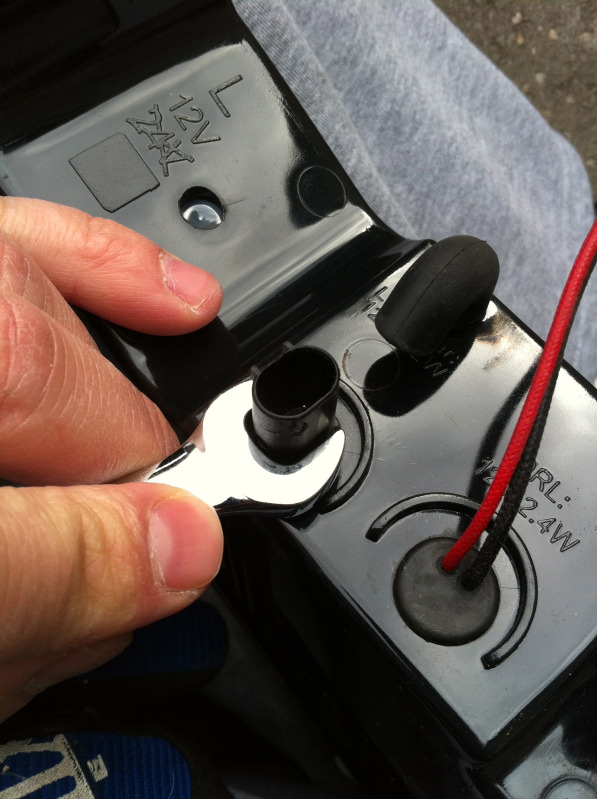
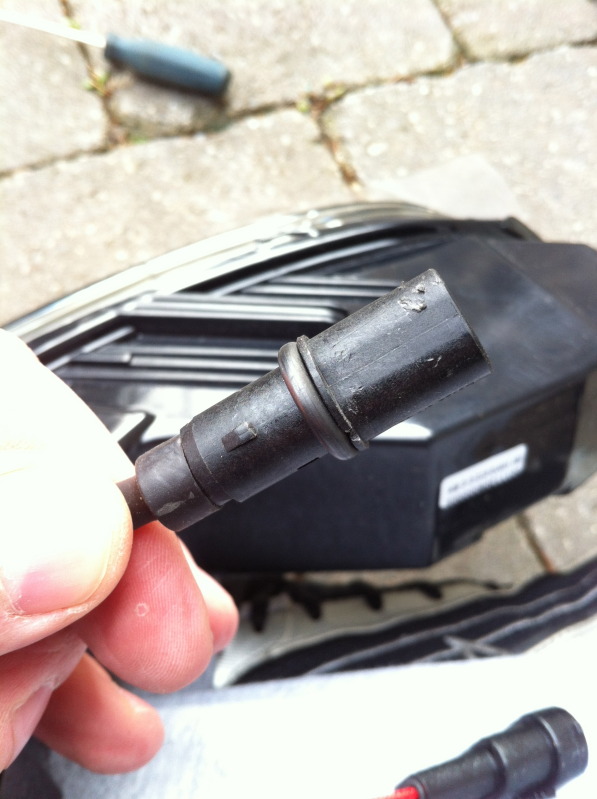
With this plug in place, you will know have a location to connect one of the remaining two connectors on the wiring harness from the car
You need to remove this clip/light socket from the stock lights. Simply turn counter clockwise and the light should come out quite simply.
On the new lights, you will find what appears to be a light bulb end, hardwired to the light (in the same location as the picture above). You need to pull this connector out of the hole (if yours is barried) and connect it to the original socket.
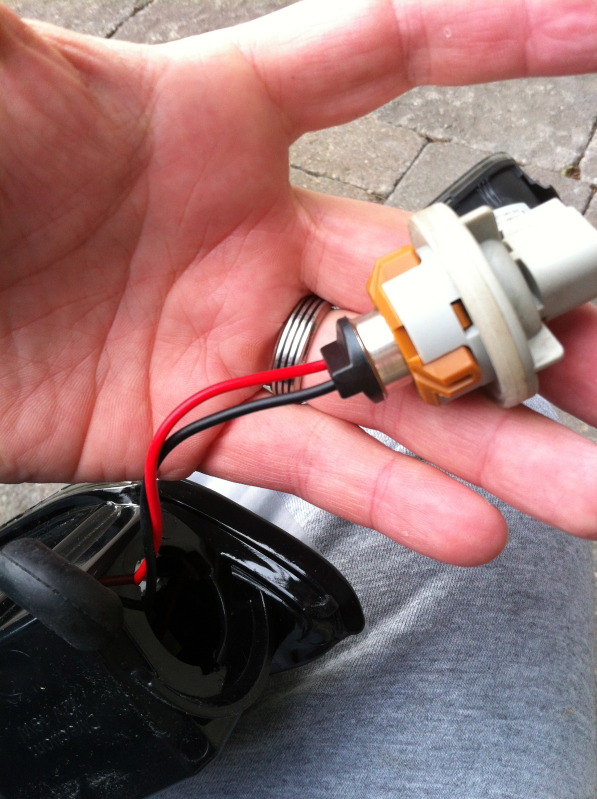
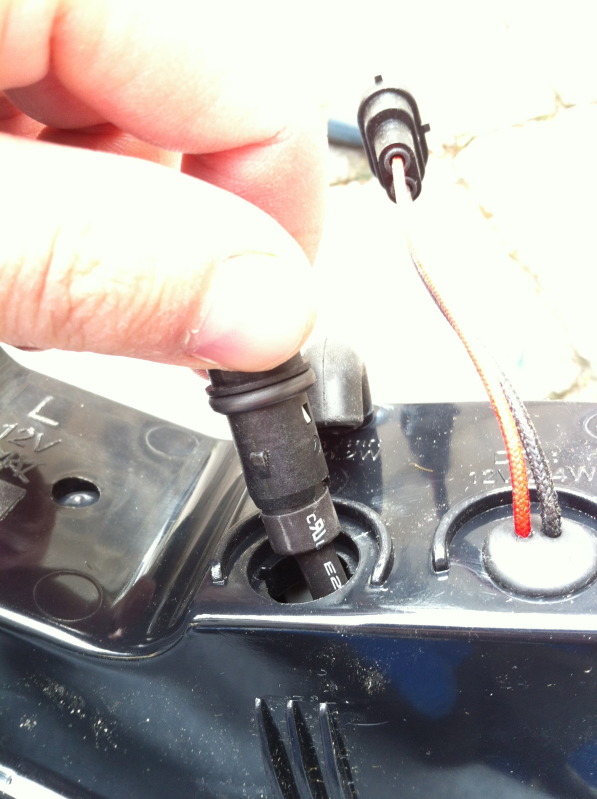
Once the two are connected, put the socket into the new light.
If haven't already done so, you can now connect all the clips from the cars wiring harness to the new lights.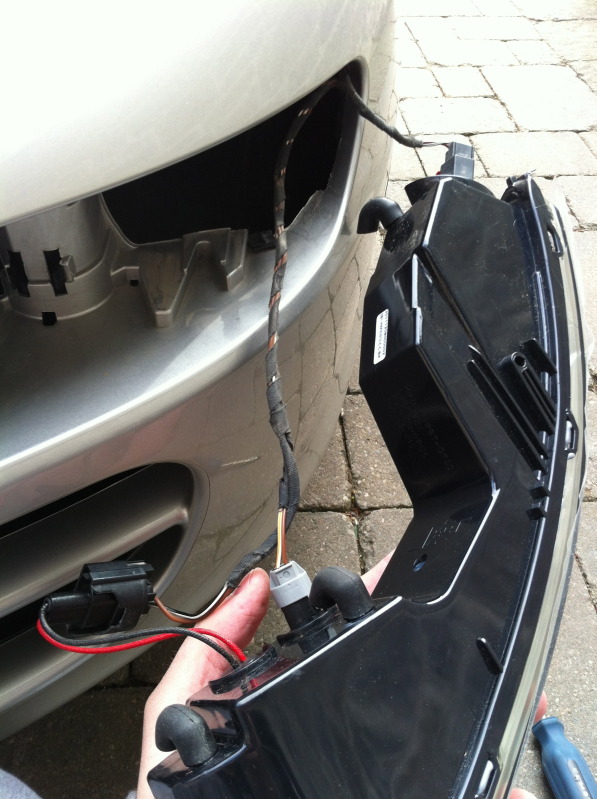
Follow the instructions in the manual for reinstalling the lights into the car. You need to put the end closes to the tire in first and then (with good pressure) push the left side (closest to plate) until is snaps in securely. It may take 2 clicks to get in fully. I would use the credit care or covered screw driver to try and pull the light back out to make sure it's not going anywhere.
Repeat the above steps for the other side and you are good to go.
I know this post is loaded with misnamed parts (socket/housing/harness etc.) but I tried to keep my mistakes consistent and hopefully the pictures will help.
This is a really easy install and should be done in 20-30min max. For most people all this stuff was common sense but on my first attempt, I left that tool in the tool box.
If you have any questions, please don't hesitate to send me a pm.
Hope this helps, goodluck!
I didn't start taking pictures until I was a few step's into the install but use the owners manual for assistance on taking out the oem lights. I used the credit card that was in the folder and a very fine small screwdriver to assist in the removal. The left light popped right out with the credit card only. Note** I did have to apply a lot of force to get them out.
When you pull the stock lights out, you can either disconnect the wire clips or take the entire housing and bulb out of the existing light. Either way works. I did both (different on each light).
The Orange Tuning lights I had, had one main connector and my thought of simple plug in and go was too hook that connector up and I would be good to go. Not true, I turned my key and noticed the (!) and warning on my dash.
There are 3 OEM wiring clips that came off of the stock lights. So, after I had the main (easy) one plugged in, I had to find a home for the other two. That was the tricky part. The other two plugs were tucked in the new light for shipping and simply needed to be pulled out of the holes in the new lights.
*** IMPORTANT TIP***
When connecting the clips together make sure you hear or feel a 'click' and/or try to pull them apart (not by the wires) to make sure the are connected firmly. If they are not properly connected they can cause error messages and your lights might not work right.
This is the picture of what I first found coming out from the new lights. The larger clip is easily found on the stock OEM wiring harness but I was clueless to what the smaller plug was for.
The smaller plug is replacing this light...
(small blue one on the upper right)
This is a picture of the clip that that needs to be removed from the oem lights. Thanks to paddyh I realized that I the one main connector doesn't control all lights and these new clips need to be connected to get full functionality.
Although this is a picture of the new light it's the same for both. I used a 11mm open ended wrench and turned the plug a half turn. I had an issue on the first light and used the assistance of a small screw driver but I think i didn't have the guides lined up properly. The second one was easy.
This is what the plug looks like.
The male plug of the new lights and the male plug off the oem lights.
Connected...
Line the plug up with the guides and insert it into the new lights. Make sure you give it a half turn to so it stays secure.
With this plug in place, you will know have a location to connect one of the remaining two connectors on the wiring harness from the car
You need to remove this clip/light socket from the stock lights. Simply turn counter clockwise and the light should come out quite simply.
On the new lights, you will find what appears to be a light bulb end, hardwired to the light (in the same location as the picture above). You need to pull this connector out of the hole (if yours is barried) and connect it to the original socket.
Once the two are connected, put the socket into the new light.
If haven't already done so, you can now connect all the clips from the cars wiring harness to the new lights.
Follow the instructions in the manual for reinstalling the lights into the car. You need to put the end closes to the tire in first and then (with good pressure) push the left side (closest to plate) until is snaps in securely. It may take 2 clicks to get in fully. I would use the credit care or covered screw driver to try and pull the light back out to make sure it's not going anywhere.
Repeat the above steps for the other side and you are good to go.
I know this post is loaded with misnamed parts (socket/housing/harness etc.) but I tried to keep my mistakes consistent and hopefully the pictures will help.
This is a really easy install and should be done in 20-30min max. For most people all this stuff was common sense but on my first attempt, I left that tool in the tool box.
If you have any questions, please don't hesitate to send me a pm.
Hope this helps, goodluck!
Last edited by frontside720; 04-05-2012 at 09:53 PM.


#5
04-06-2012, 06:52 AM
Join Date: Sep 2011
Location: Toronto
Posts: 157
Rep Power: 21
Thanks all, as far as the best brands I really have no idea. Mine are from orange tuning and I believe they are dectane but there was no label on the box. They are very bright and actually better then I expected. I also bought the module but haven't installed it yet.
Last edited by frontside720; 04-06-2012 at 06:57 AM.
#6
04-06-2012, 11:58 AM
Installing the Module is pretty straight forward. Only time consuming process was removing the various panels to make for a clean and professional appearing wire routing path.
#7
04-06-2012, 05:10 PM
Great step by step. Thanks! Got mine coming from FVD next week. Would it be a lot to ask someone to do a video for this. I am not good at reading and following written directions. :-)
Trending Topics
#9
04-08-2012, 09:58 PM

Great write-up Frontside. Wish I'd had it when I did mine a few weeks ago.
One additional tip I found helpful (it came from this forum) was how to get the new lights out if you need to change something / fix something.
The new lights are a tighter fit than the original ones, so can be harder to pull out. The tip was to use a windshield suction mount for a portable GPS. If you attach it to the light, you can use it to pull out while using the credit card to pop the latch.
I've also got the Dectanes from Orange Tuning and am very happy with how they look - for now I just put the lights in park with the fogs turned on until I figure which DRL solution I'll go for.
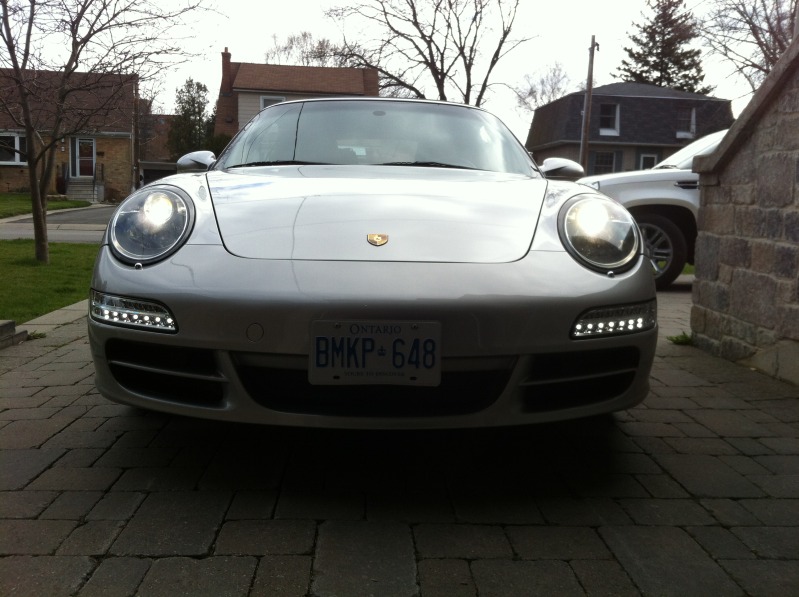
Together with the LED taillights they really help modernise the look of the 997.1
One additional tip I found helpful (it came from this forum) was how to get the new lights out if you need to change something / fix something.
The new lights are a tighter fit than the original ones, so can be harder to pull out. The tip was to use a windshield suction mount for a portable GPS. If you attach it to the light, you can use it to pull out while using the credit card to pop the latch.
I've also got the Dectanes from Orange Tuning and am very happy with how they look - for now I just put the lights in park with the fogs turned on until I figure which DRL solution I'll go for.
Together with the LED taillights they really help modernise the look of the 997.1
#10
04-09-2012, 06:39 AM
Join Date: Sep 2011
Location: Toronto
Posts: 157
Rep Power: 21
NikosF: great tip on the removal. I had to pull a light out to secure a faulty connection and it was more difficult then the stock lights.
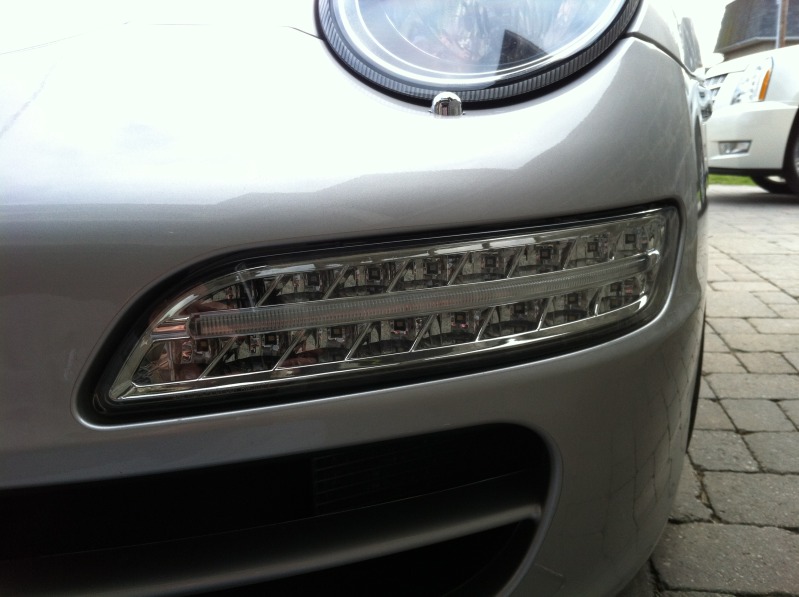
As far as the look goes... I completely agree. I hates the look of my old tails and love the led strip in the front. Great upgrade.
As far as the look goes... I completely agree. I hates the look of my old tails and love the led strip in the front. Great upgrade.
#11
04-11-2012, 06:41 PM
frontside, thanks so much for the install help. it saved plenty of guesswork when installing mine. my question is how do you get the middle led strip to turn on?
I am also in canada with my hids as my drl's. I was hoping once i installed the lights the parking light (which is on with my drl's) would activate the middle led strip. is this what the dectane module is for?i cannot otherwise no matter what configuration my switch is at...turn on that led strip.
I am also in canada with my hids as my drl's. I was hoping once i installed the lights the parking light (which is on with my drl's) would activate the middle led strip. is this what the dectane module is for?i cannot otherwise no matter what configuration my switch is at...turn on that led strip.
#12
04-11-2012, 08:56 PM
Join Date: Sep 2011
Location: Toronto
Posts: 157
Rep Power: 21 frontside, thanks so much for the install help. it saved plenty of guesswork when installing mine. my question is how do you get the middle led strip to turn on?
I am also in canada with my hids as my drl's. I was hoping once i installed the lights the parking light (which is on with my drl's) would activate the middle led strip. is this what the dectane module is for?i cannot otherwise no matter what configuration my switch is at...turn on that led strip.
I am also in canada with my hids as my drl's. I was hoping once i installed the lights the parking light (which is on with my drl's) would activate the middle led strip. is this what the dectane module is for?i cannot otherwise no matter what configuration my switch is at...turn on that led strip.
As for turning the strip on, I can try to help but I have a US car so the setting may not be the same. I turn mine on by turning my lights on and pulling out the switch (like pulling a drain plug). I'm not exactly sure what light I'm activating by doing that but I will check the manual tomorrow and it should be the same light. Just check your manual on how turn that light on.
Another thing you might want to check is your connection. I had an issue with the strips as well and I was told that they can be finicky. I would uninstall your lights (little bit more difficult so use a gps suction cup to pull them out) and check your connections. Leave the lights uninstalled and play with the different settings again.
As for the module... if you are talking about the separate module that you actually have to connect to your battery, then yes that's supposed to keep them on all the time. I have the module, but have not installed it yet so I have to manually turn on my led strip. I plan on doing a write up when I install the module as well.
Goodluck and let me know how you make out. I will find the name of that light when I check my manual tomorrow. If anyone else knows the light please chime in.
Last edited by frontside720; 04-11-2012 at 10:02 PM.
#13
04-11-2012, 09:52 PM
when i pull my switch out it activates the fog light portion (lowest LED strip). my car is a US car as well, but with the HID function activated. I read somewhere that perhaps the parking light male socket can be connected either way so I might try to reverse my plug and hope that works
#14
04-11-2012, 10:03 PM
Join Date: Sep 2011
Location: Toronto
Posts: 157
Rep Power: 21
We are talking about the same led strip correct? The one that in my last picture? That's the one that you can activate. You can't get the middle strip working?