
iPad mini on the 997

#181
 02-06-2013, 12:31 AM


Joel, really amazing job. This would have not been possible without your discovery of the bezel. I'm going to do this on my Cayman (just have to figure out how to paint the bezel in the stock metallic silver color).
Few questions:
Reasons I want to use 3.5mm over bluetooth:
Again, amazing job.
Few questions:
- Why did you decide to go the bluetooth route rather than 3.5mm cable? Were you not able to find a low profile (L shape) 3.5mm cable?
- Amazon has a similar dock to the one you recommended and also provides a picture of the parts inside. Does this dock have the same low profile lightning connector that you used? I would rather get this one, as I may be able to use the low profile 3.5mm connector that comes with it.
- Would work in place of the one you listed? It has really good reviews, but much lower wattage spec so I am unsure.
Reasons I want to use 3.5mm over bluetooth:
- Better sound quality (probably can't tell with Porsche speakers, but we always strive for the best).
- You don't have to "connect" the iPad to the a2dp receiver each time you start the car. I know it's only a few steps, but it's annoying.
- Possibility to use a to connect an external mic to the ipad as well and use a VOIP app to make phone calls. Yes, kinda cheesy, but it will work for those long conference calls where you're on mute 90% of the time.
Again, amazing job.
#182
02-24-2013, 10:00 AM

I received a few pm's asking for more details on the 996 iPad mini install I have been working on...
Rather than put it more details in Joe's excellent 997 install thread, I started a new thread here:
https://www.6speedonline.com/forums/...ml#post3778072
While the physical install is quite different, many issues like charging, usb vs. audio jack vs. bluetooth, software loads, etc. are common between different installs.
Last edited by pfbz; 02-24-2013 at 10:02 AM.
#183
03-21-2013, 07:06 AM

Great work. I want to do the same in my Cayman.
Having no experience in car audio I am a bit confused about how the parts listed hook together. Apologies if the questions are a bit basic, but I want to understand it properly and get it right rather than causing sparks.
1) Could you sketch a schematic of how your parts fit to one another? - that would help me a lot.
2) The instructions say "Prepare the Radio Adapter loom with this connection sequence. From the first plug: purple: rear right +..."
Does this mean soldering together the various loom wires so that you can connect the 4 car speakers into the 2 channel amplifier? Wouldn't I need to buy some sort of plug to get the cables onto the amp?
3) The Pyle web page shows the amp has L and R + and - terminals, so why do the instructions say "rear right +" not just "right +"? Am I missing something?
4) Then when the instructions refer to the second plug, I was unsure which wire from the car goes where on the Power connector of the amp (marked R, Earth symbol, B+) and how this fits with the switched power line from the fuse box. Can you write down exactly which wire goes where?
5) Why a cigarette lighter adaptor? I see one end is used for the USB adaptor. What about the male end? Is this just for testing, or does the system plug into a lighter socket?Wouldn't a permanent installation involve cutting off the male end and soldering into a power line? If so, where?
6) What glue do you use to fix the magnets to the bezel? Epoxy?
7) When you cut out a piece of the passenger bolster, how big is this piece? Would a hole be visible if I go back to the standard CD player?
8) You painted the bezel black. How difficult was it to take out the heating controls? Or any idea what product you would need to paint the bezel silver?
thanks!
Phew,
#184
03-25-2013, 05:51 AM
Join Date: Dec 2007
Location: Miami
Posts: 1,750
Rep Power: 124 

Ok, I will try to answer the questions in order...
1) Could you sketch a schematic of how your parts fit to one another? - that would help me a lot.
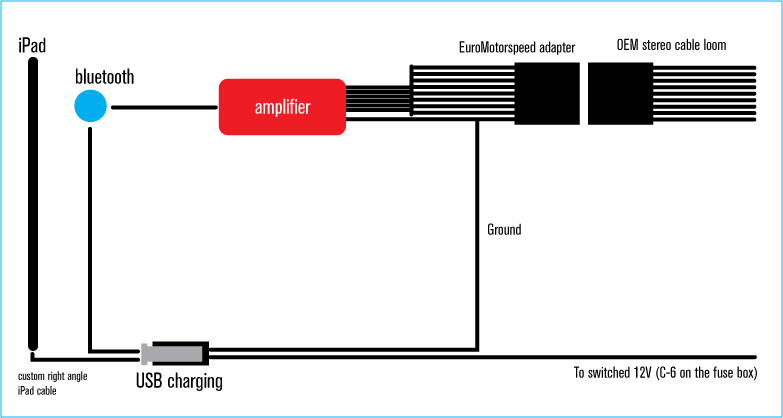
2) The instructions say "Prepare the Radio Adapter loom with this connection sequence. From the first plug: purple: rear right +..."
Does this mean soldering together the various loom wires so that you can connect the 4 car speakers into the 2 channel amplifier? Wouldn't I need to buy some sort of plug to get the cables onto the amp?
Nope, you can solder or tie them together... up to you. I didn't solder them.
3) The Pyle web page shows the amp has L and R + and - terminals, so why do the instructions say "rear right +" not just "right +"? Am I missing something?
4) Then when the instructions refer to the second plug, I was unsure which wire from the car goes where on the Power connector of the amp (marked R, Earth symbol, B+) and how this fits with the switched power line from the fuse box. Can you write down exactly which wire goes where?
There are some instructions once you buy the box adapter from EuroMotorsports. Pretty much you connect rear and front + together. You will lose the fader control
5) Why a cigarette lighter adaptor? I see one end is used for the USB adaptor. What about the male end? Is this just for testing, or does the system plug into a lighter socket?Wouldn't a permanent installation involve cutting off the male end and soldering into a power line? If so, where?
The cigarette adaptor is to be able to connect the USB adapter for charging. This could be achieved in different fashion, but I chose the more easy and reversible way in case something goes wrong.
6) What glue do you use to fix the magnets to the bezel? Epoxy?
Two part epoxy.
7) When you cut out a piece of the passenger bolster, how big is this piece? Would a hole be visible if I go back to the standard CD player?
barely 1/8" once you put the bezel in place, you won't see it. The bezel aligns with the CDR-23 or PCM, so even if you go back to to regular radio, the OEM radio will cover the tiny cuts.
8) You painted the bezel black. How difficult was it to take out the heating controls? Or any idea what product you would need to paint the bezel silver?
I used Eric from Bumperplugs for the painting. Taking the AC control, may require more patience than expertise. Eric can paint the bezel silver to match, so you don't have to take the rest out.
1) Could you sketch a schematic of how your parts fit to one another? - that would help me a lot.
2) The instructions say "Prepare the Radio Adapter loom with this connection sequence. From the first plug: purple: rear right +..."
Does this mean soldering together the various loom wires so that you can connect the 4 car speakers into the 2 channel amplifier? Wouldn't I need to buy some sort of plug to get the cables onto the amp?
Nope, you can solder or tie them together... up to you. I didn't solder them.
3) The Pyle web page shows the amp has L and R + and - terminals, so why do the instructions say "rear right +" not just "right +"? Am I missing something?
4) Then when the instructions refer to the second plug, I was unsure which wire from the car goes where on the Power connector of the amp (marked R, Earth symbol, B+) and how this fits with the switched power line from the fuse box. Can you write down exactly which wire goes where?
There are some instructions once you buy the box adapter from EuroMotorsports. Pretty much you connect rear and front + together. You will lose the fader control
5) Why a cigarette lighter adaptor? I see one end is used for the USB adaptor. What about the male end? Is this just for testing, or does the system plug into a lighter socket?Wouldn't a permanent installation involve cutting off the male end and soldering into a power line? If so, where?
The cigarette adaptor is to be able to connect the USB adapter for charging. This could be achieved in different fashion, but I chose the more easy and reversible way in case something goes wrong.
6) What glue do you use to fix the magnets to the bezel? Epoxy?
Two part epoxy.
7) When you cut out a piece of the passenger bolster, how big is this piece? Would a hole be visible if I go back to the standard CD player?
barely 1/8" once you put the bezel in place, you won't see it. The bezel aligns with the CDR-23 or PCM, so even if you go back to to regular radio, the OEM radio will cover the tiny cuts.
8) You painted the bezel black. How difficult was it to take out the heating controls? Or any idea what product you would need to paint the bezel silver?
I used Eric from Bumperplugs for the painting. Taking the AC control, may require more patience than expertise. Eric can paint the bezel silver to match, so you don't have to take the rest out.
Last edited by JoelPirela; 03-25-2013 at 06:08 AM.

#187
04-02-2013, 02:45 AM
Registered User
Join Date: Oct 2012
Location: Laguna Beach, CA
Age: 49
Posts: 437
Rep Power: 35
Beautifully done! Thank you for all the info. I am going to attempt to do it in my car soon. I am even thinking of using an iPad 2; twice the screen size. I wonder if it would look too big?
#188
04-02-2013, 08:58 AM
Join Date: Dec 2007
Location: Miami
Posts: 1,750
Rep Power: 124
The problem with the iPad2 is that it won't fit in the space where the PCM is right now. You can surely get it to work, but it will have to be mounted in some different fashion...

#191
06-12-2013, 12:26 AM
Does anyone know if there is room to squeeze a 1 din unit behind the iPad? Similar to what this guy did:
http://www.clubwrx.net/forums/electr...ml#post2976849
This solution gives you a radio, bluetooth phone, as well as an easy way to hook up your iPad through the unit. And if you use the following Sony unit, you can control the radio, volume, etc, all through an iPad app. No need to remove the iPad to get to the unit:
http://store.sony.com/webapp/wcs/sto...52921666484181
#193
06-28-2013, 07:31 AM
Join Date: Dec 2007
Location: Miami
Posts: 1,750
Rep Power: 124
for the wallpaper, look here:
http://www.flickr.com/photos/82525810@N00/8595518232/
scroll to the right...
http://www.flickr.com/photos/82525810@N00/8595518232/
scroll to the right...