When you click on links to various merchants on this site and make a purchase, this can result in this site earning a commission. Affiliate programs and affiliations include, but are not limited to, the eBay Partner Network.
DB9/V12 timing cover leak - DIY not so hard in car
I've seen on other threads here and on other sites that the oil leak from the timing cover on the V12 engine is a "dreaded" problem and a difficult job to do with the engine still in the car, if not impossible. Dealers, mine included, will charge over $5k for the work. I have found various vague hints but no clear procedure described anywhere. It's almost like it's a kept secret among those who might know. Anyway, thanks to the corona virus self-isolation lock-down I've had plenty of time to be in my garage and gave this problem a go on my 06 DB9 Volante.
I had a lot of oil gunk on my lower engine, subframe, and undercarriage. It was everywhere. I did a very thorough clean as part of another project (changed my blown engine mounts) and an oil change. I added dye to the oil and within five minutes of running at idle I started to see leaks both from the timing cover gaskets and the sump gasket. After 10 minutes I was getting drips. It's bad. This convinced me to try to take the timing cover and sump off myself, with the engine still in the car.
I don't have time tonight to tell the full story but I promise I will. I'll tell you now that I got the timing cover out (from the top) with very little trouble. Sure it took many hours (maybe 6) and a lot of tools (no AM special tools), but knowing how to do it now I think I could cut that time in half. It's pretty much a matter of getting other stuff out of the way, then out it comes. I also had to drop the sump off the engine to change that gasket too. I've done this without supporting the engine from the top, which I think is a showstopper for most people. Yup, I removed the subframe and steering rack from below without supporting the engine from the top, but everything always safe. I'll drop off the sump tomorrow. It doesn't look like it will be any trouble. It's just a matter of getting it out between the header pipes.
Timing chains in all their glory, with engine still in car. Note valve covers are still on. From below. Note sump pan still installed, but it is dropped about an inch on loose bolts. The inside of the timing chain cover on the bench. The other side has everything removed (while in the car).
I should have my new gaskets and other parts on Wed, then the reassembly begins. I've been taking some video and many pictures. I plan to write this all up for future use. Honestly I'm pretty pleased that I've gotten this far on a dreaded job that hasn't been written up before (at least that I can find).
Great work and look forward to reading the follow up. I feel the same can probably be done with the V8 variants as well. Haven't had to tear into mine yet but I'm sure I will at some point in the future.
Thats a brilliant job indeed. How difficult was it to replace the engine mounts? I believe these are Jaguar sourced items. Do you happen to have their part no?
great write up and effort on this...This is good to know...I have a tiny weep on 2009 V8V... It was supposed to have been fixed on the 4.7 by Aston Martin...! My dealer asked about a goodwill repair from Aston... they declined since I was not the original owner...I check it every oil change and the weep is not enough to even make a 3" spot on the under shield... hopefully a fix for V8V is similar.
dealer wanted about $2500 to repair but told me to not get it done unless it drips alot.
Awesome work. Curious how you dropped the subframe without needing to support the motor from above? Did you somehow support if from below? The motor mounts are on the subframe, correct?
sdekoning, I wrote up the engine mount job on the AMOC site here: https://forum.amoc.org/post/replacin...pid=1311064766. I'm pretty pleased with that job too and it gives some hints how I started the timing chain cover job.
Jano4 - I'm doing this job on my wife's DB9 but I also have a 2017 V12Vs in the garage (his-and-her Astons, we're very lucky). In that car the front of the engine is much closer to the cross frame that holds the radiator. It would definitely be a lot harder to squeeze the timing cover out. Probably doable if the intake manifold and rocker covers were removed first, which I didn't have to do in the DB9. Of course this could be all different with the V8.
Jano4 - I'm doing this job on my wife's DB9 but I also have a 2017 V12Vs in the garage (his-and-her Astons, we're very lucky). In that car the front of the engine is much closer to the cross frame that holds the radiator. It would definitely be a lot harder to squeeze the timing cover out. Probably doable if the intake manifold and rocker covers were removed first, which I didn't have to do in the DB9. Of course this could be all different with the V8.
I could see the V12 variant of the Vantage being much more difficult but would have to see how much room you would be able to gain with the radiator fans and potentially the radiator out. The V8 variants have a decent amount of room which makes me think it could also be done with the engine in the car. I have a few more projects to tackle before I would even bother with the timing cover on my end. Will of course write up a how-to when I get to that point.
I was forced to pull my newly installed rebuilt V12 (low oil pressure due to the builder using too large clearances - hopefully)...
For what it is worth, I clocked 6 hours from the time I put it on the lift to the time I lifted the body off. Took another 2 1/2 hours to get the motor cleaned up and out of the subframe and in the back of my wife's pickup. Things that took me two days took twenty minutes this time (getting the harness disconnected inside the passenger foot well).
The Duramax lift I bought has really made this fun.
Awesome work. Curious how you dropped the subframe without needing to support the motor from above? Did you somehow support if from below? The motor mounts are on the subframe, correct?
For what it is worth, I clocked 6 hours from the time I put it on the lift to the time I lifted the body off.
Man I so wish you or someone else had a fully documented report on how you did this. A bunch of color glossy pictures with circles and arrows and a paragraph on the back of each one explaining what each one was would be perfect. Or a video.
I'm currently at an impasse as I can't get the sump fully off the engine. It won't drop past the header pipes, or slide forwards because of the gubbings inside. I'll have to remove at least one header, which is looking pretty difficult in the car. If I had removed the entire chaises like you did it would be easier. Also, then I'd change the clutch at the same time. In hindsight this could have been a better way for me to go.
Learning something new every day, which keeps me sane.
Absolutely - having a bunch of color glossy pictures with circles and arrows and a paragraph on the back of each one explaining what each one would do blind justice to this
Hello again, sorry it's been so long since my last post and promise to explain the full job. Just got too busy, and I'm a rookie at video editing so kept avoiding it. Nonetheless the car is back on the road and all is well. Here's the rest of the story.
Preparing for the oil leak job
Getting the timing cover off the front of the engine while the engine is still in the car means you�ll be working in a very tight space and some standard tools won�t fit in there. The biggest challenge is pulling off the crankshaft pulley without using a traditional puller. I probably spent four hours figuring it out and getting it off. If I had to do it again it might take me an hour at most.
To do this job you are probably no rookie and already have a decent and large set of tools. I seemed to use everything in my considerable arsenal. All metric of course, lots of ratchets including extensions and knuckles in �. 3/8 and � inch drive sizes. Very important are ratcheting wrenches to reach the hard places, and torque wrenches that go low and go high.
- Aston Martin DB9 Workshop manual
- Lift. If you don�t have one the money you save doing this job yourself will justify the price of a lift. Go for it! Alternatively, there is a chance you won�t need a lift if you do all the work from the top which would likely include removing the intakes and valve/rocker covers. Since I had to replace the sump gasket I had no choice but to work from below.
- Under lift hoist (tall screw jack)
- Iron or pvc pipe of the right length for your lift (see later)
- New crankshaft pulley bolts of two longer lengths. The stock one is M12 x 1.5 x 50mm. Buy a 60mm and 70mm version. Note that the 1.5 thread is a fine thread for an M12 bolt and uncommon. I found them at www.Belmetrics.com. These bolts become tools and will save you a ton of time on both removing and replacing the pulley in its very tight spot. When the job is done you�ll have the two spare bolts leftover.
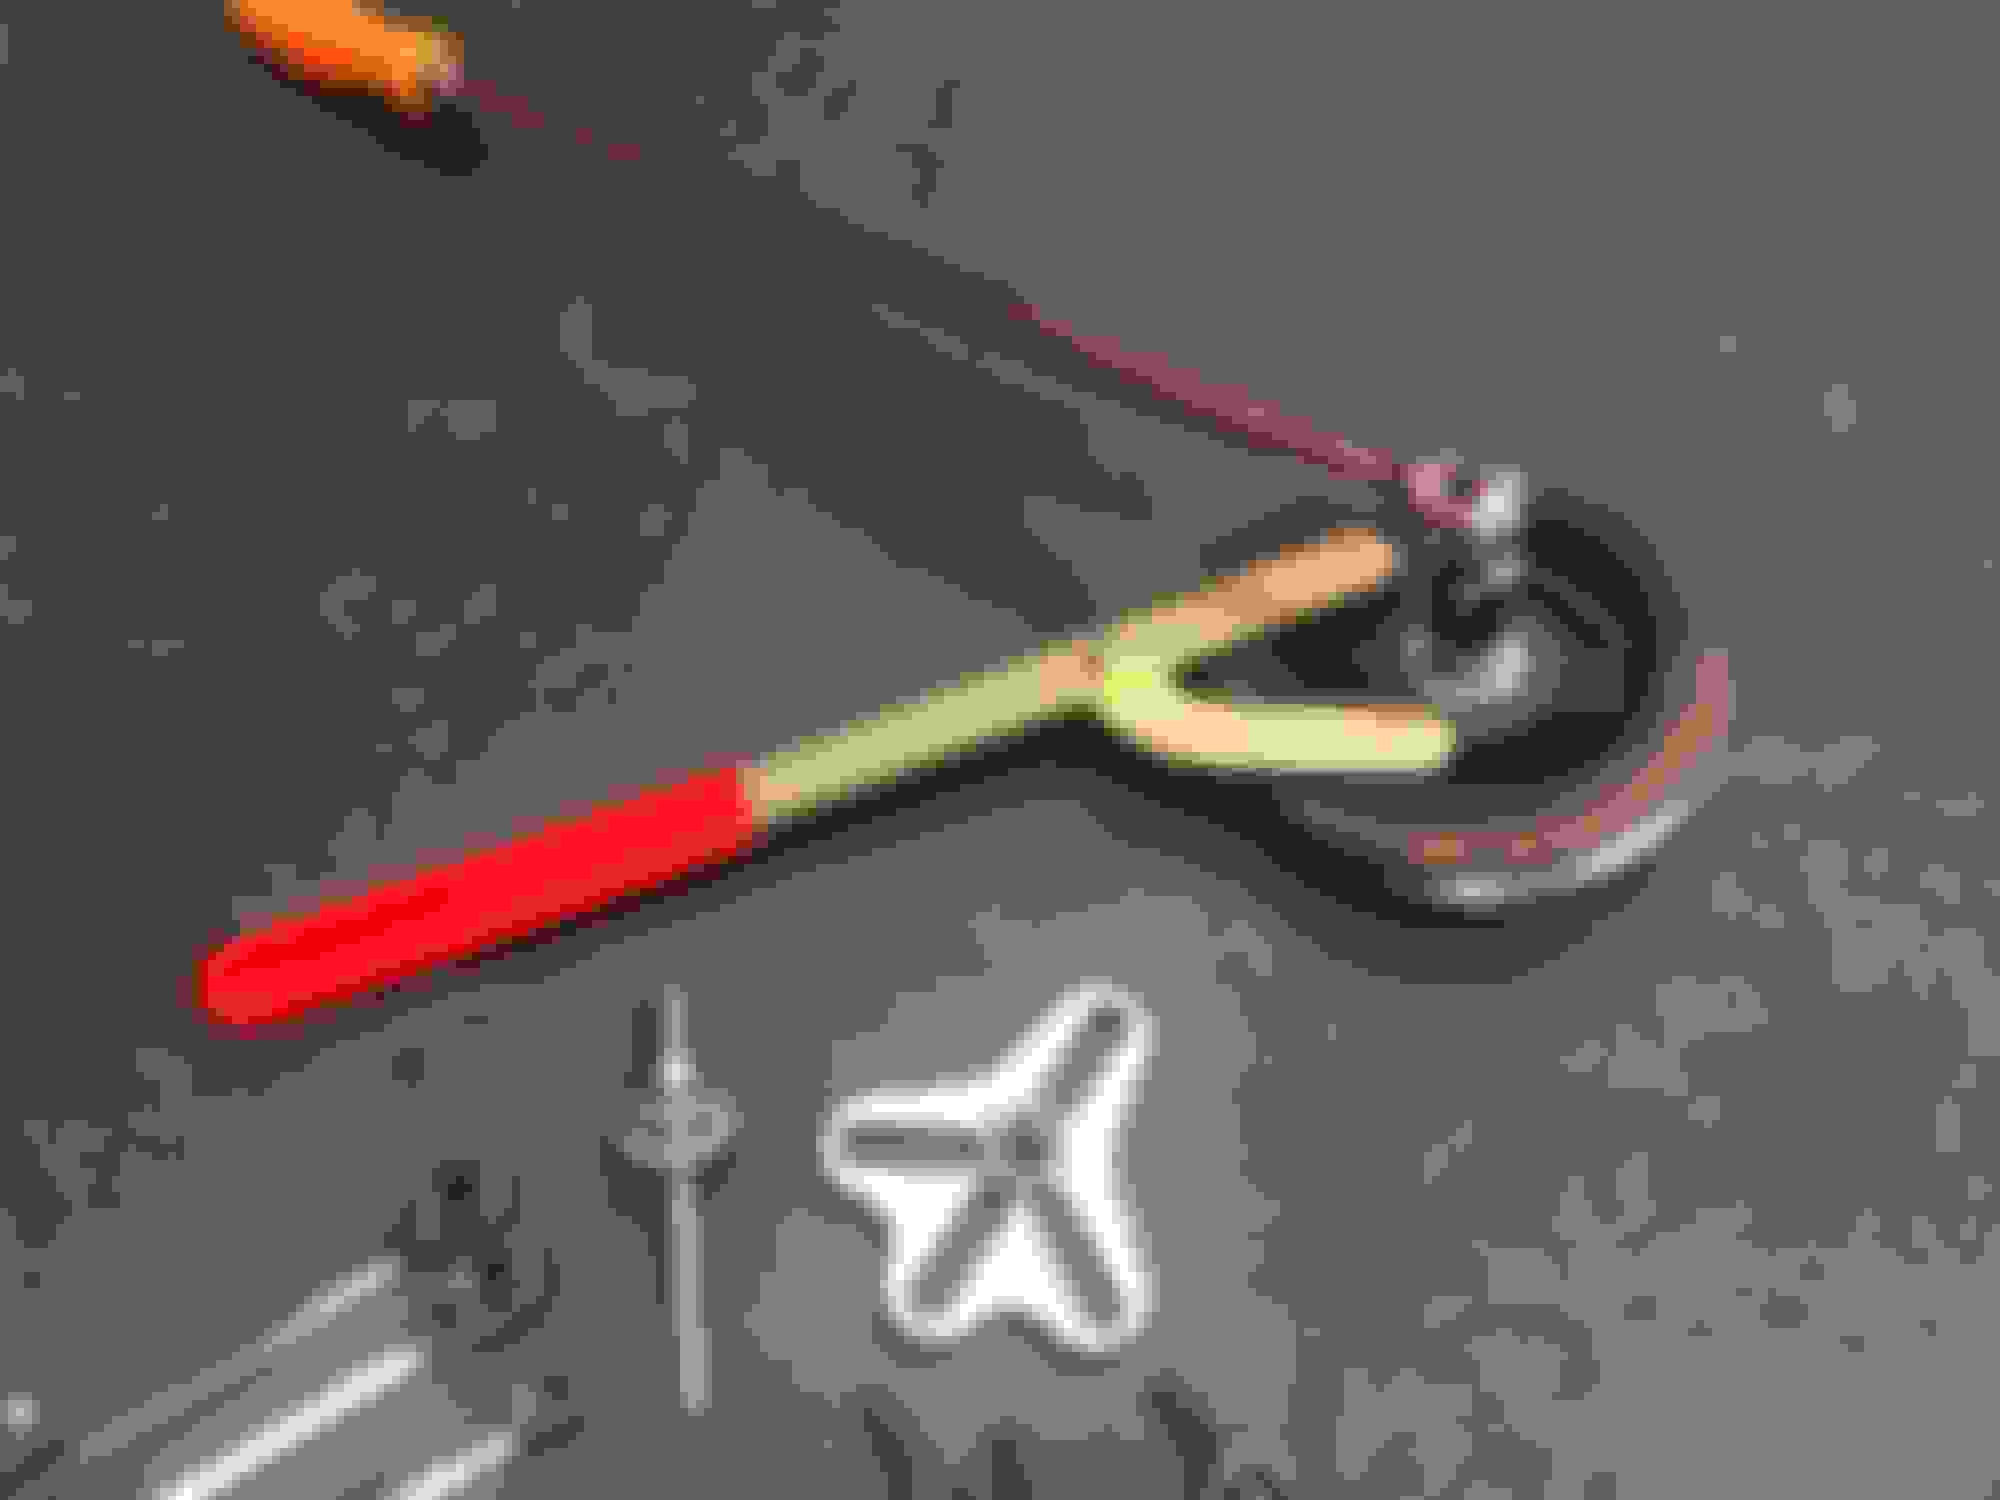
- Pulley puller with star shaped holder (see picture)
- Universal camshaft/crankshaft pulley holder (see picture)
- Gaskets for the timing chain cover (3), oil pan (1), crankshaft seal, and thermostat o-rings (3). See invoice for part numbers. I got all mine from Scudaria.com in the UK at a much better price, including shipping, than local dealer. I had them in two days which was remarkable.
- This job may as well include an oil change so get oil, filter and oil pan drain bolt.
- Might as well put in a new serpentine belt too.
The crank pully took a few tools to remove The universal pulley holder and breaker bar in position A couple invoices for the parts for the major work. Note there are very few parts for the very difficult gasket replacement job.
Start the work
- Drain the oil
- Drain the coolant including removing the lower pipe going to the water pump so you get all the lower fluid out of the pump and the small pipe that runs around the sump. (My coolant had recently been changed so I saved it in a bucket and poured it through a filter on the way back in).
- Start at the top of the engine. Use video as a reference.
o Remove the big slam panel over the radiators. The rear edge only intrudes a little bit towards the engine but it matters.
o At the thermostat remove the radiator pipes, two smaller pipes, and wire connection from the top/front of the engine. The entire thermostat housing has to come off (both halves) so you don�t necessarily have to take the housing apart. Not knowing this I did, which is no problem and it�s a good time to look inside. Removing the back part of the housing from the engine was difficult. Remove the three bolts and then start slowly wiggling and pulling up. Mine eventually popped out but it really tried my patience. Put masking tape over the holes on top of the engine so no junk falls in.
o Take the longer radiator hose to your left (drivers right) and bend and tuck it behind frame pieces to get it as much out of the way as possible, and a wee bit more. You may want to use a zip tie.
o For the right, shorter radiator hose, remove it from the steel downpipe and set aside. Remove the bolt that holds the steel pipe, and remove the two bolts that hold the power steering fluid reservoir and then zip tie the two of them as far to the right as possible. You need to create the largest possible right/left gap in front of the engine to get the cover out. See video.
o Unbolt the battery power post and tuck the unit down to the left into the cross frame (or zip tie)
o Remove the serpentine belt as per instructions on the shop manual
o Remove the three idler pulleys and mark each one to put back in the same spots
o Remove the belt tensioner. This made me nervous as I didn�t know if the coil spring inside was captive or if it would go boing and spring loose making reassembly a challenge. No worries, it comes of easily and is nicely contained.
o The only thing left on the front of the engine now is the crankshaft pulley, and that job gets its own section and pictures below.
o Before that look at the accessories that are driven by the belt. On your left are the alternator and the a/c compressor. Don�t touch these, they are not in your way.
o On the right you need to remove the two front bolts on the water pump which actually bolt into the timing chain cover, so they must come out. You get at them easily from below.
o The power steering fluid pump is trouble. The pulley stupidly covers two of the bolts that hold on the timing cover so you have to get the whole rig out of the way (but no need to disconnect any of the lines.) There are four bolts that take a significant amount of yoga to get out. Two will be most easily accessed by coming in from the side, which means the wheel liner needs to be removed. We do this later when taking off the subframe, so you might as well do it now if you can�t figure out any other way to get at those pesky bolts.
o Congratulations, you can now get to all the bolts that hold on the timing cover. But that darn crankshaft pulley still needs to go. Also, in my case I dropped the oil pan because I had big leaks to fix with a new gasket, but I understand this is a rare problem. I will explain that job too. I don�t know if the timing chain cover could be worked out of place with the sump still on the bottom, and the rocker/valve covers still on the top. Maybe, but then I�d worry about putting the timing cover back in place and screwing up the gaskets above and below on the sump and rocker covers as you slide into this tight fit. Given a choice I think it is easier to drop and reinstall the sump on the bottom than to remove and replace the intakes and rocker covers from the top. But if you have other work happening on top, and don�t have a leaky sump gasket, maybe go that way. This would also mitigate a lot of under engine work, and would not require a lift. Sounding better to go from the top if you don�t have a leaky sump gasket. If you go from the top start by reading aston1936�s outstanding blog about removing the intake manifolds first. That�s the hard part before you get to the rocker covers, which should be easy.
This was the hardest part of the job but with the tricks I learned I hope it will be much easier for you. The challenge is that you can�t get a traditional pulley puller on the front of the shaft with any room for the center bolt of the puller, which of course provides all the pull. Here�s what I worked out.
- First you have to get the OEM bolt out. Use a universal pulley holder (see picture above with the other tools) and the longest breaker bar you can find. The bolt has a normal right-hand thread. It�s a bit of a juggling act to hold the pulley holder just right and the breaker bar just right, and then apply a lot of strength to crack the bolt free, but doable. I found that the bolt doesn�t back out easily for quite a while, so switch to a ratchet after it starts moving.
- I used a star shaped puller in a kit that I have by Snap-on (see picture), but I see identical looking kits from other makers online. The pulley has three threaded M6 holes for mounting the puller, and the kit has the right M6 bolts. My threaded holes were pretty rusty so I used a re-threader tool to clean up the threads first. You want these to work smoothly. A little oil or lube on the bolts will help.
- Now here�s the trick.
o Put the OEM bolt back on the crankshaft and screw it in until the flange is about a half inch away from the hub.
o Mount the star puller on the pulley using the three M6 bolts. Make all the bolts snug and evenly loaded so the center of the puller is now flush against the head of the big center bolt.
o Sequentially tighten each of the three smaller bolts a little bit at a time which will create more and more pull on the pulley, off the crankshaft.
o After that first half-inch you�ll have to loosen up the three small bolts, back out the big bolt some more, and do it again. And again.
o The OEM bolt is not long enough for this technique to pull the pulley all the way off. When you hit the limit of the first bolt then use the next larger bolt you bought previously. And so on. It gets easier after a while.
o I�ll confess I thought through and tried a bunch of other ideas and got the pully off without the bigger bolts, but figured this one out when I was putting the pulley back on and I needed the longer bolts for that. You�ll see in the picture of the tools a short piece of threaded rod with a nut and washer on it. This is what I actually used to get the pulley off, with a similar backing-out procedure that the longer bolts will make easier.
o Once the pulley is off you should see the key on the shaft. There is no need to remove it and is better left in place.
- Congratulations. The timing chain cover is now free to be removed, well that is if it will slide out with the sump still attached and the valve covers still attached. If someone tries this please report. I had my sump dropped down so I can�t say. For the cover take, out all the bolts and gently pry the cover off. There are two locating studs, one on each side, that are so perfectly fit that they make the cover snug on the way off and the way back on, so you will have some resistance, but it isn�t futile. Now you also get to see the very thin shadow of a line where the gasket contacts the body of the engine. But I won�t rant about that again.
Removing the sump (sort of), and installing new gasket
I had a bad leak (oil dripping actually) around the sump so I had to change the gasket. I was hoping to drop the sump pan right off the car but that didn�t happen. The back of the sump gets wide at the bell housing. It�s too wide to drop down completely between the header/exhaust down pipes. I spent a fair amount of time experimenting to take off the headers while the engine was in the car but gave up. I should mention that the workshop manual shows a sketch that seems to indicate you can get the sump off with the exhaust pipes on, and the instructions don�t say to remove the pipes. This misinformation cost me a lot of time. Even though it was visually obvious the sump wouldn�t fit between the pipes my hope was it would slide forward and drop down when the exhaust pipes turned upwards. No joy. There are parts inside the sump and lower block that collide and stop the attempt to slide the sump forward. So it just hangs there daring you to try something stupid to force it off. I didn�t fall for it.
To make life easier, first completely remove the coolant hose/pipe the runs along the LH side of the sump and set it aside. (This is why you drained the coolant completely earlier by removing the big radiator hose from the bottom of the coolant pump).
On my car I also had to replace my motor mounts and for that I had to remove the subframe, which also includes removing parts of the front suspension. This of course allowed better access to the sump, but honestly, I didn�t know if it was absolutely necessary to have the subframe off. You can remove all the bolts that hold in the sump and it will drop enough to let you remove the timing chain cover from the front on the engine. It also turns out that it leaves you enough room, just barely, to carefully pull out the old sump gasket and far more carefully slide in a new one and get it in place in its groove. With the subframe and steering rack off I could drop the front maybe 1.5 inches, and the back edge of the sump maybe 3/4 inch. Without removing the subframe and steering rack you might get a ~3/4 inch gap all the way around. I would definitely try this first before removing the subframe. Either way there is barely enough of a gap to pull out the old gasket and get in there and clean up the mating surfaces of the sump and block (which were quite clean in my case with the exception of the few spots were a dot of RTV is required as shown in the manual). Nonetheless where my fingers wouldn�t fit in I used thin pieces of wood, like popsicle sticks, to gently press the new gasket into its groove on the sump. Critically important was using an endoscope so I could look carefully inside and see that I got the gasket exactly in the right place. I applied the new RTV as advised in the shop manual with sticks just before bolting it all back together, of course after I reinstalled the timing chain cover and gasket first.
Reassembly of everything on the front of the engine was pretty straight forward. The manual gives all the torque specs and order. The crankshaft pully was easy enough to put back on using the long bolt, then the medium bolt, then the stock bolt to pull the pulley all the way on. The torqueing technique is very clear in the manual but involves several steps of torqueing, loosening, and finally getting to the finish line. Getting the power steering pump bolted back on is a knuckle-bleeder. Re-attaching the sub frame is clear and straight forward especially if you use the carpenter�s clamps like I did (see video). The suspension parts take some muscle but align easily if you indexed everything on the way off. The tick there is that you have to have the wheels on the ground to do the final torques � or fake it. I left the wheels off but lowered the lift with the disks landing on jack stands (Aston has a fancy tool/jig for this) until the front lift pads were loose. This put the equivalent necessary load on the front suspension to properly tighten the control arm bolts.
Refill the fluids, reattach the battery and you�re ready to start up. Take a look at the posts by Aston1936 at https://aston1936.com/about/ about cranking the engine to circulate the oil before you start up (by temporarily removing a fuse), and doing a coast-down procedure to reset your ECU�s calibration about your coil packs. While you�re there marvel at the gift he has given all DB9 owners with his extremely thorough posts about the projects he has done on his car. Thanks Steve!
My dealer quoted me $5,500 to take care of the oil leaks, and $700 to change the engine mounts. The parts for the coil pack job were quoted at $2,700. I did not get a quote for labor but it�s a fair guess it would have been over $2k. All in this work would have been over $11k at the dealer. I bought nearly all the parts from Scuderia, some from eBay and some local, for $3137. The biggest hit was the coil packs and spark plugs. The parts only for the oil leaks (gaskets, o-rings, etc) were a total of $295. I didn�t keep track of my hours but from start to finish my DB9 was on my lift for about two weeks, but by no means did I work every day. Still the saving were significant and the work was quite a fun challenge. If it wasn�t for the Covid lockdown I may not have been able to give all this time to the work, so I can�t complain about having to stay at home and in my garage for this time. The DB9, as usual, is even an extra joy to drive after doing all this myself.

 04-05-2020, 06:55 PM


 Or a video.