
Carbon Fiber vinyl door pillar trim.
#1
 06-13-2010, 08:43 PM

Join Date: Sep 2005
Location: Colorado
Posts: 1,161
Rep Power: 69 
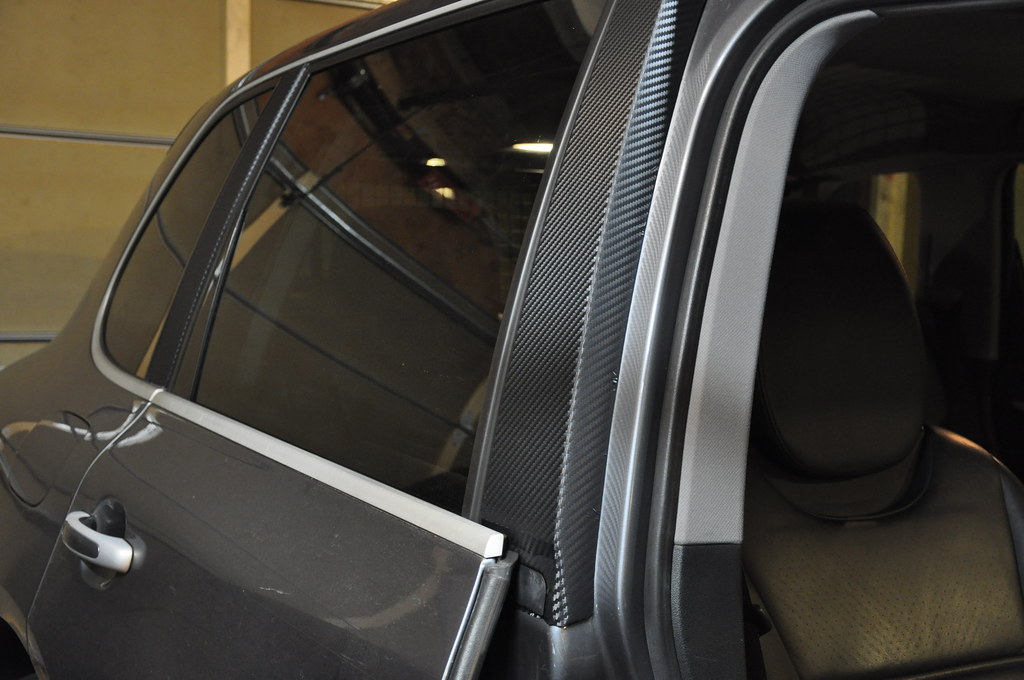
I am not a big fan of the silver pillar trim on my CTT and wanted to do something different.
I had heard good things about this Carbon Fiber vinyl stuff from 3m. So I figured I may as well give it a shot.
Here are the results. (now I just have to black out the rest of it.)

I had heard good things about this Carbon Fiber vinyl stuff from 3m. So I figured I may as well give it a shot.
Here are the results. (now I just have to black out the rest of it.)

#3
06-14-2010, 06:16 AM

Registered User
Join Date: Nov 2003
Location: Bangladesh/Herndon VA & DC
Posts: 7,049
Rep Power: 320 
the di-noc 3m film is amazing what it can do. The results looks very nice too. I just wrapped m5 spoiler in CF and ACS roof spoiler for my bmw e60 yesterday. Pix do not do justice.
#4
06-14-2010, 07:42 AM
Join Date: Sep 2005
Location: Colorado
Posts: 1,161
Rep Power: 69 I did a few misc pieces around the CTT too. The center console, ashtray drawer, inside corner door trim, rear cupholder trim and headlight washer covers.
There are a few little flaws and I need to get better with the stuff. So far I only have $60 into this little project. I am actually starting to think the dry carbon look looks cooler than the factory "carbon under plastic" look that costs thousands of dollars.

#7
06-14-2010, 10:01 AM
Join Date: Sep 2005
Location: Colorado
Posts: 1,161
Rep Power: 69 Please forgive the little flaws in some of these. This was my first time using the stuff and there is a little learning curve. Although, as far as DIY projects go, this one is pretty easy. Silly me started with the toughest piece first, the console. I think I know how to correct my little flaws in that now and will go back and fix it.
(I also took these pics in my dark garage last night, the pieces look much better out in the daylight)


I got them from CarbonFiberVinyl.com. I got a 24x36" roll (I think) it was about $60. Did all 4 pillars, cosole, headlight washer covers, corner window trim, ashtray door, rear cup holder door, ipad, 1/2 my key and I have a bit left over. I can probably get the rear door plastic trim pieces out of it and maybe a few other little items.
Trending Topics
#8
06-14-2010, 10:23 AM
Registered User
Join Date: Nov 2003
Location: Bangladesh/Herndon VA & DC
Posts: 7,049
Rep Power: 320 Would love to see that if you have any pictures.
I did a few misc pieces around the CTT too. The center console, ashtray drawer, inside corner door trim, rear cupholder trim and headlight washer covers.
There are a few little flaws and I need to get better with the stuff. So far I only have $60 into this little project. I am actually starting to think the dry carbon look looks cooler than the factory "carbon under plastic" look that costs thousands of dollars.
Send me an email at phoenix997@gmail.com and i will shoot over high res pix of my work.
#9
06-14-2010, 11:00 PM
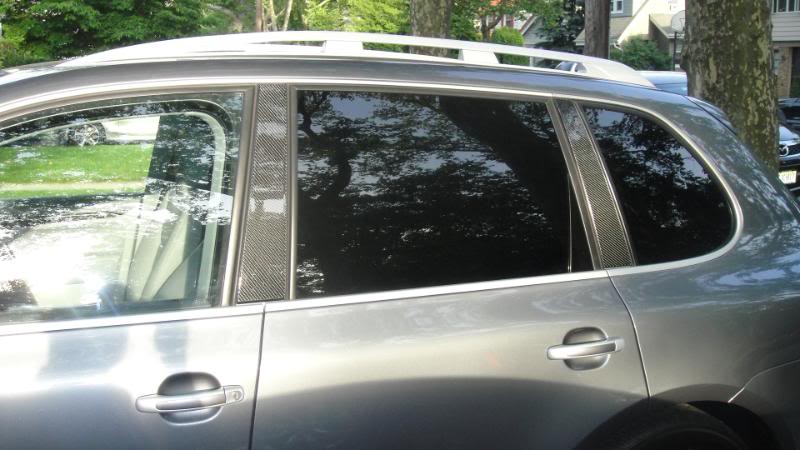
BIG LOL Dude - I did the same thing but after the second pillar I gave up. It was fighting me all the way. I caved and bought the carbon fiber overlays off ebay. From china to NJ in 3 days !
Here is the 3m on one pillar - Notice the way jacked up the upper left corner

And here is the real deal - And yes I know, I need to tint my front windows too


Here is the 3m on one pillar - Notice the way jacked up the upper left corner
And here is the real deal - And yes I know, I need to tint my front windows too
Last edited by roxboxxx; 06-14-2010 at 11:03 PM.
#10
06-15-2010, 07:05 AM
Join Date: Sep 2005
Location: Colorado
Posts: 1,161
Rep Power: 69
Those look good too.
I've started to notice that any "functional" cf I see is a more flat "dry" appearance. Where most of the decorative cf has the plasticy shiny wet look to it.
I like both, but am starting to lean more toward the dry flat look now.
I've started to notice that any "functional" cf I see is a more flat "dry" appearance. Where most of the decorative cf has the plasticy shiny wet look to it.
I like both, but am starting to lean more toward the dry flat look now.
#11
06-15-2010, 09:05 AM

Cole, first, I think what you did looks awesome. I'm curious, did you cover a woodgrain trim kit with the 3m vinyl or was your console flat black. Did you have to cover the cupholder door? Any chance you could show a pic of it if you did?
I'm thinking I'd love to do this to my CTT, but not sure how the drawer will go and since mine is woodgrain, thinking that might be tough. I supposed I could skip that part since I never close it anyhow, but would rather not. How thick is this stuff?
Anyone else have any experience with this over woodgrain?
#12
06-15-2010, 09:54 AM
Join Date: Sep 2005
Location: Colorado
Posts: 1,161
Rep Power: 69
I did not cover wood grain on this. It was a very hammered flat black console. That is why I covered it.

I did however change out the woodgrain in my Audi S4 about 7 years ago and the only piece I could nit get was the sifter surround. So I used a paint called "bumper black" from the auto parts store. It is a very simple and durable flat black. I just scuffed and painted the wood trim with it and it looked totally factory for a console. Never an issue with it scratching either.
I did however change out the woodgrain in my Audi S4 about 7 years ago and the only piece I could nit get was the sifter surround. So I used a paint called "bumper black" from the auto parts store. It is a very simple and durable flat black. I just scuffed and painted the wood trim with it and it looked totally factory for a console. Never an issue with it scratching either.
#13
06-15-2010, 09:55 AM
Cole, first, I think what you did looks awesome. I'm curious, did you cover a woodgrain trim kit with the 3m vinyl or was your console flat black. Did you have to cover the cupholder door? Any chance you could show a pic of it if you did?
I'm thinking I'd love to do this to my CTT, but not sure how the drawer will go and since mine is woodgrain, thinking that might be tough. I supposed I could skip that part since I never close it anyhow, but would rather not. How thick is this stuff?
Anyone else have any experience with this over woodgrain?
I'm thinking I'd love to do this to my CTT, but not sure how the drawer will go and since mine is woodgrain, thinking that might be tough. I supposed I could skip that part since I never close it anyhow, but would rather not. How thick is this stuff?
Anyone else have any experience with this over woodgrain?
#14
06-15-2010, 09:56 AM
I actually we prefer if it was a little more matt then shinny. I may take some 800 grit sand paper to it.
#15
06-15-2010, 09:58 AM
Join Date: Sep 2005
Location: Colorado
Posts: 1,161
Rep Power: 69
Here is the Audi S4 interior. The trim piece around the shifter is a factory burl wood painted over with bumper black. This picture was taken to sell the car, so the paint in this picture is about 5 years old.


Thread
Thread Starter
Forum
Replies
Last Post
Name Brand
Automotive Parts & Accessories For Sale/Wanted
1
11-21-2015 06:06 PM