
DRL Installed
#46
 08-20-2012 | 07:31 AM
Registered User
Joined: Oct 2008
Posts: 326
From: South Florida
Rep Power: 32

slant83 and cawhale, do you have exactly the same type of DRL Siwtch?
http://www.ebay.com/itm/LED-Daytime-...376e30&vxp=mtr
it seems that one worked and the other did not :-( I'm assuming you connected to the correct terminals right? Do they accept returns/exchange perhaps? I hope they do.
http://www.ebay.com/itm/LED-Daytime-...376e30&vxp=mtr
it seems that one worked and the other did not :-( I'm assuming you connected to the correct terminals right? Do they accept returns/exchange perhaps? I hope they do.
#47
08-20-2012 | 07:42 AM

Registered User
Joined: Jan 2012
Posts: 348
From: Philippines
Rep Power: 26
Just wanted to update the thread and let everyone know that yes you can pop out the grill in the picture above. Also, (added info) i was able to upgrade my foglight H11 bulbs because they are accessible after I pulled out the grills.
Any news or update on the non working DRL Switch from ebay?
Any news or update on the non working DRL Switch from ebay?
#49
08-20-2012 | 10:52 PM
Thread Starter
|
Registered User
Joined: Apr 2012
Posts: 212
From: San Diego
Rep Power: 26

Just wanted to update the thread and let everyone know that yes you can pop out the grill in the picture above. Also, (added info) i was able to upgrade my foglight H11 bulbs because they are accessible after I pulled out the grills.
Any news or update on the non working DRL Switch from ebay?
Any news or update on the non working DRL Switch from ebay?
#50
08-22-2012 | 12:43 AM

Registered User
Joined: Jul 2012
Posts: 31
From: Canada
Rep Power: 14
I heard some posts say the grills have doubleside tape attached but mine don't have. Just pull straight to yourself. When pulling, shake it loose a bit. I will take video when I get a chance.
I am waiting for replacement on DRL switch purchased on ebay.
Also I was able to replace the headlights to 8000K Xeon, works great, though I should go with 10000K, which looks more blue. I also replaced the corning light (LED wont work!), and the bulbs to LED inside headlights as well as side markers. They look awesome all together!
I also blacked out the b and c pillars, will post some pics
#51
08-22-2012 | 06:27 AM
Registered User
Joined: Jan 2012
Posts: 348
From: Philippines
Rep Power: 26
Hole on the engine firewall???
That is the one...I wired it directly to battery in the Boxster. I haven't gotten around to the Cayenne yet. I'll probably direct wire and not use the auto switch when I wire to the passenger side interior fuse box like I did for my radar on the same fuse tap. A bigger job and just waiting for a break in the heat. Next rainy day !!!
@bansasn - I will try to shoot a video removing the grills. Use a plastic panel removal tool.
@cawhale - No error messages when you changed your foglights to HIDs? Did you just tap the wiring to the existing foglights line?
Last edited by fullmetaljacket; 08-23-2012 at 05:57 AM.
#52
08-24-2012 | 10:00 AM
Registered User
Joined: Jan 2012
Posts: 348
From: Philippines
Rep Power: 26
Guys, got the DRLs in the mail today yahoo.
I tried fitting the DRL assembly into the 2nd slot but its too thick. When i try forcing it inwards the fins get kinda pregnant :-( Did you do anything special to your DRLS or grills so that you can push them inwards? If not, then how many millimeters did your DRLS protrude? I want the DRLS to be more inward and like them to appear flat and not protruding to give a more OEM look. Will this be possible?
I tried fitting the DRL assembly into the 2nd slot but its too thick. When i try forcing it inwards the fins get kinda pregnant :-( Did you do anything special to your DRLS or grills so that you can push them inwards? If not, then how many millimeters did your DRLS protrude? I want the DRLS to be more inward and like them to appear flat and not protruding to give a more OEM look. Will this be possible?
#53
08-24-2012 | 10:51 AM
Registered User
Joined: Jul 2012
Posts: 31
From: Canada
Rep Power: 14
Guys, got the DRLs in the mail today yahoo.
I tried fitting the DRL assembly into the 2nd slot but its too thick. When i try forcing it inwards the fins get kinda pregnant :-( Did you do anything special to your DRLS or grills so that you can push them inwards? If not, then how many millimeters did your DRLS protrude? I want the DRLS to be more inward and like them to appear flat and not protruding to give a more OEM look. Will this be possible?
I tried fitting the DRL assembly into the 2nd slot but its too thick. When i try forcing it inwards the fins get kinda pregnant :-( Did you do anything special to your DRLS or grills so that you can push them inwards? If not, then how many millimeters did your DRLS protrude? I want the DRLS to be more inward and like them to appear flat and not protruding to give a more OEM look. Will this be possible?
 I wet the doubleside tape with some water, push, and hold until it's dry. Just how I did it but there's a risk of washing out the adhesive if too much water.
 I didn't change the foglights but the only low beam. Mine already has xenon, so just replaced the xenon bulbs. The cornering lights require halogen and LED won't work because the current draw (wattage) is different.
#55
08-25-2012 | 08:36 AM
Registered User
Joined: Jan 2012
Posts: 348
From: Philippines
Rep Power: 26
Thanks for the updates and tips.
I hope my DRL switch works.
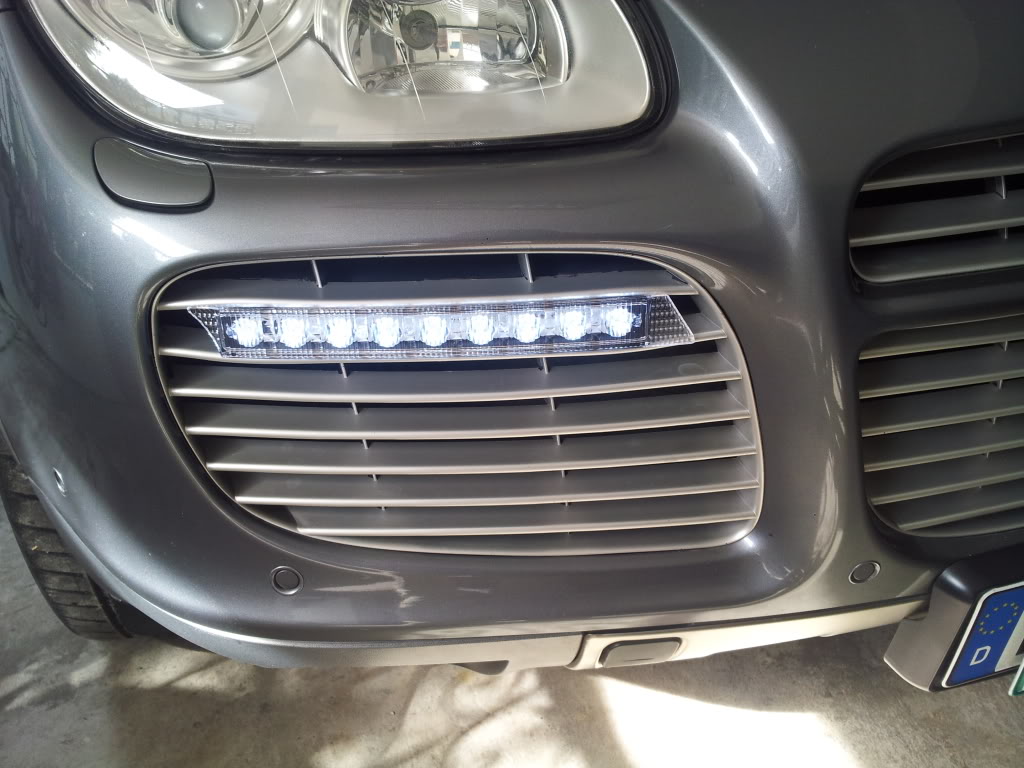
Just wanted to share my initial install pix with you guys. I sanded off excess plastics and was able to flushmount the DRLs. I used plastic that came from a BMW E36 bumper lying around the garage to add support to the back part and force the DRL housing to get farther inside the grill (if you don't have a bimmer bumper, you can always use any hard plastic sheets :-))
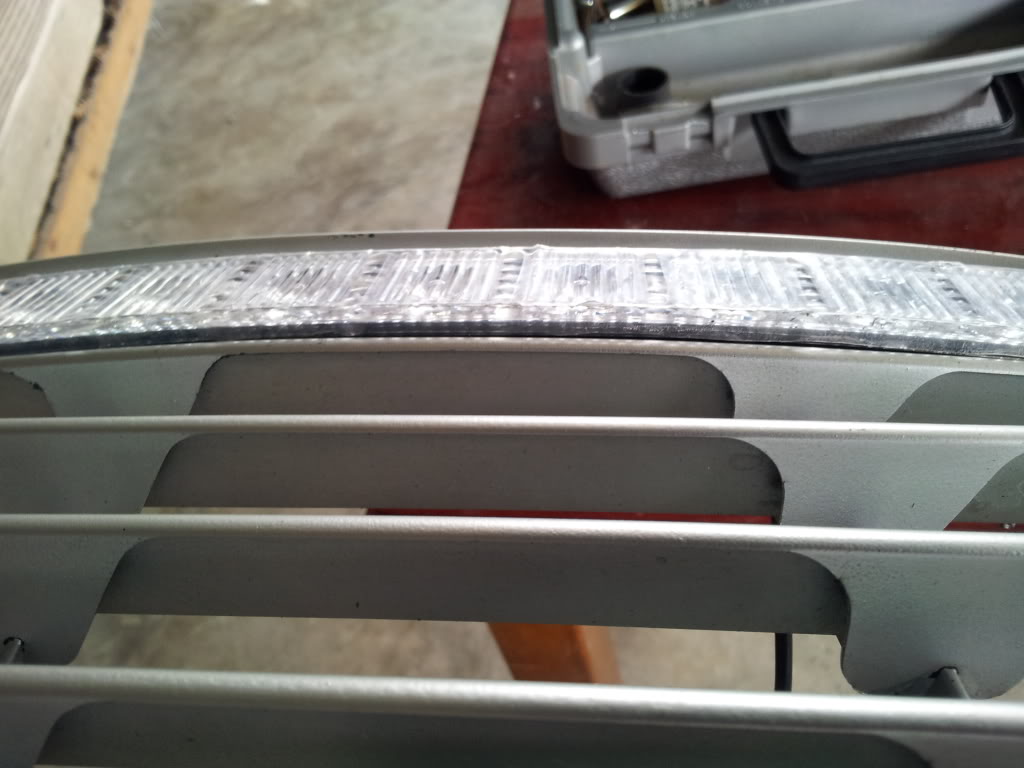
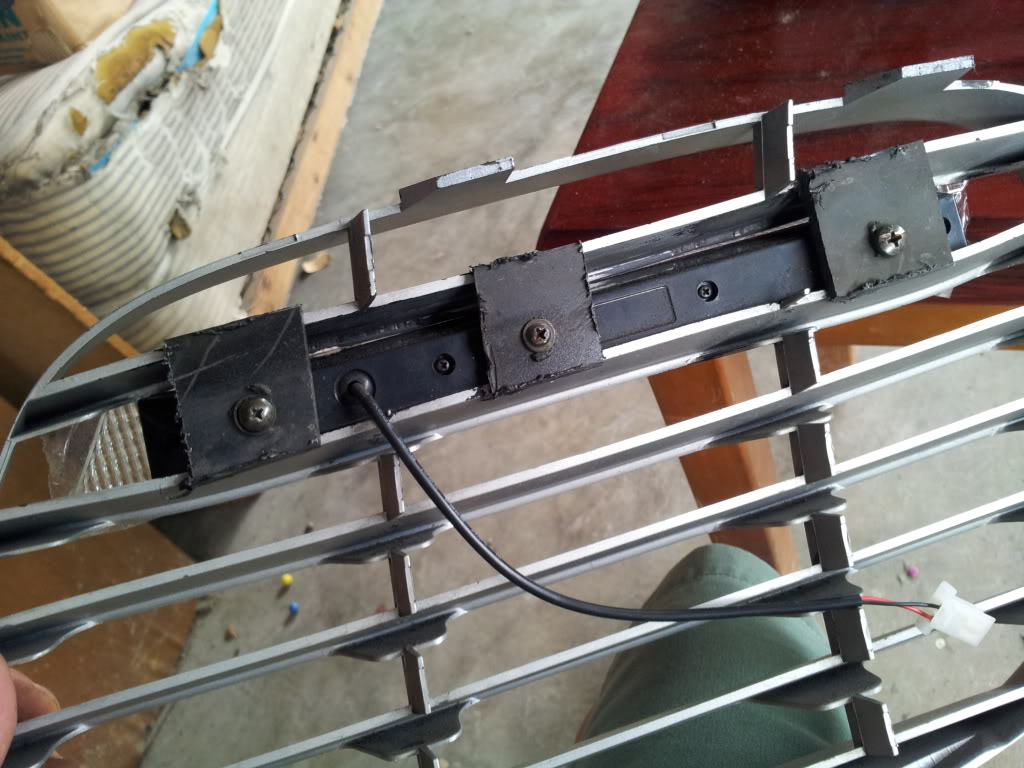
Im just gonna route the wirings with the DRL switch. Hopefully, everything will work out. Will take some pictures again after complete install. Hope these gives you more ideas how to install the DRLs.
I hope my DRL switch works.
Just wanted to share my initial install pix with you guys. I sanded off excess plastics and was able to flushmount the DRLs. I used plastic that came from a BMW E36 bumper lying around the garage to add support to the back part and force the DRL housing to get farther inside the grill (if you don't have a bimmer bumper, you can always use any hard plastic sheets :-))
Im just gonna route the wirings with the DRL switch. Hopefully, everything will work out. Will take some pictures again after complete install. Hope these gives you more ideas how to install the DRLs.
#56
08-27-2012 | 12:09 AM
Registered User
Joined: Jul 2012
Posts: 31
From: Canada
Rep Power: 14
Today, it kept going on and off every few seconds and now it's completely off, i am so frustrated!!
#57
08-28-2012 | 05:34 AM
Registered User
Joined: Jan 2012
Posts: 348
From: Philippines
Rep Power: 26
It is fortunate that mine are working perfectly. Here is to complete the install pictures...
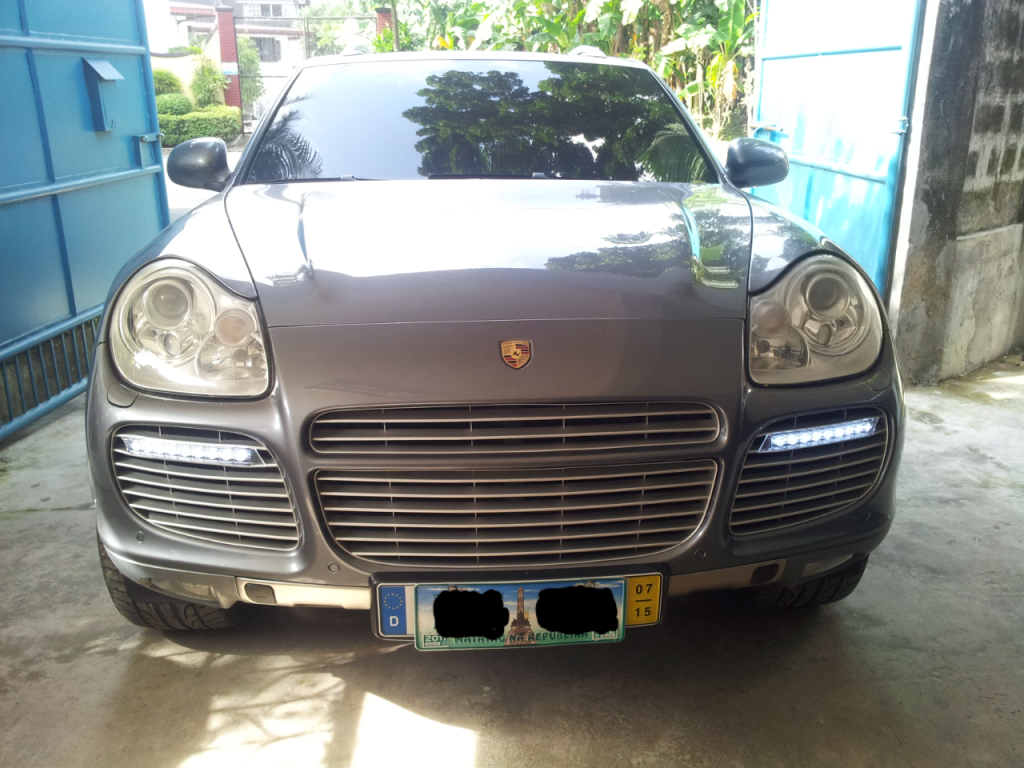
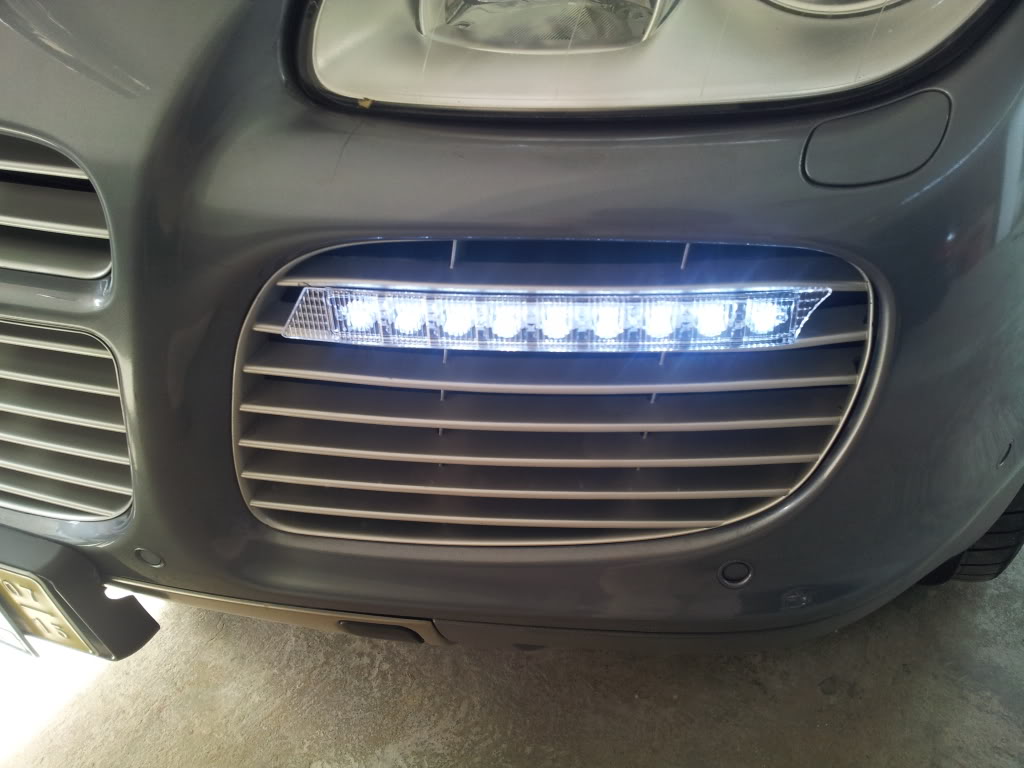
To all you guys in this thread...thanks for all your inputs!
To all you guys in this thread...thanks for all your inputs!
Last edited by fullmetaljacket; 08-28-2012 at 05:38 AM.
#59
08-29-2012 | 07:03 AM
Registered User
Joined: Jan 2012
Posts: 348
From: Philippines
Rep Power: 26
hope this helps
sorry for not being able to take pictures of the relay installation. However, I can try and explain how I did the DRL switch relay install...
1. Assuming you have already mounted the DRL's on the grill, remove both passenger and driver's side headlight assemblies. This will enable you to have access to the back part where you will route and tuck in the DRL wirings.
2. After tucking in and routing the DRL wirings towards the driver's side headlight hole or silo, you will see huge ribbed wire tubings inside. This is where I securely zipped tied the DRL relay box and also the excess wires.
3. Inside this headlight silo, you will be able to route the DRL switch's power wiring (red colored power wire) towards the battery jumper cable terminal (this is the one beside the brake fluid plastic container).
4. There is also a bolt located somewhere on the left side of the silo where you can bolt on the DRL relay's ground wire ring (black colored power wire). Look for an 8' nut to secure and tighten the connection.
5. Remove the red plastic cover revealing the terminal and force the aluminum ring tip of the red positive wire into the small hole directly into the top of the battery jumper terminal and plug in some small lead materials so that the wire will remain snuggingly secured.
6. Don't forget to put the red plastic cover back to protect the terminal.
7. I did not bother to connect the yellow wire which was intended as an auto off switch when you turn on your headlights. Just put a shrink tube on it and zip tie it together with the excess wirings.
That's it!
Insert your key into the ignition and power up. Your DRL's will light up when you turn the key and will turn off when you power down. There is however a slight delay before the DRL's go out - maybe around 2 seconds. In my case I don't mind the slight delay. In some cases the FRL's also momentarily turn on when you lock and unlock your vehicle using the remote but remains off when ignition is not turned on.
I hope it stays this way. I'm contemplating on ordering another switch for my MB. Will wait for a month beofre I do so just to be sure.
Shoot some questions if you get lost in the install. For me, it was mainly common sense and stock knowledge I used for the install. I hope this helps. Cheers!
Last edited by fullmetaljacket; 08-29-2012 at 07:09 AM.