
Pimping my garage


#137
 12-13-2009, 11:37 AM
Autocross season is over, back to work. Took a seasons 1st place with each of 2 PCA regions that run here, same as last year.
Dec 09 progress report.
I was hoping to get another year out of the Tyvek house (garage) wrap, but it was not going to happen. Dupont rates it for exposure for only 30-60 days and it has been 3 years. Sunlight has broken it down and instead of being something that is almost impossible to tear, it rips almost like newspaper. Large sheets of the back wall blew off in September, as well as the sides of the dormers. I replaced what I could with Greenguard, rated for a years exposure. It won�t be uncovered that long though.
Back wall

Set up some staging and covered the back wall. You can see the Tyvek missing from the dormer side, upper left.

Covered the back wall with Vinyl siding while the staging was set up. I did it myself and it only took me about 18 hours to put up almost 8 square. That time also includes applying the corner boards and related flashing. Applied 2 coats of paint to the rake boards while I was up there. Peak is about 26 feet up.

Replacing the Tyvek on the dormers was a little more tricky. I crawled out on the plank to access the roof and stood on the end to do the face. Not shown is the long 2x6 that was clamped sideways at the end of the plank. Safety rail. Once it was set up I re-covered a dormer in just about an hour each. Front door trim has also been replaced with Azek.

That�s all for now until spring gets here. Hanging about 300 sheets of drywall in the house addition. Hope to move in by spring, or earlier.
Dec 09 progress report.
I was hoping to get another year out of the Tyvek house (garage) wrap, but it was not going to happen. Dupont rates it for exposure for only 30-60 days and it has been 3 years. Sunlight has broken it down and instead of being something that is almost impossible to tear, it rips almost like newspaper. Large sheets of the back wall blew off in September, as well as the sides of the dormers. I replaced what I could with Greenguard, rated for a years exposure. It won�t be uncovered that long though.
Back wall
Set up some staging and covered the back wall. You can see the Tyvek missing from the dormer side, upper left.
Covered the back wall with Vinyl siding while the staging was set up. I did it myself and it only took me about 18 hours to put up almost 8 square. That time also includes applying the corner boards and related flashing. Applied 2 coats of paint to the rake boards while I was up there. Peak is about 26 feet up.
Replacing the Tyvek on the dormers was a little more tricky. I crawled out on the plank to access the roof and stood on the end to do the face. Not shown is the long 2x6 that was clamped sideways at the end of the plank. Safety rail. Once it was set up I re-covered a dormer in just about an hour each. Front door trim has also been replaced with Azek.
That�s all for now until spring gets here. Hanging about 300 sheets of drywall in the house addition. Hope to move in by spring, or earlier.
#138
12-13-2009, 01:01 PM

congrats on the auto X wins. they are a blast. i cant believe this started in 06 and still isnt finished yet!
#139
12-17-2009, 05:31 AM
Registered User
Join Date: Dec 2009
Location: An oven called Phoenix
Posts: 194
Rep Power: 22 
Anticipating your finished product, not as much as you though.
Loved the eviction notice on the bird house, the ML in the incomplete garage and the diagrams throughout the thread of where you anticipated parking which cars. Just like something I'd do. Great thread and look forward to more. Luck!
Loved the eviction notice on the bird house, the ML in the incomplete garage and the diagrams throughout the thread of where you anticipated parking which cars. Just like something I'd do. Great thread and look forward to more. Luck!
#140
12-19-2009, 07:58 AM
Only 2 dormers left to be re wrapped in green guard. Aluminum pump jacks are in the front of the garage at this moment. I stripped most of the tattered tyvek from the front last night, and will have the front green in a few hours, and hope to wrap one more stripped dormer before the storm hits. It was 20F outside this AM, and as much as 15+" of snow on the way this eve. Staging is not a lot of fun with snow and ice on it.
#142
10-08-2010, 07:10 AM

Registered User
Join Date: Sep 2008
Location: Newport News, Va
Age: 40
Posts: 49
Rep Power: 18
Damn, being that you had so many frustrations from the beginning, I am glad to see it all coming together and wrapping up. Such a nice garage!
#144
10-28-2010, 02:39 PM
Not even close to having the outside done. Had to replace Tyvek on the front as soon as winter ended. Also had to start the cedar shingles on the front sorta from the peak down. I'll try to post a pic soon to show that because it also involved a copper roof overhang over the front upstairs windows. Major push right now is to have Thanksgiving in the house addition. First floor is 95% finish painted and laminate flooring is going down.
#145
12-06-2010, 07:24 AM
Not even close to having the outside done. Had to replace Tyvek on the front as soon as winter ended. Also had to start the cedar shingles on the front sorta from the peak down. I'll try to post a pic soon to show that because it also involved a copper roof overhang over the front upstairs windows. Major push right now is to have Thanksgiving in the house addition. First floor is 95% finish painted and laminate flooring is going down.
Scruffy!
Let me know when you are having the "garage warming" party haha.
Thanks,
Chris
#146
04-03-2011, 03:42 PM
April 3, 2011
Over a full year later and a bit more progress. First floor of the house is ready to move in almost so back to the garage. Last spring I completed the upper window overhang, and put copper shingles on it.
I used the Completion Backwards method. Ledgers were lagged to the framing, flashed with Grace and lead, and then I shingled up to the peak. Next I framed the upper overhang, applied the copper roof, and finished the soffit underneath. Normally this would all be done from the ground up, but it would be very hard to shingle with the overhang almost crowding me off the staging. Trimmed off the window, lower ledgers lagged on, repeat.
Last weekends lower overhang progress. Framing was completed a few hours after this pic.

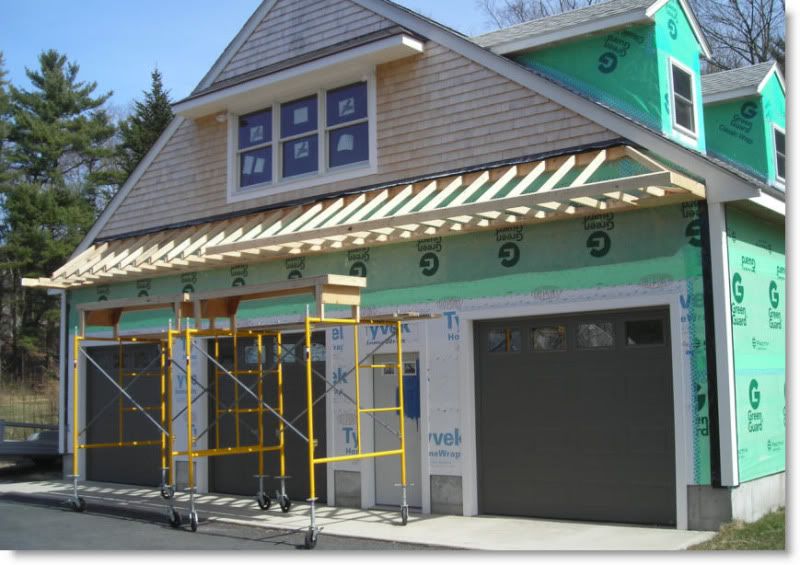
End of second weekend. Completely covered with water and ice shield. Bought 1 roll for both overhangs, had 1 foot left over. Copper shingles will be done later this month.

More pics when the copper first goes on and again when shingles are completed.
Over a full year later and a bit more progress. First floor of the house is ready to move in almost so back to the garage. Last spring I completed the upper window overhang, and put copper shingles on it.
I used the Completion Backwards method. Ledgers were lagged to the framing, flashed with Grace and lead, and then I shingled up to the peak. Next I framed the upper overhang, applied the copper roof, and finished the soffit underneath. Normally this would all be done from the ground up, but it would be very hard to shingle with the overhang almost crowding me off the staging. Trimmed off the window, lower ledgers lagged on, repeat.
Last weekends lower overhang progress. Framing was completed a few hours after this pic.
End of second weekend. Completely covered with water and ice shield. Bought 1 roll for both overhangs, had 1 foot left over. Copper shingles will be done later this month.
More pics when the copper first goes on and again when shingles are completed.

