
Exhaust sound control at your finger tip
#1
 02-28-2010, 04:26 PM

Join Date: Apr 2008
Location: Rocklin, California
Posts: 1,120
Rep Power: 132 

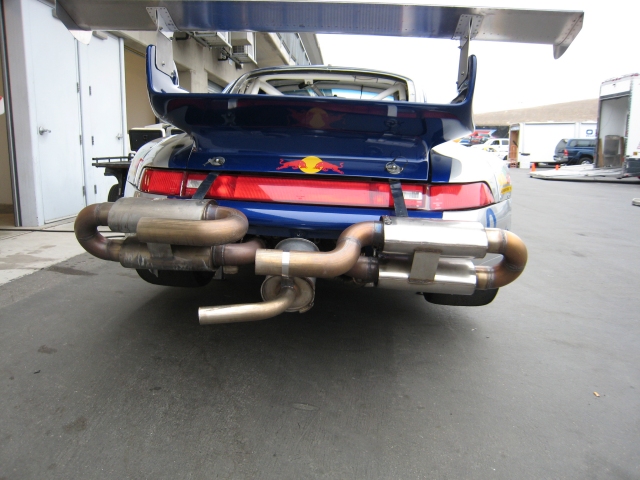
It will be nice to control the loudness of our exhaust at our finger tip especially for those of us with after market exhaust or track time at Laguna Seca since it impose sound limit of 92 db. Wait, if you drive with the sport button off should solve the problem right? Well, no. Even with sport button off, the lower exhaust valve open up to allow better exhaust flow past 4K RPM. This is why you can't pass the 92 db sound limit at Laguna Seca even with stock exhaust and sport button off.
So far the only solution is manually connect the lower exhaust flap vacuum line together so the lower exhaust valve remained closed all the time which mute the exhaust by directing exhaust flow through all chamber of the two main side muffler. Restrict the exhaust flow lead to 8.2 lb-ft of torque and 9.3 hp loss but most importantly 17.2 lb-ft loss of torque at 4300 RPM but sometime you have to pay to play.
So I set out to find ways to make the exhaust flow control less painful and easy with a flip of a switch. First I need to know what voltage trigger the electronic vacuum valve and also find out ways to route the wire from driver compartment to engine compartment.
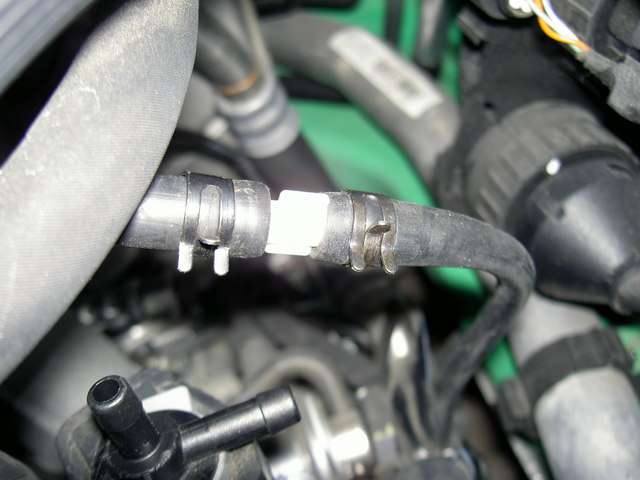
Blue collar way to manually close the lower exhaust flap as demonstrated by my earlier Laguna sound buster write up

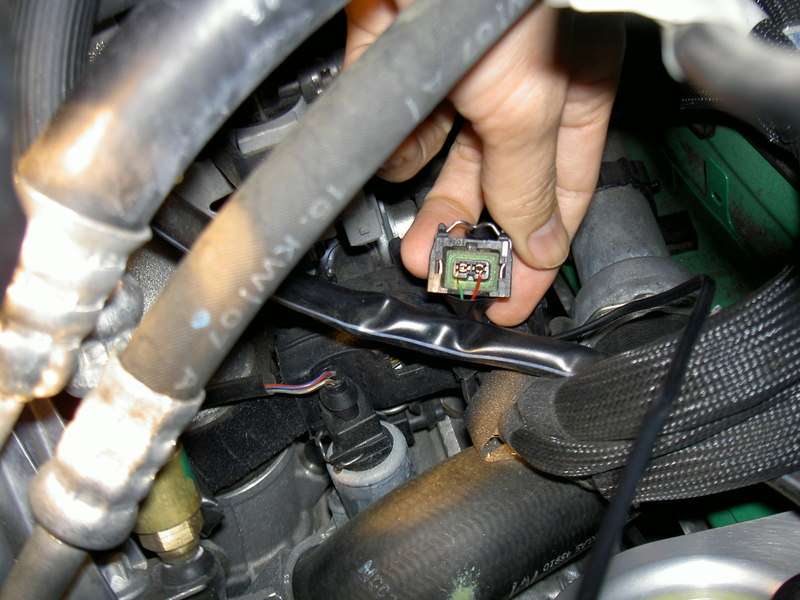
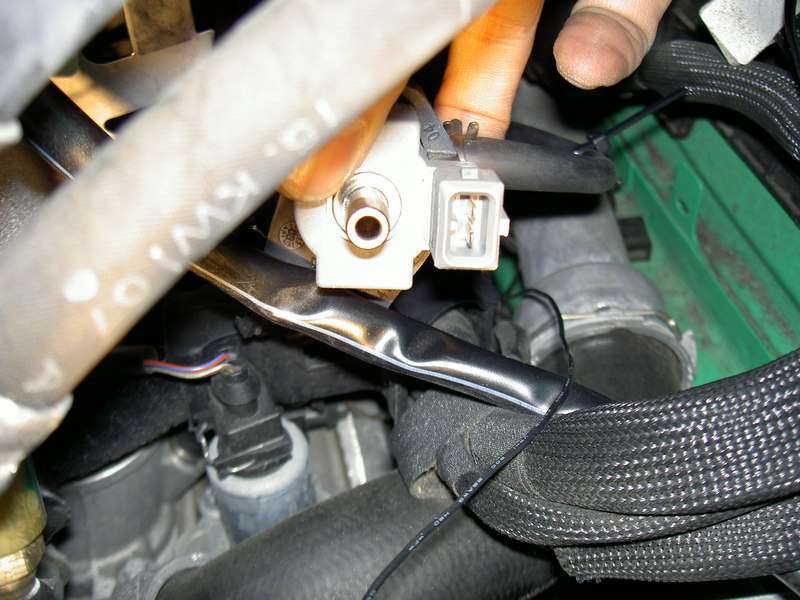
Let's tap into the electronic vacuum valve to find out what voltage turn it on and off
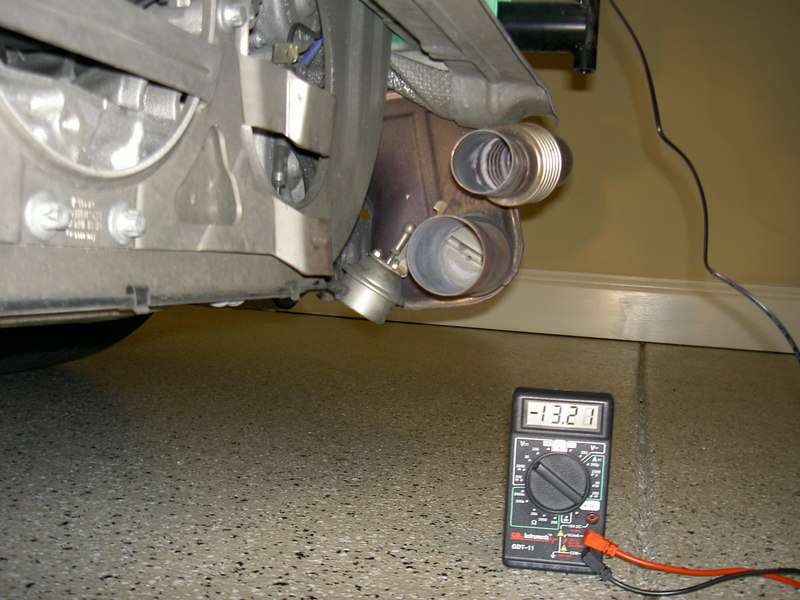
13 volts to the electronic vacuum switch close the lower exhaust flap. It turns out 12V from inside of the car also works
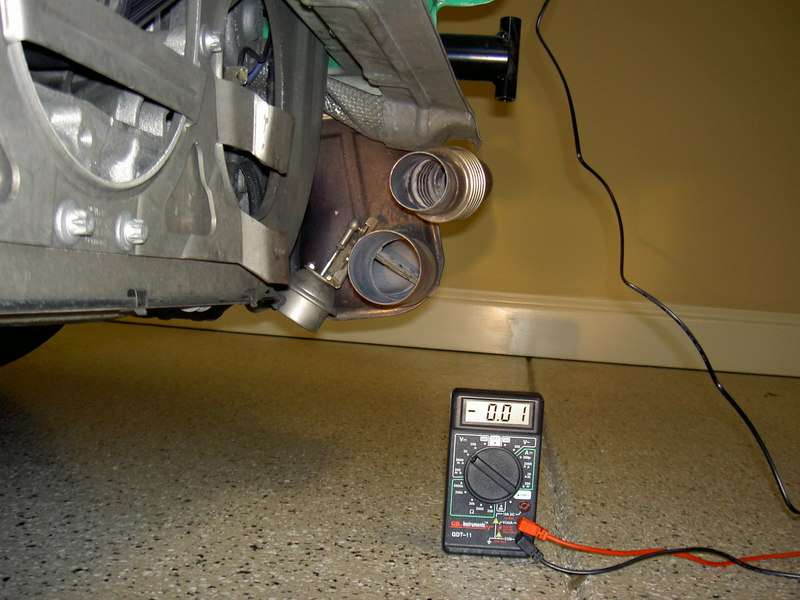
Zero volt turn the lower exhaust flap open regardless if you have sport button on or off
Here is a video of the lower exhaust flap in action with voltage change to the electronic vacuum valve
http://www.youtube.com/watch?v=3Bwyqg3NrTA
Now we need to find ways to control the electronic vacuum valve with a simple switch from inside of the car. Radio Shack is a great source for the occasion
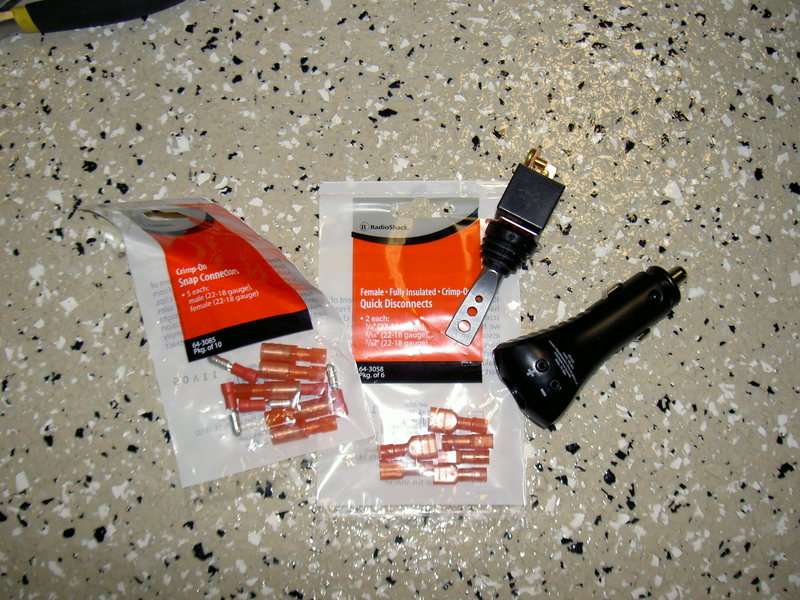
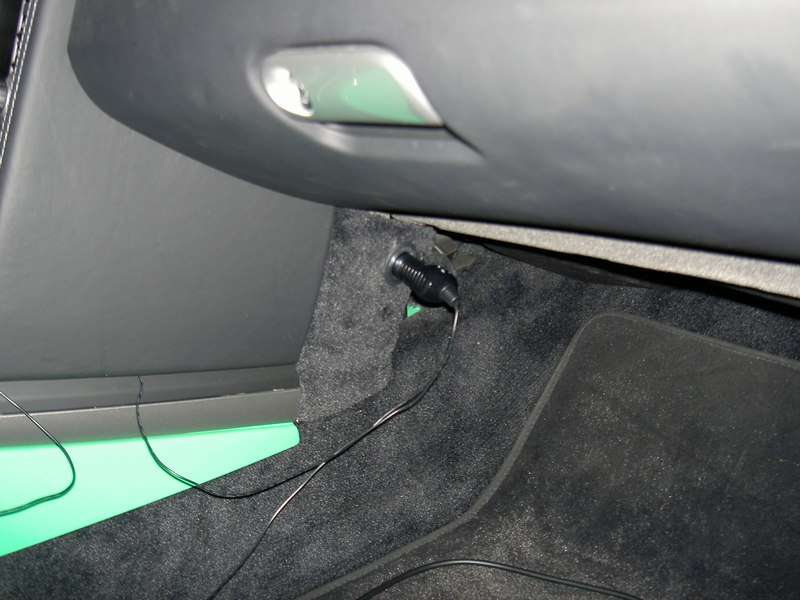
The 12 volt outlet on the passenger side is a good source for the juice needed to control the vacuum valve. A simple cigarette lighter plug does the job
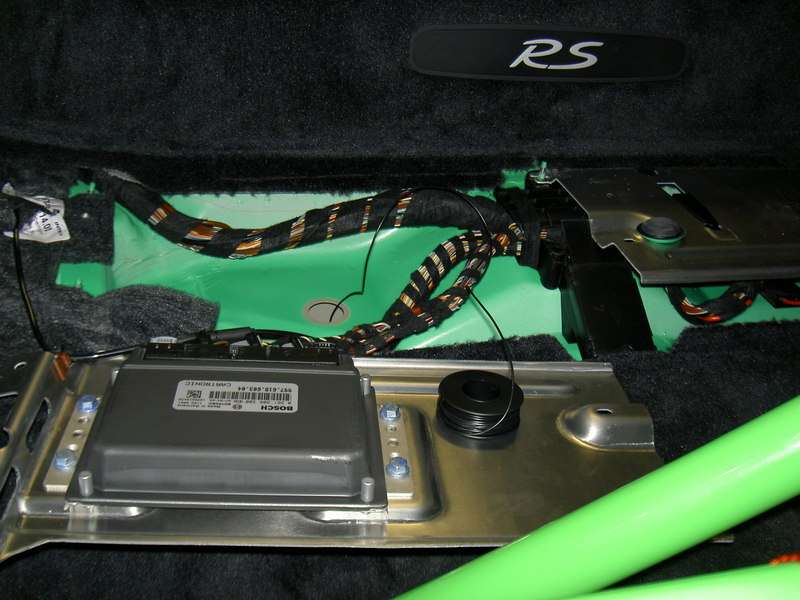
Lift the flat rear carpet and expose the panel that house the DME. Remove three 10 mm nut and lift the panel away to reveal a round plastic body plug. Remove the plug then you can gain access to the engine compartment.
Thread the wires down through both round openings and it will pass next to the transmission
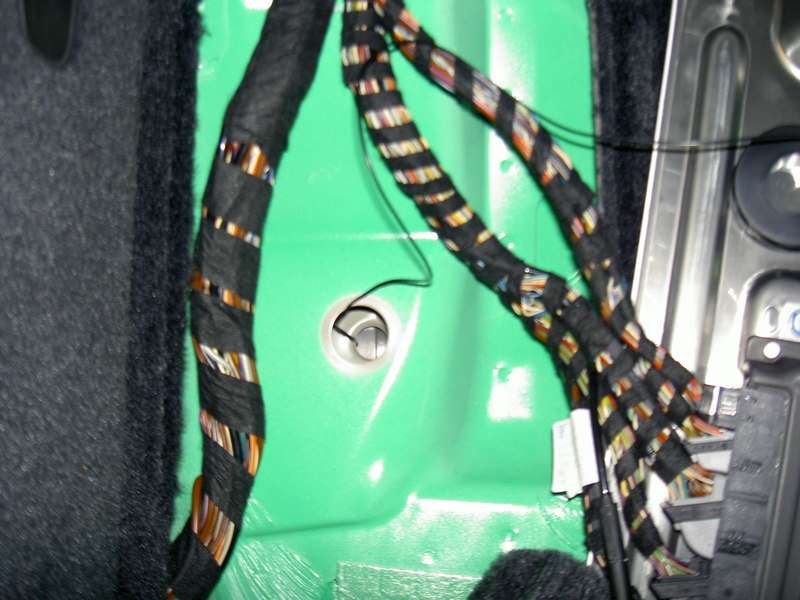
Route the wires to the electronic vacuum valve and try to avoid moving suspension parts and contact with the engine

Lift up the electronic vacuum valve from the metal bracket. to reveal the under side of the plug receiver. I used two small insulated plugs and cup away the insulation at the top of the pug to make it fit in the vacuum valve plug receiver. I tested the polarity of the original plug and made sure the modified plugs also carry the same DC polarity. I don't know if the electronic vacuum valve can be damaged if polarity is switch around. Best to play it safe since they are $135 each to replace!

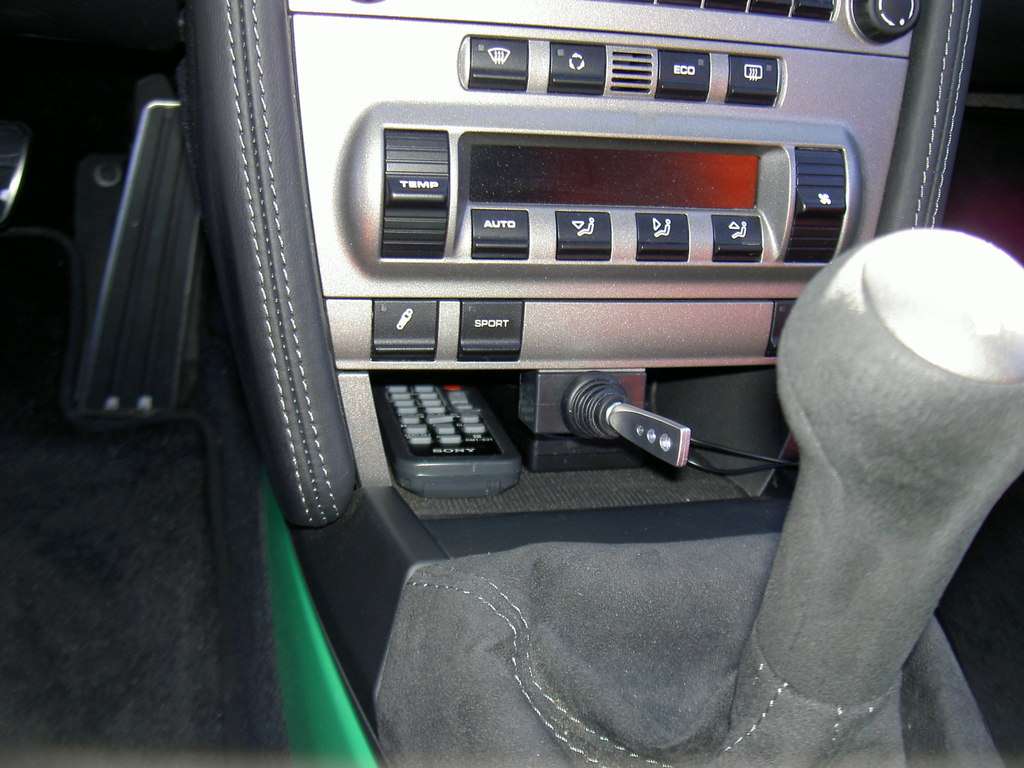
I used a simple on and off switch with a long handle that you can toggle from side to side. It was secure to the underside of the center console with double sided tape. These double sided tape can be had from any hardware store (I got mine form home depot) and it will not fall off. I had one heck of a time removing it to reposition the switch. The whole setup was perfect even on the track. Super easy to operate just by touch!
Here is a video demonstrating the switch operation
http://www.youtube.com/watch?v=rI_VFuACtjg
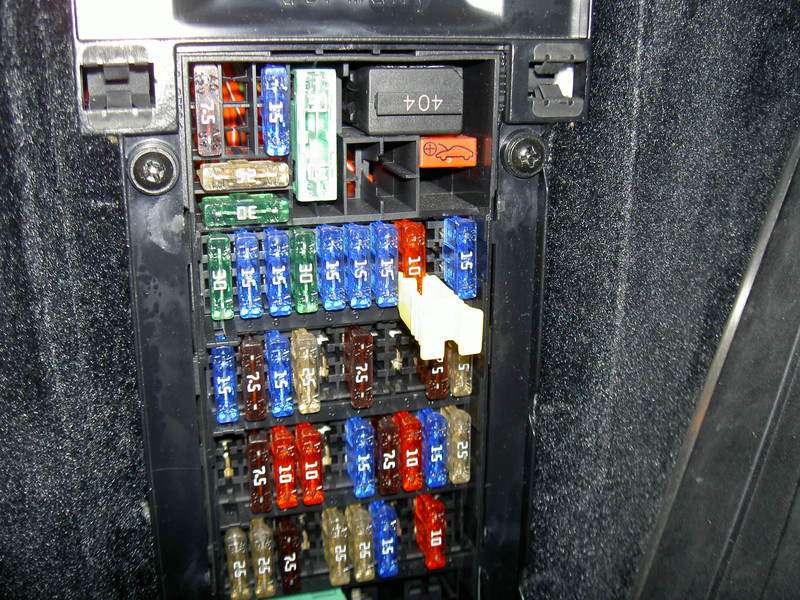
I had so much fun with this switch and kept on toggling back and froth driving to Laguna Seca couple days ago and end up burning the 12V outlet fuse lol. It did not help that both 12V outlet were being used in the same time (the other one was connected to traqmate). I swap out the 7.5A fuse with a beefier 10A fuse and switch my traqmate to the center console cigarette plug and had no issue with the fuse since. Here is a picture of the 12V power outlet fuse if you need to gain access. It is the one with the yellow fuse puller - I replaced it with a 10A fuse
Now we need to label the toggle switch to help ID the correct side for on and off operation. Right side = more power and sound. Left = quiet and less adrenaline. I made a few suggestion as follow
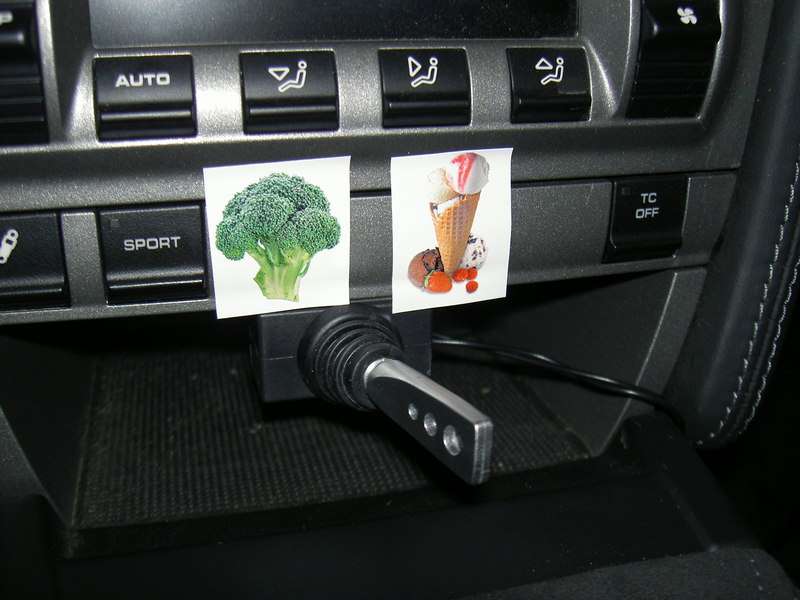
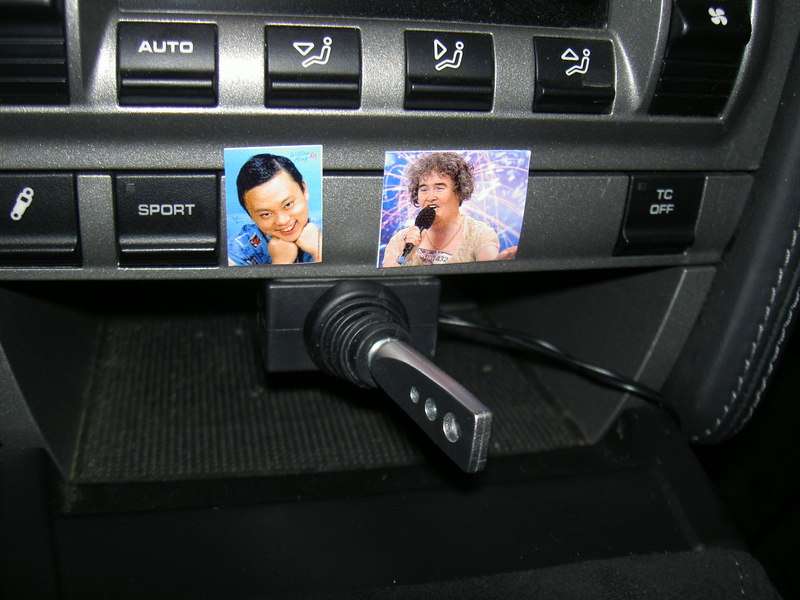

I think I like this one the best

So far I am super pleased with this in-car exhaust sound switch and it has been a blast! With a flip of a finger you can reduce the exhaust note for long trip comfort and Laguna Seca sound requirement. Toggle it back if you are trying to pass a CHP lol. This give us another option to control our exhaust note at the touch of our finger.
So far the only solution is manually connect the lower exhaust flap vacuum line together so the lower exhaust valve remained closed all the time which mute the exhaust by directing exhaust flow through all chamber of the two main side muffler. Restrict the exhaust flow lead to 8.2 lb-ft of torque and 9.3 hp loss but most importantly 17.2 lb-ft loss of torque at 4300 RPM but sometime you have to pay to play.
So I set out to find ways to make the exhaust flow control less painful and easy with a flip of a switch. First I need to know what voltage trigger the electronic vacuum valve and also find out ways to route the wire from driver compartment to engine compartment.
Blue collar way to manually close the lower exhaust flap as demonstrated by my earlier Laguna sound buster write up
Let's tap into the electronic vacuum valve to find out what voltage turn it on and off
13 volts to the electronic vacuum switch close the lower exhaust flap. It turns out 12V from inside of the car also works
Zero volt turn the lower exhaust flap open regardless if you have sport button on or off
Here is a video of the lower exhaust flap in action with voltage change to the electronic vacuum valve
http://www.youtube.com/watch?v=3Bwyqg3NrTA
Now we need to find ways to control the electronic vacuum valve with a simple switch from inside of the car. Radio Shack is a great source for the occasion
The 12 volt outlet on the passenger side is a good source for the juice needed to control the vacuum valve. A simple cigarette lighter plug does the job
Lift the flat rear carpet and expose the panel that house the DME. Remove three 10 mm nut and lift the panel away to reveal a round plastic body plug. Remove the plug then you can gain access to the engine compartment.
Thread the wires down through both round openings and it will pass next to the transmission
Route the wires to the electronic vacuum valve and try to avoid moving suspension parts and contact with the engine
Lift up the electronic vacuum valve from the metal bracket. to reveal the under side of the plug receiver. I used two small insulated plugs and cup away the insulation at the top of the pug to make it fit in the vacuum valve plug receiver. I tested the polarity of the original plug and made sure the modified plugs also carry the same DC polarity. I don't know if the electronic vacuum valve can be damaged if polarity is switch around. Best to play it safe since they are $135 each to replace!
I used a simple on and off switch with a long handle that you can toggle from side to side. It was secure to the underside of the center console with double sided tape. These double sided tape can be had from any hardware store (I got mine form home depot) and it will not fall off. I had one heck of a time removing it to reposition the switch. The whole setup was perfect even on the track. Super easy to operate just by touch!
Here is a video demonstrating the switch operation
http://www.youtube.com/watch?v=rI_VFuACtjg
I had so much fun with this switch and kept on toggling back and froth driving to Laguna Seca couple days ago and end up burning the 12V outlet fuse lol. It did not help that both 12V outlet were being used in the same time (the other one was connected to traqmate). I swap out the 7.5A fuse with a beefier 10A fuse and switch my traqmate to the center console cigarette plug and had no issue with the fuse since. Here is a picture of the 12V power outlet fuse if you need to gain access. It is the one with the yellow fuse puller - I replaced it with a 10A fuse
Now we need to label the toggle switch to help ID the correct side for on and off operation. Right side = more power and sound. Left = quiet and less adrenaline. I made a few suggestion as follow
I think I like this one the best
So far I am super pleased with this in-car exhaust sound switch and it has been a blast! With a flip of a finger you can reduce the exhaust note for long trip comfort and Laguna Seca sound requirement. Toggle it back if you are trying to pass a CHP lol. This give us another option to control our exhaust note at the touch of our finger.
Last edited by mikymu; 02-28-2010 at 11:07 PM.
#2
02-28-2010, 04:44 PM
Registered User
Join Date: Aug 2009
Location: Roseville, California
Posts: 284
Rep Power: 27
#3
02-28-2010, 05:41 PM
Join Date: Apr 2008
Location: Rocklin, California
Posts: 1,120
Rep Power: 132
I had some fun with the stickers lol
I toggle the switch to quiet around my neighborhood and loud when I stop next to a cop
I toggle the switch to quiet around my neighborhood and loud when I stop next to a cop
#5
02-28-2010, 08:20 PM
Another great write up man. You really take a lot of time to help the board out with things a lot of people probably don't think about. While this write up doesn't affect me personally I think its a great idea. Let me tell you I really appreciate your contribution!

Trending Topics
#8
02-28-2010, 10:17 PM
Join Date: Apr 2008
Location: Rocklin, California
Posts: 1,120
Rep Power: 132 LOL
I was going to be aerospace engineer then I got struck by lightning and became a doctor instead. I am living my engineer dream by modding my car
The angel on my right shoulder tell me to be good but the green devil on the left shoulder tell me I only live once

#9
02-28-2010, 10:22 PM
Here is a video of the lower exhaust flap in action with voltage change to the electronic vacuum valve
http://www.youtube.com/watch?v=3Bwyqg3NrTA
did you do this with the garage door closed again?
too much carbon mono makes mod your car more and more.
#10
02-28-2010, 10:34 PM
Join Date: Apr 2008
Location: Rocklin, California
Posts: 1,120
Rep Power: 132 did you do this with the garage door closed again?
too much carbon mono makes mod your car more and more.
traqmate knows where the soundbooth is on T5. would be great to have traqmate hack that opens and closes the valves in that section of the track. no manual toggles. your next diy.
too much carbon mono makes mod your car more and more.
traqmate knows where the soundbooth is on T5. would be great to have traqmate hack that opens and closes the valves in that section of the track. no manual toggles. your next diy.
The switch has to be toggled before turn 5 ... wait, why am I talking about this? My switch is always on quiet!
#11
02-28-2010, 10:44 PM
i bet this guy wishes he had a toggle switch eh.
#12
02-28-2010, 11:14 PM
Join Date: Apr 2008
Location: Rocklin, California
Posts: 1,120
Rep Power: 132 Toggle switch is no brainer. Give me a shout when you are ready to do the mod
#13
03-01-2010, 04:01 AM

Great write up and great pictures mikymu.
You have blown a fuse because your new switch can't handle the current. The switch is burning and might melt over time. You should use a relay instead.
The switch should trigger the relay and the relay can handle the current to the electronic vacuum valve.
The set up you run now is hazardous so be careful.
#15
03-02-2010, 01:20 AM
Join Date: Apr 2008
Location: Rocklin, California
Posts: 1,120
Rep Power: 132 Great write up and great pictures mikymu.
You have blown a fuse because your new switch can't handle the current. The switch is burning and might melt over time. You should use a relay instead.
The switch should trigger the relay and the relay can handle the current to the electronic vacuum valve.
The set up you run now is hazardous so be careful.
I don't think a relay in this case will work and the electronic vacuum valve may have a build in relay.
I don't know off hand without looking at the small pamphlet included in the fuse box cover. It should be easy to figure out